Garmin Montana 700 Owners Manual - Page 10
Trip Computer, Altimeter
 |
View all Garmin Montana 700 manuals
Add to My Manuals
Save this manual to your list of manuals |
Page 10 highlights
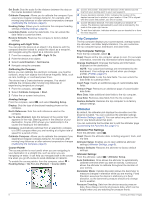
Set Scale: Sets the scale for the distance between the dots on the course deviation indicator. Calibrate Compass: Allows you to calibrate the compass if you experience irregular compass behavior, for example, after moving long distances or after extreme temperature changes (Calibrating the Compass, page 6). Heading Setup: Allows you to customize the compass heading settings (Heading Settings, page 6). Lock Data Fields: Locks the data fields. You can unlock the data fields to customize them. Restore Defaults: Restores the compass to factory default settings. Navigating with Sight 'N Go You can point the device at an object in the distance with the compass direction locked in, project the object as a waypoint, and navigate using the object as a reference point. 1 From the compass, select > Sight 'N Go. 2 Point the device at an object. 3 Select Lock Direction > Set Course. 4 Navigate using the compass. Calibrating the Compass Before you can calibrate the electronic compass, you must be outdoors, away from objects that influence magnetic fields, such as cars, buildings, or overhead power lines. The device has a 3-axis electronic compass. You should calibrate the compass after moving long distances or experiencing temperature changes. 1 From the compass, select . 2 Select Calibrate Compass > Start. 3 Follow the on-screen instructions. Heading Settings From the compass, select , and select Heading Setup. Display: Sets the type of directional heading shown on the compass. North Reference: Sets the north reference used on the compass. Go To Line (Pointer): Sets the behavior of the pointer that appears on the map. Bearing points in the direction of your destination. Course (CDI) shows your relationship to the course line leading to the destination. Compass: Automatically switches from an electronic compass to a GPS compass when you are traveling at a higher rate of speed for a period of time. Calibrate Compass: Allows you to calibrate the compass if you experience irregular compass behavior, for example, after moving long distances or after extreme temperature changes (Calibrating the Compass, page 6). Course Pointer The course pointer is most useful when you are navigating to your destination in a straight line, such as when you are navigating on water. It can help you navigate back to the course line when you go off-course to avoid obstacles or hazards. To enable the course pointer, from the compass, select > Heading Setup > Go To Line (Pointer) > Course (CDI). Course line pointer. Indicates the direction of the desired course line from your starting point to your next waypoint. Course deviation indicator (CDI). Indicates the location of the desired course line in relation to your location. If the CDI is aligned with the course line pointer, you are on course. Course deviation distance. The dots indicate your distance off course. The distance represented by each dot is indicated by the scale in the upper-right corner. To-and-from indicator. Indicates whether you are headed to or from the next waypoint. Trip Computer The trip computer displays your current speed, average speed, trip odometer, and other helpful statistics. You can customize the trip computer layout, dashboard, and data fields. Trip Computer Settings From the trip computer, select . Reset: Resets all the trip computer values to zero. For accurate information, reset the trip information before beginning a trip. Change Dashboard: Changes the theme and information displayed on the dashboard. NOTE: Your customized settings are remembered by the dashboard. Your settings are not lost when you change profiles (Profiles, page 21). Lock Data Fields: Locks the data fields. You can unlock the data fields to customize them. Insert Page: Inserts an additional page of customizable data fields. Remove Page: Removes an additional page of customizable data fields. More Data: Adds additional data fields to the trip computer. Less Data: Removes data fields from the trip computer. Restore Defaults: Restores the trip computer to its factory default settings. Altimeter By default, the altimeter plot displays the elevation over the distance traveled. You can customize the altimeter settings (Altimeter Settings, page 6). You can select any point on the plot to view details about that point. You can customize the favorites bar to add the altimeter page (Customizing the Favorites Bar, page 21). Altimeter Plot Settings From the altimeter, select . Reset: Resets the altimeter data, including waypoint, track, and trip data. Altimeter Setup: Enables you to open additional altimeter settings (Altimeter Settings, page 6). Restore Defaults: Restores the altimeter to factory default settings. Altimeter Settings From the altimeter, select > Altimeter Setup. Auto Calibration: Once allows the altimeter to automatically calibrate one time when you start an activity. Continuous allows the altimeter to calibrate throughout the duration of your activity. Barometer Mode: Variable Elevation allows the barometer to measure changes in elevation while you are moving. Fixed Elevation assumes the device is stationary at a fixed elevation, so the barometric pressure should only change due to weather. Pressure Trending: Sets how the device records pressure data. Save Always records all pressure data, which can be helpful when you are watching for pressure fronts. 6 Viewing the Main Pages
-
 1
1 -
2
-
3
-
4
-
 5
5 -
 6
6 -
 7
7 -
 8
8 -
 9
9 -
 10
10 -
 11
11 -
 12
12 -
 13
13 -
 14
14 -
 15
15 -
16
-
17
-
18
-
19
-
20
-
21
-
22
-
23
-
24
-
25
-
26
-
27
-
28
-
29
-
30
-
31
-
32
-
33
-
34
 |
 |
