Garmin Varia UT800 Smart Headlight Owners Manual - Page 5
Introduction, Installing the Out-Front Mount, WARNING
 |
View all Garmin Varia UT800 Smart Headlight manuals
Add to My Manuals
Save this manual to your list of manuals |
Page 5 highlights
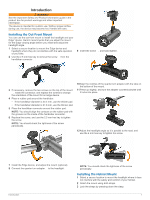
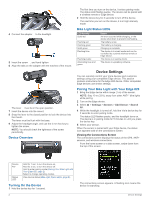
Introduction WARNING See the Important Safety and Product Information guide in the product box for product warnings and other important information. The device is intended for outdoor use. Without proper airflow during use, the device may become hot. Handle with care. Installing the Out-Front Mount You can use the out-front mount to install the headlight and your Edge® device. Garmin recommends that you adjust the mount for the Edge viewing angle before you install and adjust the headlight angle. 1 Select a secure location to mount the Edge device and headlight where they do not interfere with the safe operation of your bike. 2 Use the 2.5 mm hex key to remove the screw from the À handlebar connector . Á 9 Insert the screw , and hand tighten. Ä 3 If necessary, remove the two screws on the top of the mount , rotate the connector, and replace the screws to change  the orientation of the mount for an Edge device. 4 Place a rubber pad around the handlebar: • If the handlebar diameter is 25.4 mm, use the thicker pad. • If the handlebar diameter is 31.8 mm, use the thinner pad. 5 Place the handlebar connector around the rubber pad. NOTE: You should align the contours on the rubber pad with the grooves on the inside of the handlebar connector. 6 Replace the screw, and use the 2.5 mm hex key to tighten the screw. NOTE: You should check the tightness of the screw periodically. 10Align the notches of the quarter-turn adapter with the tabs on the bottom of the mount. 11Press up slightly, and turn the adapter counterclockwise until it locks into place. 12Adjust the headlight angle so it is parallel to the road, and use the 4 mm hex key to tighten the screw. 7 Install the Edge device, and adjust the mount (optional). 8 Connect the quarter-turn adapter to the headlight. à Introduction NOTE: You should check the tightness of the screw periodically. Installing the Helmet Mount 1 Select a secure location to mount the headlight where it does not interfere with the safety and comfort of your helmet. 2 Attach the mount using both straps. 3 Lock the straps by pressing down the clasp. 1
-
 1
1 -
 2
2 -
 3
3 -
 4
4 -
 5
5 -
 6
6 -
 7
7 -
 8
8 -
 9
9 -
 10
10 -
 11
11 -
12
 |
 |
