Garmin eTrex Owner's Manual
Garmin eTrex - Hiking GPS Receiver Manual
 |
UPC - 753759046019
View all Garmin eTrex manuals
Add to My Manuals
Save this manual to your list of manuals |
Garmin eTrex manual content summary:
- Garmin eTrex | Owner's Manual - Page 1
eTrex® personal navigator™ owner's manual - Garmin eTrex | Owner's Manual - Page 2
current updates and supplemental information concerning the use and operation of this and other Garmin products. Web site address: www.garmin.com Garmin® and eTrex® are registered trademarks of Garmin Ltd. and may not be used without the express permission of Garmin Ltd. February 2003 Part Number - Garmin eTrex | Owner's Manual - Page 3
to operate your eTrex. On Your Mark. . . eTrex Registration Help us to better support you by completing your on-line registration today! Why should you register your eTrex purchase? • Notification of Product Updates • Notification of New Products Connect to our web site (www.garmin.com) and look - Garmin eTrex | Owner's Manual - Page 4
Basics 10 Map Page Basics Review Waypoint Page 23 Routes 25 Tracks 28 Setup Menu 31 Appendices 40-51 Appendix A: Specifications 40 Appendix B: What is GPS 41 Appendix C: Satellite Reception Tips 42 Appendix D: Time Offset Chart 44 Appendix E: Wiring Diagram 45 Appendix F: Troubleshooting - Garmin eTrex | Owner's Manual - Page 5
eTrex to secure the GPS unit so that it will not cause damage or personal injury in the event of an accident. Do not mount the eTrex to use the eTrex in a vehicle eTrex to the exclusion of safe operating practices. It is unsafe to operate the eTrex (GPS) GPS equipment. Although the eTrex your eTrex if - Garmin eTrex | Owner's Manual - Page 6
accept any interference received, including interference that may cause undesired operation. The eTrex does not contain any user-serviceable parts. Repairs should be made only by an authorized Garmin service center. Unauthorized repairs can void the warranty. California's Proposition 65 WARNING - Garmin eTrex | Owner's Manual - Page 7
, your GPS provides other data, like speed, direction of movement, time and distance to destination, and more. From these basic features, your Garmin GPS can provide and trip odometer. eTrex Features NOTE: You should always be prepared for and capable of navigating without the eTrex. It is designed - Garmin eTrex | Owner's Manual - Page 8
• Adjust display contrast on Satellite Page • Zoom in and out on Map Page • Cycle through trip data on NavigationPage The ENTER Button: • Confirms data entry or menu selections • Displays options on main pages • Pressing and holding the ENTER button activates the Mark Waypoint Page The PAGE Button - Garmin eTrex | Owner's Manual - Page 9
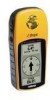
Internal GPS Antenna UP Button DOWN Button ENTER Button External Power and Data Connector Introduction eTrex Description PAGE Button POWER Button LCD Display (with backlight) Waterproof Case Battery Compartment 7 - Garmin eTrex | Owner's Manual - Page 10
data input/output. Bicycle Mounting Kit Allows the eTrex to be mounted on a bicycle handle bar. PC Cable/Auto Power Adapter Allows transfer of waypoints and routes from a PC to the eTrex and provides unit operation from an automobile cigarette lighter. MapSource® Map Data CD-ROMs An excellent tool - Garmin eTrex | Owner's Manual - Page 11
view of the sky (a nearby park would work fine). Press and hold the POWER Button to turn the unit on. You'll see the Welcome Page for a few seconds while the eTrex performs a self-test, followed by the Satellite Page. The eTrex needs to receive at least three strong satellite signals to find - Garmin eTrex | Owner's Manual - Page 12
, Setup Display (backlighting/ contrast), and returning to Normal Skyview. 10 PAGE PAGE PAGE PAGE Satellite Map Navigation Menu Satellite Page Basics The Satellite Page shows the eTrex gathering all the necessary satellite information in order to work. There are two display options on the - Garmin eTrex | Owner's Manual - Page 13
waypoint in the "Discovering GPS Navigation" section. To help you better visualize the "real world", the eTrex automatically rotates the map as you move, so see your entire trip, you can change the map scale (from 200 feet to 800 miles!) by pressing and holding the UP Button to view a larger area, - Garmin eTrex | Owner's Manual - Page 14
Location) Name Straight Line Distance to the Destination Compass Ring The eTrex is not a magnetic compass. You must be moving in order movement. Speed Destination Symbol The Navigation Page The Navigation Page helps guide you to a destination. When you're moving with no particular destination - Garmin eTrex | Owner's Manual - Page 15
and access advanced features. The Main Menu gives you access to the eTrex's more advanced features. With the Main Menu you can create and view on all these advanced features is included in the reference section of this manual. Changing the Time Zone Practice using the Main Menu and change the - Garmin eTrex | Owner's Manual - Page 16
GPS Navigation Discovering how to use your eTrex is as easy as taking a quick walk around an open outdoor area. In this brief exercise, you'll mark your current location (your home for example), travel a short distance away, and then have the eTrex guide ' Page and the 'REVIEW WAYPOINT' Page. 14 To - Garmin eTrex | Owner's Manual - Page 17
in memory. ) NOTE: As a shortcut, press and hold ENTER to mark a waypoint. Edit Waypoints You can create or press ENTER. Then follow the on-screen instructions. Now that you've marked your location, it's to the Map Page. Walk in a straight line for 3-4 minutes at a fast pace and watch the Map Page. - Garmin eTrex | Owner's Manual - Page 18
points straight up as shown, you're on track! 16 Guidance by Garmin The eTrex guides you to a destination using a GOTO (GOTO means GOing TO a Press the UP or DOWN Button to select 'HOME' and press ENTER. The 'REVIEW WAYPOINT' Page appears. 6. Press the UP or DOWN Button to highlight the ' - Garmin eTrex | Owner's Manual - Page 19
Page and press ENTER. Clearing a Cluttered Map Display After you've used the eTrex for a few trips, the map display will become a bit messy from keeping through the basic operation of the eTrex and you're ready to navigate! To turn the eTrex off, press and hold the POWER Button. Highlight STOP - Garmin eTrex | Owner's Manual - Page 20
you are moving. When you select 'Orient Map Northward' the figure icon is replaced by a 'direction' triangle. The tip of the triangle tells you the general direction you are moving. 18 Introduction This section covers the remaining features of the eTrex that were not covered in the Getting Started - Garmin eTrex | Owner's Manual - Page 21
Map Page the little grey "man". The man stands still when you are not moving, he moves when you move, and a blinking "?" means the eTrex has lost satellite reception (weak signals). You should relocate the eTrex of different data, such as 'Elevation'. The eTrex will tell you the time of sunrise - Garmin eTrex | Owner's Manual - Page 22
press the UP or DOWN Button and scroll through the available options, stopping on the data you want the eTrex to display. Main Menu Selections The Main Menu turns the eTrex into a powerful navigation tool. From the Main Menu you can customize the display, transfer information from a computer to the - Garmin eTrex | Owner's Manual - Page 23
' field and press ENTER. The 'MARK WAYPOINT' Page appears with the correct elevation displayed. Mark Waypoint Page The 'EDIT LOCATION' Page displays on-screen instructions on how to edit the waypoint location. The 'ENTER CORRECT ELEVATION' Page allows you to change the elevation for the waypoint. 21 - Garmin eTrex | Owner's Manual - Page 24
location. You can select a waypoint from this list by pressing the UP or DOWN Button and selecting the desired waypoint. Once selected, press ENTER. The 'REVIEW WAYPOINT' appears allowing you to edit the waypoint if you desire. To delete all waypoints: 1. On the 'WAYPOINT' Page, press the UP or DOWN - Garmin eTrex | Owner's Manual - Page 25
and location (just like on the Mark Waypoint Page). You can also delete the waypoint, display the waypoint on the Map Page, and start a GOTO. To delete a waypoint: 1. On the 'REVIEW WAYPOINT' Page, press the UP or DOWN Button and highlight 'DELETE'. Press the ENTER Button. A confirmation message box - Garmin eTrex | Owner's Manual - Page 26
(i.e., in order to travel to a location sighted in the distance), press and hold the OK Button to mark your location and save it as a waypoint. Then, select it from the waypoints list, and press ENTER to display the 'REVIEW WAYPOINT' Page. 2. Using the UP or DOWN Button, highlight the 'PROJECT' field - Garmin eTrex | Owner's Manual - Page 27
is at least two waypoints that describe the path you are going to travel. The Route feature is very convenient because it allows the eTrex to guide you from the first waypoint in the route, to each successive waypoint until you reach your final destination. When you start your trip, you activate - Garmin eTrex | Owner's Manual - Page 28
To Device" to download the 'ROUTE' to the eTrex. See your Garmin dealer for more information on using MapSource (MapSource is an optional accessory, waypoint in the route. The eTrex will guide you to the selected final destination following each waypoint in the route (the eTrex has one route). To create - Garmin eTrex | Owner's Manual - Page 29
window appears asking you if you really want to clear all of the route waypoints. If you do, select 'YES'and press ENTER. Routes The eTrex draws an electronic breadcrumb trail as you travel. The message 'ARRIVING DESTINATION' is displayed on every page when you are 15 seconds from reaching the - Garmin eTrex | Owner's Manual - Page 30
. 'CLEAR' the track log before starting a new trip. 28 What is a Track Log? The eTrex draws an electronic breadcrumb trail or 'track log' on the Map Page as you travel. The track log starts recording as soon as the eTrex gets a location fix. If you want to keep a record of a certain track log before - Garmin eTrex | Owner's Manual - Page 31
LOG' Page will appear. 2. Place the highlight on a saved track and press ENTER. The saved track will be displayed on a map. 3. A default name will be displayed at the top of the map. Using the UP or DOWN Button, highlight the name and press ENTER. The 'EDIT TRACK NAME' Page will be displayed - Garmin eTrex | Owner's Manual - Page 32
the track or the end of the track (see sidebar). Press the UP or DOWN Button and select the desired destination point. The 'NAVIGATION' Page guides you to your destination. You may not remember the original direction of the saved track, but by using 'BEGIN' or 'END', you can always select - Garmin eTrex | Owner's Manual - Page 33
The Setup Menu allows you to customize the eTrex. From the Setup Menu you can change coordinate systems, map datums, and distance units. You can clock with 12 hour AM and 12 hour PM cycles. The 24 hour option sets the eTrex to display a 24 hour cycle (Military Time). To change the time format: 1. - Garmin eTrex | Owner's Manual - Page 34
Time' and replaced Greenwich Mean Time . You can find time offset values for your longitude by following instructions and the Time Offset Chart (Appendix D). To change the time zone into or out of effect). You can choose 'Yes' to manually add daylight savings or 'No' to remain on standard time. - Garmin eTrex | Owner's Manual - Page 35
you must select the position format (grid), map datum, map units, and north reference to match the map's units. This is the purpose of the Units Page. Regarding position format, the eTrex allows you to choose from eighteen different grids. The eTrex supports the UTM/UPS and latitude/longitude grids - Garmin eTrex | Owner's Manual - Page 36
Reference Map Datums Eighteen position formats are available in the eTrex. Data Entry Pages exist for the User Grid Format and the User Datum Setup. These pages allow you to configure the eTrex for compatibility with custom designed grids. We recommend surfing the net for links to Garmin user-grid - Garmin eTrex | Owner's Manual - Page 37
The 'UNITS' Page appears. 2. Press the UP or DOWN Button and select the 'MAP DATUMS' field. Press ENTER. 3. Press the UP or DOWN Button to select the Press PAGE to select the page of your choice. Units of Measure The eTrex lets you select statute (the default setting), nautical, or metric units of - Garmin eTrex | Owner's Manual - Page 38
as you move around the earth. Magnetic North is the direction in which a compass needle points. The eTrex bearings will correspond to a compass if the eTrex is set to magnetic north. Due to errors introduced when map makers flatten the earth's sphere onto paper, not all of the grid lines drawn on the - Garmin eTrex | Owner's Manual - Page 39
format used to exchange waypoint, route, and track data with a PC. • Garmin DGPS - allows DGPS input using a Garmin beacon receiver and a standard RTCM SC-104 format and DGPS tuning. • NMEA OUT - supports the output of standard NMEA 0183 version 3.0 data. • TEXT OUT - allows simple ASCII text output - Garmin eTrex | Owner's Manual - Page 40
to the page of your choice. System Page The System Page shows you the eTrex's current software version and allows you to choose from three modes of operation: • Normal • Battery Save • Demo (Demonstration) Normal Mode The GPS receiver is turned on all the time when it's in 'NORMAL' mode. The normal - Garmin eTrex | Owner's Manual - Page 41
(the unit's GPS receiver will turn off and stop tracking satellites, but the unit itself will not power off). To do so, press ENTER. Congratulations! You now know all there is to know about the Garmin eTrex. Battery Save The eTrex's batteries will last up to 22 hours in 'BATTERY SAVE' mode (when - Garmin eTrex | Owner's Manual - Page 42
Receiver: Acquisition time: Update Rate: Position Accuracy: eTrex may exceed the usable range of some batteries. Alkaline bat teries can rupture at high temperatures. External power can only be applied using the Garmin Auto Power Adapter or PC Interface Cable with Auto Power Adapter (This cable - Garmin eTrex | Owner's Manual - Page 43
above the earth. These satellites transmit signals containing time and orbital data to calculate satellite position and almanac data. Meanwhile, receivers used on the ground, sea and air search the sky for the satellites. The GPS unit needs to acquire good signals from at least three satellites to - Garmin eTrex | Owner's Manual - Page 44
' was covered on page 9. If the eTrex has problems with receiving satellite signals, you will be prompted to answer some questions. Please follow the steps that best describes your situation: A. You are trying to use the eTrex indoors: 1. The message 'TROUBLE TRACKING SATELLITES. ARE YOU INDOORS NOW - Garmin eTrex | Owner's Manual - Page 45
indoors, but you have moved hundreds of miles/km since you last used your eTrex: 1. The message 'TROUBLE TRACKING SATELLITES. ARE YOU INDOORS NOW?' will appear. Press the UP or DOWN Button to highlight 'NO'. Press ENTER. 2. eTrex then asks: 'HAVE YOU MOVED HUNDREDS OF MILES/KM SINCE LAST USE?' Press - Garmin eTrex | Owner's Manual - Page 46
Appendices Appendix D Time Offset Longitudinal Zone W180.0º to W172.5º W172.5º to W157.5º W157.5º to W142.5º W142.5º to W127.5º W127.5º to W112.5º W112.5º to W097.5º W097.5º to W082.5º W082.5º to W067.5º W067.5º to W052.5º W052.5º to W037.5º W037.5º to W022.5º W022.5º to W007.5º W007.5° to E007.5° - Garmin eTrex | Owner's Manual - Page 47
second GPS receiver. The NMEA 0183 version 2.0 interface format is supported by the eTrex and GPS unit. The eTrex may be hard-wired to a serial connector using the Data Cable (see the Garmin web site www.garmin.com for ordering information). Refer to the wiring diagram and the eTrex unit data - Garmin eTrex | Owner's Manual - Page 48
configured to use the same position format and datum as your map. See page 34. ) NOTE: The Auto Power Adapter converts 12 VDC to 3 VDC output for the eTrex. This adapter is not interchangeable with auto power adapters designed for the Garmin VHF 720 and 725, GPS 170, 175, 190 and 195. 46 - Garmin eTrex | Owner's Manual - Page 49
of Defense (DoD) and have been funded by U.S. taxpayers' dollars. Reception of GPS satellite signals is free to everyone. Does the eTrex work anywhere in the world and in any weather? Yes. How accurate is a Garmin GPS? The eTrex is accurate to within 15 meters without the DoD-imposed Selective - Garmin eTrex | Owner's Manual - Page 50
Appendices Appendix G FAQs What Grid Formats does the eTrex Support? hddd.dddddo (degrees, decimal degrees) hdddomm.mm (degrees, minutes, decimal minutes) hdddomm'ss.s (degrees, minutes, seconds, decimal seconds) British Grid Dutch Grid Finnish KKJ27 Grid - Garmin eTrex | Owner's Manual - Page 51
6 C Cancelling a GOTO 17 Clear a Route Waypoint 27 Compass 12 Course Line 18 D Data Entry 34 Daylight Savings Time 32 Delete a Waypoint 23 Delete All Waypoints 22 Demo Mode 39 Started 9-17 GOTO 16, 17, 23 GPS 41 GPS Accuracy 47 Grid Formats 47-48 H Heading 19 Appendices Appendix H Index 49 - Garmin eTrex | Owner's Manual - Page 52
Location 20 Low Battery 38 M Main Menu 13 Map Datum 33, 34, 35 Map Display 17 Map Orientation 18 Map Page 11, 18 Map Scale 11 MapSource CD 8, 36 Maps 33 Marine Autopilot 45 Mark a Waypoint 14 Mark a Waypoint 24 R Ready to Navigate 10 Registration 1 Review Waypoint Page 23-24 Routes 25-27 RTCM 37 - Garmin eTrex | Owner's Manual - Page 53
31-39 Signal Strength Bar 10 Software Version 38 Specifications 40 Speed 19 Stop Navigation 18, 19 System Page 38-39 T Time Format 31 Time Offset Chart 44 Time Zones 13, 44 Tracback Navigation 30-31 Track Logs 17, 28-30, 48 Trip Odometer 20 Troubleshooting 46 U Units of Measure 35 - Garmin eTrex | Owner's Manual - Page 54
OR FITNESS FOR Garmin retains the exclusive right to repair or replace the unit or software service, contact your local Garmin authorized dealer. Or call Garmin Customer Service at one of the numbers shown below, for shipping instructions and an RMA tracking number. The unit should be securely - Garmin eTrex | Owner's Manual - Page 55
- Garmin eTrex | Owner's Manual - Page 56
For the latest free software updates throughout the life of your Garmin product, visit the Garmin web site at: www.garmin.com. © 2000-2003 Garmin Ltd. or its subsidiaries Garmin International, Inc. 1200 East 151st Street, Olathe, Kansas 66062, U.S.A. Garmin (Europe) Ltd. Unit 5, The Quadrangle,
-
 1
1 -
 2
2 -
 3
3 -
 4
4 -
 5
5 -
 6
6 -
 7
7 -
8
-
9
-
10
-
11
-
12
-
13
-
14
-
15
-
16
-
17
-
18
-
19
-
20
-
21
-
22
-
23
-
24
-
25
-
26
-
27
-
28
-
29
-
30
-
31
-
32
-
33
-
34
-
35
-
36
-
37
-
38
-
39
-
40
-
41
-
42
-
43
-
44
-
45
-
46
-
47
-
48
-
49
-
50
-
51
-
52
-
53
-
54
-
55
-
56
 |
 |

owner’s
manual
eTrex
®
personal navigator
™