Gateway DX4200 8513028 - Gateway Hardware Reference Guide - Page 54
Adding or replacing an, expansion card
 |
View all Gateway DX4200 manuals
Add to My Manuals
Save this manual to your list of manuals |
Page 54 highlights
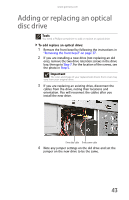
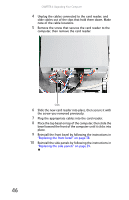
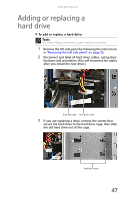
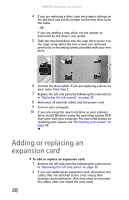
CHAPTER 4: Upgrading Your Computer 4 If you are replacing a drive, note any jumper settings on the old drive and set the jumper on the new drive to be the same. - OR If you are adding a new drive, set the jumper as instructed by the drive's user guide. 5 Slide the new hard drive into the cage, then secure it to the cage using either the two screws you removed previously or mounting screws provided with your new drive. 6 Connect the drive cables. If you are replacing a drive, use your notes from Step 2. 7 Replace the left side panel by following the instructions in "Replacing the side panels" on page 39. 8 Reconnect all external cables and the power cord. 9 Turn on your computer. 10 If you are using the new hard drive as your primary drive, install Windows using the operating system DVD that came with your computer. For more information on restoring your system, see "Recovering your system" on page 88. Adding or replacing an expansion card To add or replace an expansion card: 1 Remove the left side panel by following the instructions in "Removing the left side panel" on page 35. 2 If you are replacing an expansion card, disconnect any cables that are attached to the card, noting their locations and orientation. (You may need to reconnect the cables after you install the new card.) 48
-
 1
1 -
2
-
3
-
4
-
5
-
6
-
7
-
8
-
9
-
10
-
11
-
12
-
13
-
14
-
15
-
16
-
17
-
18
-
19
-
20
-
21
-
22
-
23
-
24
-
25
-
26
-
27
-
28
-
29
-
30
-
31
-
32
-
33
-
34
-
35
-
36
-
37
-
38
-
39
-
40
-
41
-
42
-
43
-
44
-
45
-
46
-
47
-
48
-
 49
49 -
 50
50 -
 51
51 -
 52
52 -
 53
53 -
 54
54 -
 55
55 -
 56
56 -
 57
57 -
 58
58 -
 59
59 -
60
-
61
-
62
-
63
-
64
-
65
-
66
-
67
-
68
-
69
-
70
-
71
-
72
-
73
-
74
-
75
-
76
-
77
-
78
-
79
-
80
-
81
-
82
-
83
-
84
-
85
-
86
-
87
-
88
-
89
-
90
-
91
-
92
-
93
-
94
-
95
-
96
-
97
-
98
-
99
-
100
-
101
-
102
-
103
-
104
-
105
-
106
-
107
-
108
-
109
-
110
-
111
-
112
-
113
-
114
-
115
-
116
-
117
-
118
-
119
-
120
-
121
-
122
 |
 |
