Gateway MX6627 8511180 - Hardware Reference Gateway Notebook - Page 43
Step 15, Step 11
 |
View all Gateway MX6627 manuals
Add to My Manuals
Save this manual to your list of manuals |
Page 43 highlights
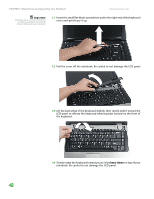
www.gateway.com Replacing the hard drive kit 9 Remove the two hard drive bay cover screws, slide the hard drive bay cover, then remove it. The hard drive is attached to the back of the cover. 10 If your new hard drive already includes the hard drive cover, go to Step 15. -OR- If you need to move the hard drive cover from your old hard drive to your new hard drive, go to Step 11. 11 Remove the screws that secure the hard drive to the hard drive cover. Screws Screws 39
-
 1
1 -
2
-
3
-
4
-
5
-
6
-
7
-
8
-
9
-
10
-
11
-
12
-
13
-
14
-
15
-
16
-
17
-
18
-
19
-
20
-
21
-
22
-
23
-
24
-
25
-
26
-
27
-
28
-
29
-
30
-
31
-
32
-
33
-
34
-
35
-
36
-
37
-
 38
38 -
 39
39 -
 40
40 -
 41
41 -
 42
42 -
 43
43 -
 44
44 -
 45
45 -
 46
46 -
 47
47 -
 48
48 -
49
-
50
-
51
-
52
-
53
-
54
-
55
-
56
-
57
-
58
-
59
-
60
-
61
-
62
-
63
-
64
-
65
-
66
 |
 |

Replacing the hard drive kit
www.gateway.com
39
9
Remove the two hard drive bay cover screws, slide the hard drive bay
cover, then remove it. The hard drive is attached to the back of the cover.
10
If your new hard drive already includes the hard drive cover, go to
Step 15
.
-OR-
If you need to move the hard drive cover from your old hard drive to your
new hard drive, go to
Step 11
.
11
Remove the screws that secure the hard drive to the hard drive cover.
Screws
Screws