Gateway MX6627 8511180 - Hardware Reference Gateway Notebook - Page 46
keys-down
 |
View all Gateway MX6627 manuals
Add to My Manuals
Save this manual to your list of manuals |
Page 46 highlights
CHAPTER 3: Maintaining and Upgrading Your Notebook www.gateway.com Important Inserting a piece of cloth between the screwdriver and keyboard will help prevent damage to your notebook. 11 Insert the small flat-blade screwdriver under the right end of the keyboard cover and gently pry it up. 12 Pull the cover off the notebook. Be careful to not damage the LCD panel. 13 Lift the back edge of the keyboard slightly, then slowly slide it toward the LCD panel to release the keyboard retaining tabs located on the front of the keyboard. 14 Slowly rotate the keyboard toward you so it lies keys-down on top of your notebook. Be careful to not damage the LCD panel. 42
-
 1
1 -
2
-
3
-
4
-
5
-
6
-
7
-
8
-
9
-
10
-
11
-
12
-
13
-
14
-
15
-
16
-
17
-
18
-
19
-
20
-
21
-
22
-
23
-
24
-
25
-
26
-
27
-
28
-
29
-
30
-
31
-
32
-
33
-
34
-
35
-
36
-
37
-
38
-
39
-
40
-
 41
41 -
 42
42 -
 43
43 -
 44
44 -
 45
45 -
 46
46 -
 47
47 -
 48
48 -
 49
49 -
 50
50 -
 51
51 -
52
-
53
-
54
-
55
-
56
-
57
-
58
-
59
-
60
-
61
-
62
-
63
-
64
-
65
-
66
 |
 |

CHAPTER 3: Maintaining and Upgrading Your Notebook
www.gateway.com
42
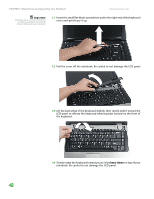
Important
Inserting a piece of cloth between the
screwdriver and keyboard will help
prevent damage to your notebook.
11
Insert the small flat-blade screwdriver under the right end of the keyboard
cover and gently pry it up.
12
Pull the cover off the notebook. Be careful to not damage the LCD panel.
13
Lift the back edge of the keyboard slightly, then slowly slide it toward the
LCD panel to release the keyboard retaining tabs located on the front of
the keyboard.
14
Slowly rotate the keyboard toward you so it lies
keys-down
on top of your
notebook. Be careful to not damage the LCD panel.