GE 19230-GE User Manual - Page 4
Note: The back
 |
UPC - 043180192301
View all GE 19230-GE manuals
Add to My Manuals
Save this manual to your list of manuals |
Page 4 highlights
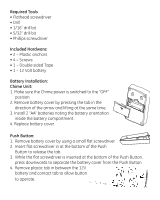
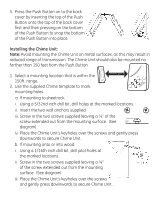
Installation using the provided screws: 1. Remove the old push button and use this location to install your new Push Button. 2. Remove the battery cover as described in the installation of the battery. 3. Use the battery cover as a template to mark the position of the screws. 4. Using a 1/16th inch drill bit, drill a pilot hole for each screw. 5. Using a Phillips head screwdriver, mount the back cover using the screws provided. (Note: The back cover has an arrow and the word "Up" embossed on the inside of the cover. Position the back cover with the arrow pointing upwards and the word "Up" is at the top) 6. Press the Push Button on to the back cover by inserting the top of the Push Button onto the top of the back cover first and then pressing on the bottom of the Push Button to snap the bottom of the Push Button into place. Installation using the provided Double Sided Tape: 1. Clean the surface where you would like to mount the Push Button and the back of the Push Button. Use a mixture of 50/50 water to isopropyl alcohol. 2. Remove the battery cover as described in the installation of the battery. 3. Remove the backing from one side of the double sided tape and press it onto the back of the back plate of the Push Button. 4. Remove the backing from the other side of the double sided tape and press the back plate to the cleaned mounting surface. (Note: The back cover has an arrow and the word "Up" embossed on the inside of the cover. Position the back cover with the arrow pointing upwards and the word "Up" is at the top)
-
 1
1 -
 2
2 -
 3
3 -
 4
4 -
 5
5 -
 6
6 -
 7
7 -
 8
8
 |
 |
