GE 29451 User Guide
GE 29451 - Business Speakerphone With Intercom Manual
 |
UPC - 044319294514
View all GE 29451 manuals
Add to My Manuals
Save this manual to your list of manuals |
GE 29451 manual content summary:
- GE 29451 | User Guide - Page 1
2-9451 Four-Line Business Phone with Intercom User's Guide We bring good things to life. - GE 29451 | User Guide - Page 2
be used on coin service provided by the telephone trouble instructions and on, the user is encouraged to Problems." This booklet is available from the U.S. Government Printing Office, Washington, D.C. 20402. Please specify stock number 004-000-00345-4 when ordering copies. HEARING AID COMPATIBILITY - GE 29451 | User Guide - Page 3
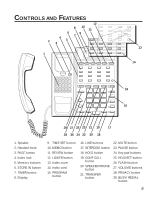
28 26 24 22 20 18 9. TIME SET button 10. MEMO button 11. REVIEW button 12. LOWER button 13. Index cover 14. Index card 15. PROGRAM button . CONF CALL button 20. SPEAKER PHONE button 21. TRANSFER button 22. MUTE button 23. PAUSE button 24. Key pad buttons 25. HEADSET button 26. FLASH button 27. - GE 29451 | User Guide - Page 4
. Line currently being used 37. Extension number 38. DATA PORT 39. DATA PORT line switch 40. LINE 1+2 41. LINE 3+4 42. AC power jack 43. Power cord strain relief 44. Battery compartment door 45. Headset jack 46. Mini User's Guide door - GE 29451 | User Guide - Page 5
MOUNT INSTALLATION 9 SETTING UP YOUR STATION ADDRESS 11 CHANGING THE PHONE TO A 2-9450 MODEL 13 SYSTEM VERIFICATION 14 OTHER STATIONS 14 YOUR STATION 14 CLOCK SETUP 15 PROGRAMMING THE HOUR FORMAT 15 SETTING THE TIME 15 HEADSET ...15 BASIC OPERATION 16 MAKING OUTSIDE CALLS 16 USING THE - GE 29451 | User Guide - Page 6
CALL 24 VOLUME ...24 RINGER VOLUME 24 SPEAKERPHONE, HANDSET, AND HEADSET VOLUME 25 CONFERENCE 25 INTERCOM ...26 ONE-TOUCH INTERCOM 26 INTERCOMING A STORED NUMBER 32 CHAIN DIALING 32 REVIEWING A NUMBER STORED IN A MEMORY LOCATION 33 STORING A MEMO 33 REVIEWING A MEMO 33 STORING A MEMO INTO - GE 29451 | User Guide - Page 7
TONE DETECT 38 SETTING AUTO INTERCOM 39 CHANGING A STATION ADDRESS 39 TROUBLESHOOTING GUIDE 40 REPLACING THE BATTERY 42 GENERAL PRODUCT CARE 43 SERVICE ...44 INDEX ...45 LIMITED WARRANTY 47 WARNING: TO PREVENT FIRE OR ELECTRICAL SHOCK HAZARD, DO NOT EXPOSE THIS PRODUCT TO RAIN OR MOISTURE - GE 29451 | User Guide - Page 8
as: 32 memory locations, busy redial, hold, conference call, intercom, call transfer, LCD display, and speakerphone capabilities. Please read this user's guide carefully to familiarize yourself with all the features of your new phone. Also, make sure to retain this guide for future reference. 4 - GE 29451 | User Guide - Page 9
includes the following items: PAGE STORE IN TIMER TIME SET MEMO REVIEW LOWER 1 2 3 4 5 6 7 8 9 10 11 HEADSET MUTE SPEAKERPHONE HOLD INTERCOM Base unit Handset Handset cord Line cords AC power supply CAUTION: Use only the Thomson 5-2418 power supply that is compatible - GE 29451 | User Guide - Page 10
phone (i.e. intercom, transfer, page, etc.), lines 1 and 2 must be connected and common to all phones connected to the system. Only other 2-9451 or 2-9450 models are compatible of your business phone. • As you read the instructions, you may require additional line cords or other components not - GE 29451 | User Guide - Page 11
INSTALLATION IMPORTANT: It is imperative you follow these steps in sequence for proper installation of the phone. Telephone line cords must be connected before AC power connection is made. The phone may not install properly, otherwise. Also, without AC power or the battery installed, pulse dialing - GE 29451 | User Guide - Page 12
to stabilize the cord to prevent it from disconnecting easily. Then plug the AC power supply into an electrical outlet. 4. Follow the steps in "Setting Up Your Station Address" to continue installing your phone. CAUTION: Use only the Thomson 5-2418 power supply that is compatible with this unit - GE 29451 | User Guide - Page 13
the slot at the bottom of the bracket. Snap it into place. Connect the LINE 1,2 and LINE 3,4 line cords to their respective wall jacks. 3. Hold the phone against the wall plate (not included) so that the posts on the wall plate slide into the keyholes on the wall mount bracket. Slide the - GE 29451 | User Guide - Page 14
relief to stabilize the cord to prevent it from disconnecting easily. Then plug the AC power supply into an electrical outlet. 6. Follow the steps in "Setting Up Your Station Address" to continue installing your phone. PAGE STORE IN TIMER TIME SET MEMO REVIEW LOWER 1 2 5 6 9 10 13 14 - GE 29451 | User Guide - Page 15
phone (i.e. intercom, transfer, page, etc.), lines 1 and 2 must be connected and common to all phones connected to the system. Only other 2-9451 or 2-9450 models are compatible line cords TIMER TIME SET MEMO REVIEW LOWER 1 2 3 HEADSET MUTE SPEAKERPHONE HOLD INTERCOM INTERCOM indicator 11 - GE 29451 | User Guide - Page 16
all the user's names next to phone or the line cords are not properly connected. Check the line cord REVIEW LOWER BUSY REDIAL FLASH PAUSE TRANSFER CONF CALL PRIVACY VOLUME 1 2 ABC 3 DEF 4 GHI 5 JKL 6 MNO 7 PQRS * TONE 8 TUV 0 OPER 9 WXYZ # LINE 4 LINE 3 LINE 2 LINE 1 HEADSET - GE 29451 | User Guide - Page 17
phone can also be set up to be compatible If the line cords are connected properly 16 STORE IN TIMER TIME SET MEMO REVIEW LOWER PAGE BUSY REDIAL FLASH PAUSE TRANSFER 1 HEADSET MUTE SPEAKERPHONE HOLD INTERCOM PROGRAM button INTERCOM indicator NOTE : If you program the 29451 as - GE 29451 | User Guide - Page 18
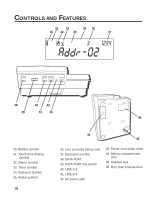
1 and 2 must be connected to the LINE 1,2 jack, and the phone must be programmed with a station address number. OTHER STATIONS 1. Press LINE will hear an error tone, and intercom will be cancelled. YOUR STATION 1. Press REVIEW. 2. Press INTERCOM. The display will read Addr- with the two-digit station - GE 29451 | User Guide - Page 19
local telephone products dealer for the availability of a compatible headset. Connect the coiled headset cord to the headset jack on the bottom of the base unit. When the headset is not in use, simply press the HEADSET button to turn off headset mode and return to normal handset or speakerphone mode - GE 29451 | User Guide - Page 20
provides the convenience of accessing 4 separate telephone lines, each obtained from the telephone company and each having its own phone number. This is generally applicable to small offices. It provides for 16 telephones (or stations) to share multiple lines. Each station is interconnected to all - GE 29451 | User Guide - Page 21
you want. 3. Wait for a dial tone. 4. Dial a phone number. 5. Press HEADSET to turn it off. NOTE: If the headset is not connected, an error tone is heard when the HEADSET button is pressed. RECEIVING INCOMING CALLS USING THE HANDSET When the phone rings, the corresponding line's indicator flashes - GE 29451 | User Guide - Page 22
. To switch to the headset, press HEADSET. The headset indicator will come on. TIMER During a phone conversation, a call will be timed. The call time and timer symbol show on the display. When finished, the total time of the call stays on the display for 15 seconds. To review the timer once it has - GE 29451 | User Guide - Page 23
MUTE Use the MUTE button to interrupt a phone conversation to talk privately with someone else in the room. A conversation can be muted with speakerphone, handset, or headset use. 1. Press MUTE to activate the mute feature. The mute indicator will come on. 2. Press MUTE again to turn it off. NOTE: - GE 29451 | User Guide - Page 24
UP A CALL ON HOLD 1. Lift the handset, or press SPEAKERPHONE or HEADSET. 2. Press the line on hold. NOTE: The call on hold can be after you have connected to the customer calling service to enable tone dialing. When you hang up, the phone automatically resumes pulse dialing. TIP: Temporary Tone - GE 29451 | User Guide - Page 25
up the handset, or press SPEAKERPHONE or HEADSET. 2. The line is automatically selected. (For headset, press the line you want.) 3. Wait REVIEWING THE REDIAL BUFFER 1. Press REVIEW. 2. Press REDIAL. The last number stored in the redial buffer shows on the display. AUTOMATIC BUSY REDIAL If the phone - GE 29451 | User Guide - Page 26
BUSY REDIAL IS CANCELLED WHEN • You press BUSY REDIAL again. or • A call comes in on the same line between redial attempts. or • You pick up the handset or press SPEAKERPHONE. or • Ten attempts have been made and the line is still busy. NOTE: Auto busy redial is factory set to a 30 second interval - GE 29451 | User Guide - Page 27
• If the party at the other station doesn't pick up the transferred call, and you wish to attempt to transfer to another station, press the line you want and repeat the transfer process. • If the station number you pressed is not valid, you will hear an error tone and the transfer cancels. • If the - GE 29451 | User Guide - Page 28
conversation. This feature only applies to 2-9450/ 2-9451 phones, however. Other phones which are not compatible with these models can still access the line. access the line on hold. VOLUME The ringer, speaker, and handset/headset volumes can be set independently with the VOLUME up and down buttons - GE 29451 | User Guide - Page 29
turn the ringer off, on, or change the ringing pattern, see "Adjusting the Ringers". SPEAKERPHONE, HANDSET, AND HEADSET VOLUME • While the phone is in use, press the VOLUME up or down buttons to the desired volume. The phone will store the setting once the button is released. NOTE: The handset and - GE 29451 | User Guide - Page 30
You can intercom a station by simply pressing the station number (memory keys 1-16). The handset must be hung up and neither the speakerphone nor the headset can be in use for this feature to work. INTERCOMING A STATION 1. If the INTERCOM indicator is red, it is in use. Wait until the indicator - GE 29451 | User Guide - Page 31
intercom you. The display will also read Int- followed by the station address attempting to reach you. Press INTERCOM. (Pick up the handset or press HEADSET if you want to use it instead.) PAGING ALL STATIONS 1. Lift the handset. 2. Press PAGE and listen for the beep. The other stations will - GE 29451 | User Guide - Page 32
program your own page group number, see "Programming Your Page Group". Also, phones which have the page function disabled or those that are in Do Not Disturb cannot be paged. Paging can only be done from the handset or headset. DISABLING OR ENABLING PAGE The station page can be disabled or enabled - GE 29451 | User Guide - Page 33
accesses those numbers stored in the lower memory locations. STORING A NUMBER 1. Press the STORE IN button. The STORE indicator comes on. 2. Enter the phone number you want to store using the keypad digits. The numbers you enter show on the display. 3. Press STORE IN again. The STORE indicator - GE 29451 | User Guide - Page 34
number, press STORE IN twice, then the memory location you want to erase. STORING A CHAIN OF NUMBERS You can link together a dialing sequence of phone numbers in separate memory locations by combining them in a single memory location or have another memory location stored in one of the locations to - GE 29451 | User Guide - Page 35
STORING THE LAST NUMBER DIALED You can quickly and easily store into memory the last number dialed by pressing the redial button. Follow steps #1-7 of "Storing a Number ", but press REDIAL instead of entering the number through the keypad. STORING A PAUSE Use the PAUSE button to insert a pause when - GE 29451 | User Guide - Page 36
STORED NUMBER 1. Pick up the handset, press SPEAKERPHONE, or press HEADSET. 2. Press the line you want. 3. Wait for a dial Local access number of long 6 distance company Authorization code (ID) 7 Long distance phone number 8 Using 1. Press the line you want. 2. Press memory location 6. ( - GE 29451 | User Guide - Page 37
store a number into memory (up to 30 digits), even while you are on the phone. 1. Press MEMO. 2. Enter the phone number you want to store using the keypad digits. 3. Press MEMO to exit. REVIEWING A MEMO 1. Press REVIEW. 2. Press MEMO. The number will be displayed on the display. STORING A MEMO INTO - GE 29451 | User Guide - Page 38
the DATA PORT switch to LINE 4 in order to receive faxes on the phone number for line 4. In the event that you are talking to someone on line , change the DATA PORT switch to LINE 2 or LINE 3, and give the person the phone number for line 2 or line 3. Your fax machine now can receive calls on line - GE 29451 | User Guide - Page 39
SPECIAL FEATURES ADJUSTING THE RINGERS The ringers for all 4 of the lines can be set independent of one another. 1. Press STORE IN. 2. Press the desired line button. 3. Press 0-4 for different ringer sounds (0 disables). 4. Press # to confirm. NOTE: The line indicators will still continue to flash - GE 29451 | User Guide - Page 40
SETTING THE PRIORITY LINE A priority line allows you to select one of the 4 lines to have precedence over the other 3 lines. 1. Press STORE IN. 2. Press LOWER. 3. Press any line button to enter Priority Line mode. 4. Press the line button you want to have priority. 5. Press # to confirm. NOTE: To - GE 29451 | User Guide - Page 41
PROGRAMMING THE EXTENSION NUMBER The line 3 and line 4 extension numbers are used for some of the advanced functions utilized by the system. 1. Press PROGRAM. 2. Press the line you want to set. 3. Enter the 4-digit extension number (0-9 for each digit). 4. Press # to confirm. PROGRAMMING A PAGE - GE 29451 | User Guide - Page 42
to set the desired length of time corresponding to 0-90 seconds. 4. Press # to confirm. ADJUSTING THE WAIT FOR BUSY TONE DETECT The time the phone waits until it receives a busy tone can also be adjusted. 1. Press PROGRAM. 2. Press LOWER. 3. Press BUSY REDIAL. 4. Press the keypad digit 0-5 to set - GE 29451 | User Guide - Page 43
mode. Press 1 for automatic intercom operation during intercom, or 0 for manual intercom operation. 5. Press # to confirm. CHANGING A STATION ADDRESS 1. want. 4. Press # to confirm. The indicator will blink red while the phone checks the new station location. If it is already assigned, you will hear - GE 29451 | User Guide - Page 44
In case of difficulty, please check the following Troubleshooting Guide before seeking service. Problem No dial tone Solution • Check installation: -- Are the telephone line cords connected to the phone and the wall jack? Are they damaged? • Does the hook switch pop up when the handset is lifted - GE 29451 | User Guide - Page 45
Problem Incoming voice too low or none at all. Indicator and tone feedback battery needs replacing or is not installed. • Make sure lines 1 and 2 are connected properly and common to all phones on the system. • Make sure all station addresses involved have been assigned. • Make sure lines 1 and 2 - GE 29451 | User Guide - Page 46
designed to accept a 9-volt battery for backup power. In the event you experience a power outage, you will still be able to use the phone. 1. Carefully turn over the phone. On the bottom is the battery compartment door. Remove the screw on the door with a screwdriver. 2. Open the door and remove the - GE 29451 | User Guide - Page 47
GENERAL PRODUCT CARE To keep your telephone working and looking good, follow these guidelines: • Avoid putting the phone near heating appliances and devices that generate electrical noise (for example, motors or fluorescent lamps). • DO NOT expose to direct sunlight or moisture. • Avoid dropping the - GE 29451 | User Guide - Page 48
, changes or modifications not expressly approved by Thomson Consumer Electronics could void the user's authority to operate this product. For instructions on how to obtain service, refer to the warranty included in this guide or call Consumer Information at 1-800-448-0329. Attach your sales receipt - GE 29451 | User Guide - Page 49
operation 16 C Changing a station address 39 Changing the phone to a 2-9450 model 13 Cleaning the phone 43 Clock setup 15 Conference 25 D DATA PORT jack 34 Desktop installation 7 Do Not Disturb 19 F Flash 20 G General product care 43 H Headset 15 Hold 20 I Installation 7 Intercom 26 Introduction - GE 29451 | User Guide - Page 50
17 Redial 21 Replacing the battery 42 S Service 44 Setting Auto Intercom 39 Setting the Priority Line 36 Setting up your station address 11 Special features 35 System verification 14 T Timer 18 TONE button 20 Transfer 22 Troubleshooting guide 40 V Volume 24 W Wall mount installation 9 Warranty - GE 29451 | User Guide - Page 51
freight. What your warranty does not cover: • Customer instruction. (Your Owner's Manual provides information regarding operating instructions and user controls. For additional information, ask your dealer.) • Installation and setup service adjustments. • Batteries. • Damage from misuse or neglect - GE 29451 | User Guide - Page 52
Model 2-9451 15339430 (Rev. 2 E/S) 99-06 Printed in China © 1999 Thomson Consumer Electronics, Inc. P.O. Box 1976, Indianapolis, IN 46206 Trademark(s) ® Registered Marca(s) Registrada(s)
-
 1
1 -
 2
2 -
 3
3 -
 4
4 -
 5
5 -
 6
6 -
 7
7 -
8
-
9
-
10
-
11
-
12
-
13
-
14
-
15
-
16
-
17
-
18
-
19
-
20
-
21
-
22
-
23
-
24
-
25
-
26
-
27
-
28
-
29
-
30
-
31
-
32
-
33
-
34
-
35
-
36
-
37
-
38
-
39
-
40
-
41
-
42
-
43
-
44
-
45
-
46
-
47
-
48
-
49
-
50
-
51
-
52
 |
 |

We bring good things to life.
2-9451
Four-Line Business Phone with Intercom
User’s Guide