GE DSXH47GGWW Owners Manual
GE DSXH47GGWW - 5.8 cu. Ft. Gas Dryer Manual
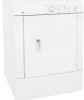 |
UPC - 084691158950
View all GE DSXH47GGWW manuals
Add to My Manuals
Save this manual to your list of manuals |
GE DSXH47GGWW manual content summary:
- GE DSXH47GGWW | Owners Manual - Page 1
Gas Dryer 18 Gas Supply Requirements 13 Location of Your Dryer 14 Mobile Home Installation 15 Preparing to Install Your Dryer . . . . . .9, 10 Reversing the Door Swing 18 Troubleshooting Tips 19-21 Consumer Support Consumer Support 24 Warranty 23 Owner's Manual & Installation Instructions - GE DSXH47GGWW | Owners Manual - Page 2
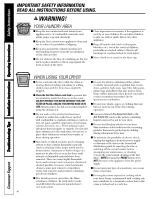
Consumer Support Troubleshooting Tips Installation Instructions Operating Instructions Safety Instructions IMPORTANT SAFETY INFORMATION. READ ALL INSTRUCTIONS BEFORE USING. WARNING! For your safety, the information in this manual must be followed to minimize the risk of fire or explosion, electric - GE DSXH47GGWW | Owners Manual - Page 3
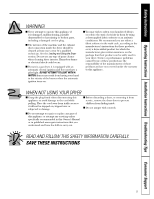
Safety Instructions Operating Instructions Installation Instructions Troubleshooting Tips Consumer Support PROPER INSTALLATION This dryer must be properly installed and located in accordance with the Installation Instructions before it is used. ■ Properly ground dryer to conform with all governing - GE DSXH47GGWW | Owners Manual - Page 4
Support Troubleshooting Tips Installation Instructions Operating Instructions Safety Instructions IMPORTANT SAFETY INFORMATION. READ ALL INSTRUCTIONS flow of ventilating air. Do not stack or place laundry or throw rugs against the front or back of the dryer. ■ Close supervision is necessary if - GE DSXH47GGWW | Owners Manual - Page 5
from service, remove the dryer door to prevent children from hiding inside. ■ Do not tamper with controls. ■ Do not attempt to repair or replace any part of this appliance or attempt any servicing unless specifically recommended in this Owner's Manual or in published user-repair instructions that - GE DSXH47GGWW | Owners Manual - Page 6
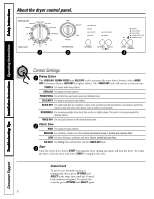
Consumer Support Troubleshooting Tips Installation Instructions Operating Instructions Safety Instructions About the dryer control panel. Control Settings Drying Cycles The REGULAR, PERMA PRESS and DELICATE cycles automatically sense fabric dryness. Select MORE DRY for heavier fabrics, LESS DRY - GE DSXH47GGWW | Owners Manual - Page 7
Instructions Operating Instructions Installation Instructions Troubleshooting Tips Consumer Support About your dryer the Dryer Light Bulb WARNING: To reduce the risk of electric shock cover back on the light housing. Drying Rack (on some models) A handy drying rack may be used for drying articles - GE DSXH47GGWW | Owners Manual - Page 8
Consumer Support Troubleshooting Tips Installation Instructions Operating Instructions Safety Instructions Loading and using the dryer. Always follow the fabric manufacturer's care label when laundering. Sorting and Loading Hints As a general rule, if clothes are sorted properly for the washer, - GE DSXH47GGWW | Owners Manual - Page 9
leave these instructions with the customer.) • The National Fuel Gas code restricts installations of gas appliances in garages. They must be 18″ (45.7 cm) off the ground and protected from vehicles by a barrier. See Location of Your Dryer section. • The electrical service to the dryer must conform - GE DSXH47GGWW | Owners Manual - Page 10
access cover and install cord) (ELECTRIC DRYER) Pipe thread sealer (GAS DRYER) UL-listed dryer must be level and rest firmly on all four leveling legs. 8. Connect the power supply. 9. Check the operation of the power supply and venting. 10. Place the Owner's Manual and the Installation Instructions - GE DSXH47GGWW | Owners Manual - Page 11
Installation Instructions Read these instructions completely and carefully. ELECTRICAL CONNECTION INFORMATION FOR ELECTRIC DRYERS WARNING - To reduce the risk of fire, electric top panel. ELECTRICAL CONNECTION INFORMATION FOR GAS DRYERS WARNING - To reduce the risk of fire, electric shock or - GE DSXH47GGWW | Owners Manual - Page 12
installed in accordance with the instructions found in "Connecting the Dryer to House Vent" on this page. • Do not terminate exhaust in a chimney, a wall, a ceiling, gas metal (semi-rigid) ducting can be used (Kit WX08X10077). • Never install flexible metal duct in walls, ceilings, floors or - GE DSXH47GGWW | Owners Manual - Page 13
, or through the dryer bottom. Gas dryers can exhaust on the cabinet right side or the dryer bottom. To change exhaust direction you will need Exhaust Kit Pub. No. 14-A018 and a rigid metal 4″ 90-degree elbow. The kit is available through your GE retailer. Follow the instructions supplied with the - GE DSXH47GGWW | Owners Manual - Page 14
for proper operation in a recess or closet installation. 0″ (0 cm) 0″ (0 cm) 3″ (7.6 cm) 3″ (7.6 cm) STACKED INSTALLATION If a stacked washer/dryer installation is desired, you MUST use Stacking Kit WE25X10020. This kit is available through your GE retailer. Closet door 60 sq. in. (387 - GE DSXH47GGWW | Owners Manual - Page 15
be made for outside make-up air. This provision is to be not less than twice the area of the dryer exhaust outlet. 4. Gas dryers MUST be fastened to the floor using Mobile Home Installation Kit Pub. No. 14-D346-33. 5. See the Exhaust System Checklist section for other important venting information - GE DSXH47GGWW | Owners Manual - Page 16
proper and safe electrical installation of your dryer. Failure to follow these instructions can create electrical shock and/or a fire hazard. This appliance MUST be properly grounded. Electrical shock can result if the dryer is not properly grounded. Follow the instructions in this manual for proper - GE DSXH47GGWW | Owners Manual - Page 17
Installation Instructions 3-WIRE SYSTEM FOR ELECTRIC DRYERS DO NOT use for Mobile Home Installations. NOT for use on new construction. 1. Remove the screws securing the terminal block access cover and the strain relief mounting bracket located on the back of the dryer upper corner. 2. Install a UL- - GE DSXH47GGWW | Owners Manual - Page 18
Installation Instructions GAS CONNECTION FOR GAS DRYERS 1. Remove the shipping cap from gas pipe at the rear of the dryer. Conversion to LP Gas: DO NOT connect the dryer to LP gas service without converting the gas valve. An LP conversion kit (Pub. No. 14-A038) MUST be installed by a qualified gas - GE DSXH47GGWW | Owners Manual - Page 19
Instructions Operating Instructions Installation Instructions Troubleshooting Tips Consumer Support Before you call for service... Troubleshooting Tips Save time and money! Review the charts on the following pages first and you may not need to call for service. Problem Dryer doesn't start Dryer - GE DSXH47GGWW | Owners Manual - Page 20
Consumer Support Troubleshooting Tips Installation Instructions Operating Instructions Safety Instructions Before you call for service... Problem Static occurs Inconsistent drying times Clothes take too long to dry Clothes are wrinkled Clothes shrink Possible Causes What To Do Overdrying • Try - GE DSXH47GGWW | Owners Manual - Page 21
Safety Instructions Operating Instructions Installation Instructions Troubleshooting Tips Consumer Support Error Codes If the dryer stops, the If the dryer stops, status lights flash again and the beeping continues, please contact service for assistance. Error Code, Error 4 beeps, Dryer ran too - GE DSXH47GGWW | Owners Manual - Page 22
Consumer Support Troubleshooting Tips Installation Instructions Operating Instructions Safety Instructions Notes. 22 - GE DSXH47GGWW | Owners Manual - Page 23
Instructions Operating Instructions Installation Instructions Troubleshooting Tips Consumer Support GE Dryer Warranty. All warranty service provided by our Factory Service Centers, or an authorized Customer Care® technician. To schedule service on-line, visit us at GEAppliances.com, or call 800.GE - GE DSXH47GGWW | Owners Manual - Page 24
24 hours a day, any day of the year! For greater convenience and faster service, you can now download Owner's Manuals, order parts or even schedule service on-line. Schedule Service GEAppliances.com Expert GE repair service is only one step away from your door. Get on-line and schedule your - GE DSXH47GGWW | Owners Manual - Page 25
prepararse para la instalación de su secadora 9, 10 Conexión de gas para la secadora de gas 18 Extracción de la secadora 12, 13 Instalación eléctrica 16, 17 Instalación en casas rodantes 15 Requisitos del abastecimiento de gas 13 Requisitos eléctricos 11 Ubicación de su secadora 14 Consejos - GE DSXH47GGWW | Owners Manual - Page 26
USAR. ¡ADVERTENCIA! Por su seguridad, debe seguir las indicaciones de este manual para minimizar el riesgo de incendio o explosión, descarga eléctrica, o potencial de exposición a tales sustancias. Los electrodomésticos de gas pueden causar la exposición a cuatro de estas sustancias, concretamente - GE DSXH47GGWW | Owners Manual - Page 27
Seguridad INSTALACIÓN APROPIADA Antes de usarse, la secadora se debe instalar apropiadamente de acuerdo con las Instrucciones de instalación. ■ Conecte la secadora a tierra de manera apropiada que cumpla con todos los códigos y ordenanzas reguladoras. Siga con cuidado las Instrucciones de - GE DSXH47GGWW | Owners Manual - Page 28
de pelusa, polvo y suciedad. ■ No obstruya el flujo de aire de ventilación. No coloque los artículos de lavado o las alfombrillas contra la parte frontal o la parte posterior de la secadora. ■ Supervise a los niños en caso de que ellos usen la secadora o jueguen cerca de ella durante su operaci - GE DSXH47GGWW | Owners Manual - Page 29
ía provocar vapores peligrosos o una descarga eléctrica. ■ Si su secadora es de gas, ésta está equipada con un encendido eléctrico automático y no necesita una ninguna parte de éste electrodoméstico ni intente llevar a cabo ningún tipo de servicio a no ser que lo recomiende el Manual del propietario - GE DSXH47GGWW | Owners Manual - Page 30
DRY Para cargas pequeñas y urgentes, tales como uniformes deportivos y escolares. También puede usarse (SECADO RÁPIDO) si el ciclo anterior dejó algunas partes húmedas, tales como cuellos o puños. DEWRINKLE Para eliminar las arrugas de prendas secas o ligeramente húmedas. No se recomienda este ciclo - GE DSXH47GGWW | Owners Manual - Page 31
ón del immueble retirando el fusible o bien apagando el cortacircuitos. Para reemplazar la luz de la secadora: 1 Con un destornillador de cabeza plana pequeño, abra la parte inferior de la cubierta de la luz y sáquela de la carcasa del foco. de corriente. La luz de la secadora se ubica encima de la - GE DSXH47GGWW | Owners Manual - Page 32
y carga de la ropa Como regla general, si la ropa es clasificada apropiadamente para han aprobado para usarse con todas las secadoras GE de acuerdo con las instrucciones del fabricante. de secado se prolonguen. El filtro se ubica en la parte inferior de la abertura de la puerta. Retire jalando hacia - GE DSXH47GGWW | Owners Manual - Page 33
a 800.GE.CARES (1. manual. Los materiales de ventilación flexibles a menudo se desploman, se aplastan y atrapan pelusas. Estas condiciones obstruyen la corriente de aire de la secadora y aumentan el riesgo de incendio. • No instale (National Electrical Code), ANSI/NFPA 70. • El servicio de gas de la - GE DSXH47GGWW | Owners Manual - Page 34
bloque terminal e instale el cable) (SECADORA ELÉCTRICA) Sellador de roscas para tubería (SECADORA A GAS) Alivio de o mover la secadora. Almohadilla de espuma del empaque Parte posterior de la secadora Empaque 4. Vuelva a colocar la . Coloque el Manual del propietario y las Instrucciones de instalación - GE DSXH47GGWW | Owners Manual - Page 35
el CÓDIGO NACIONAL SOBRE ELECTRICIDAD (NATIONAL ELECTRICAL CODE), ANSI/NFPA NO. 70. Requisitos ELÉCTRICA PARA SECADORAS A GAS ADVERTENCIA - Para reducir el un electricista certificado instale el tomacorriente tornillo verde descargado a tierra en la parte posterior de la secadora en la esquina - GE DSXH47GGWW | Owners Manual - Page 36
esta página. 12 ADVERTENCIA • No instale la boca de salida dentro de una chimenea, pared, cielorraso, ventilación de gas, espacio entre pisos, ático, bajo de metal flexible (semi-rígido) aprobado por UL (Kit WX08X10077). • Nunca instale conductos de metal flexible en paredes, cielorrasos, pisos u - GE DSXH47GGWW | Owners Manual - Page 37
de su distribuidor GE. Siga las INSTALE LAS TERMINALES MACHO EN LA DIRECCIÓN CORRECTA CORRECTO INCORRECTO REQUISITOS DEL ABASTECIMIENTO DE GAS Gas Combustible (National Fuel Gas Code), ANSI Z223.1 (última edición). 2. La tubería de abastecimiento de gas debe ser de tubo rígido de 1/2″ (1.27 - GE DSXH47GGWW | Owners Manual - Page 38
dentro del mismo armario que la SECADORA A GAS. 3. Su secadora necesita espacio alrededor para una ventilación adecuada. NO INSTALE SU SECADORA DENTRO DE UN ARMARIO CON UNA á disponible a través de su distribuidor GE. Puerta del armario 60 pulgadas cuadradas (387.1 cm. cuadrados) 3″ (7.6 cm) 14 - GE DSXH47GGWW | Owners Manual - Page 39
a la estructura de la casa rodante. 3. Cuando se instale una secadora a gas en una casa rodante, deben tomarse medidas con respecto a abastecimiento de gas en la parte posterior de la unidad 36″ (91.4 cm) 13 1/2″ 2 3/8″ (34.3 cm) (6.03 cm) Hacia los extractores posterior y de la base 27″ (68.6 - GE DSXH47GGWW | Owners Manual - Page 40
Consulte los Requisitos eléctricos en este manual para adquirir el cable de corriente adecuado. , con el Código Nacional sobre Electricidad (National Electrical Code), ANSI/NFPA No. 70. Para una del aparato. Para una secadora a gas descargada a tierra con conexión de instale una toma adecuada. 16 - GE DSXH47GGWW | Owners Manual - Page 41
del alivio de tensión ubicada en la parte posterior de la secadora, en la esquina superior. 2. Instale un alivio de tensión aprobado por UL de enero de 1996: El Código Nacional sobre Electricidad (National Electrical Code) requiere que las nuevas construcciones (no existentes) utilicen una - GE DSXH47GGWW | Owners Manual - Page 42
gas en la parte posterior de la secadora. Conversión a gas LP: NO conecte la secadora al servicio de gas LP sin convertir la válvula de gas. Un equipo de conversión LP (No. 14-A038) DEBE instalarse por un técnico de gas certificado. a. Conecte un tubo de 1/2″ (1.27 manual tornillos. 4. Instale los 4 - GE DSXH47GGWW | Owners Manual - Page 43
el tanque. La secadora se deberá está vacío o se ha producido una calentar cuando se reestablezca el servicio de gas. interrupción en el servicio de gas natural (en los modelos a gas) Un poco de temblor/ruido es normal. La secadora podría estar disnivelada • Coloque la secadora en un lugar con - GE DSXH47GGWW | Owners Manual - Page 44
utilizar un suavizador de telas. Tipo de calor • Los plazos de secado automático pueden variar según el tipo de calor utilizado (eléctrico, gas natural o LP), tamaño de la carga, tipos de telas, humedad de la ropa y la condición de los conductos de extracción. Clasificación incorrecta Cargas - GE DSXH47GGWW | Owners Manual - Page 45
Seguridad Códigos de error Si la secadora se detiene, las luces de estado destellan y se emite un pitido, ha ocurrido un error. Presione PAUSE/CANCEL. Consulte la Tabla de códigos de error para ver la causa posible y la solución. Haga la corrección, elija un ciclo y presione START. Si la secadora - GE DSXH47GGWW | Owners Manual - Page 46
Notas. 22 Soporte al consumidor Solucionar problemas Instrucciones de instalación Operación Seguridad - GE DSXH47GGWW | Owners Manual - Page 47
situado en un área que no dispone de servicio por parte de un proveedor de servicio autorizado de GE, podría tener que hacerse cargo de los costes de envío ngase en contacto con la Oficina de su Procurador General. Garante: General Electric Company. Louisville, KY 40225 Instrucciones de instalación - GE DSXH47GGWW | Owners Manual - Page 48
, o llamar al 800.626.2224 durante horas normales de oficina. GE Consumer Home Services estará aún ahí cuando su garantía termine. Piezas y accesorios descritas en este manual cubren los procedimientos a seguir por cualquier usuario. Cualquier otra reparación debería, por regla general, referirse a
-
 1
1 -
 2
2 -
 3
3 -
 4
4 -
 5
5 -
 6
6 -
 7
7 -
8
-
9
-
10
-
11
-
12
-
13
-
14
-
15
-
16
-
17
-
18
-
19
-
20
-
21
-
22
-
23
-
24
-
25
-
26
-
27
-
28
-
29
-
30
-
31
-
32
-
33
-
34
-
35
-
36
-
37
-
38
-
39
-
40
-
41
-
42
-
43
-
44
-
45
-
46
-
47
-
48
 |
 |
175D1807P643
49-90381
04-09 JR
GEAppliances.com
Dryers
Safety Instructions
. . . . . . . . . . . . . 2–5
Operating Instructions
Care and Cleaning . . . . . . . . . . . . . . . . . . . . .8
Controls . . . . . . . . . . . . . . . . . . . . . . . . . . . . . .6
Features
. . . . . . . . . . . . . . . . . . . . . . . . . . . . . .7
Loading and Using the Dryer . . . . . . . . . . .8
Installation Instructions
. . . . . . 9–18
Electrical Installation for
Electric Dryer
. . . . . . . . . . . . . . . . . . . . 16, 17
Electrical Requirements . . . . . . . . . . . . . . .11
Exhausting the Dryer
. . . . . . . . . . . . .12, 13
Gas Connection for Gas Dryer . . . . . . . .18
Gas Supply Requirements
. . . . . . . . . . . .13
Location of Your Dryer . . . . . . . . . . . . . . . .14
Mobile Home Installation . . . . . . . . . . . . .15
Preparing to Install Your Dryer . . . . . .9, 10
Reversing the Door Swing
. . . . . . . . . . . .18
Troubleshooting Tips
. . . . . . . . .19–21
Consumer Support
Consumer Support . . . . . . . . . . . . . . . . . . . 24
Warranty . . . . . . . . . . . . . . . . . . . . . . . . . . . . 23
Spacemaker
DSXH47
Owner’s Manual &
Installation Instructions
®
Printed in Mexico