GE FCM25SUWW Use and Care Manual - Page 7
Consumer Support, Troubleshooting Tips, Safety Instructions, Installation, Instructions - freezer model
 |
UPC - 084691162414
View all GE FCM25SUWW manuals
Add to My Manuals
Save this manual to your list of manuals |
Page 7 highlights
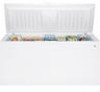
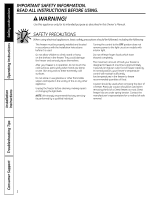
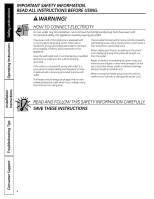
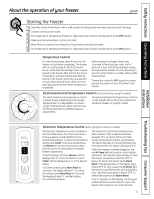
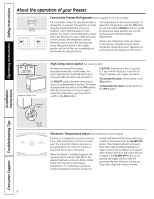
Safety Instructions Operating Instructions ge.com Power-On Light (on some models) The Power-On Light indicates that the freezer is properly connected to the electrical power. The light glows even when the temperature control is turned off. Key-Ejecting Lock (on some models) The key for the spring-loaded lock is automatically ejected-key will not remain in lock in either the open or closed position. Keep the key out of reach of children and away from the freezer. Freezer Shelves (on some models) The spacers (on some models) are used to secure the shelves during shipping. Remove and discard the spacers. Small objects are a choke hazard to children. Tilt-Out Shelf (some Upright models) This shelf is located inside on the freezer door and provides additional storage space. To access an item, tilt the top of the "basket" shelf down. Installation Instructions Troubleshooting Tips Consumer Support Slide-Out Basket (some Upright models) A slide-out basket provides separate storage space for items that are difficult to store on shelves. It is located at the bottom of the freezer. To remove this basket, pull out and lift up. Upright Models Interior Light The interior light comes on when the freezer door is opened. To replace the bulb, set the temperature control to OFF and unplug the electrical cord. Replace the bulb by unscrewing it from the fixture. Replace with the same size and wattage. Wire Shelf Placement Holes Adjustable Shelves (Upright models) The adjustable shelves can be moved to different levels within the freezer. To move the shelf, grasp the shelf and push to either the right or the left to disengage the ends of the shelf from placement holes in the freezer. Tilt the shelf to release the other side. To install the shelf, reverse these directions. Some models will have glass shelves and some models will have wire shelves. Glass Shelf Placement Holes 7
-
 1
1 -
 2
2 -
 3
3 -
 4
4 -
 5
5 -
 6
6 -
 7
7 -
 8
8 -
 9
9 -
 10
10 -
 11
11 -
 12
12 -
13
-
14
-
15
-
16
-
17
-
18
-
19
-
20
-
21
-
22
-
23
-
24
-
25
-
26
-
27
-
28
-
29
-
30
-
31
-
32
-
33
-
34
-
35
-
36
-
37
-
38
-
39
-
40
-
41
-
42
-
43
-
44
-
45
-
46
-
47
-
48
-
49
-
50
-
51
-
52
-
53
-
54
-
55
-
56
-
57
-
58
-
59
-
60
 |
 |