GE PB970 Installation Instructions
GE PB970 - Profile 30 in. Double Oven Range Manual
 |
View all GE PB970 manuals
Add to My Manuals
Save this manual to your list of manuals |
GE PB970 manual content summary:
- GE PB970 | Installation Instructions - Page 1
Installation Free-Standing Instructions Electric Ranges Models PB970, PB975 Questions? Call 800.GE.CARES (800.432.2737) or Visit our Website at: ge.com BEFORE YOU BEGIN Read these instructions completely and carefully. • IMPORTANT - Save these instructions for local inspector's use. • IMPORTANT - - GE PB970 | Installation Instructions - Page 2
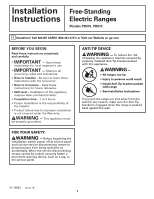
Installation Instructions PREPARE TO INSTALL THE RANGE FOR YOUR SAFETY: All rough-in and spacing dimensions must be met for safe use of your range. To reduce the risk of burns or fire when reaching over hot surface elements, cabinet storage space above the cooktop should be avoided. If cabinet - GE PB970 | Installation Instructions - Page 3
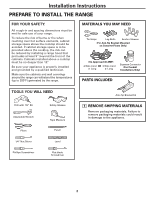
Installation Instructions 2 PREPARE THE OPENING See illustrations for all rough-in and spacing dimensions. The range may be placed with 0" clearance (flush) at the back wall and side walls of the cabinet. Acceptable electrical outlet area. Orient the electrical receptacle so the length is - GE PB970 | Installation Instructions - Page 4
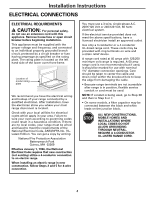
Instructions ELECTRICAL CONNECTIONS ELECTRICAL oven front frame. Location of model rating plate We recommend you have the electrical wiring and hookup of your range damaging the cable. • Because range terminals are not accessible after range is in position, flexible service conduit or cord must be - GE PB970 | Installation Instructions - Page 5
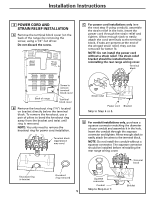
Installation Instructions 3 POWER CORD AND STRAIN RELIEF INSTALLATION A Remove the terminal block cover (on the back of the range) by removing the screw, using a 1/4" nut driver. Do not discard the screw. C For power cord installations only (see the next step if using conduit), assemble - GE PB970 | Installation Instructions - Page 6
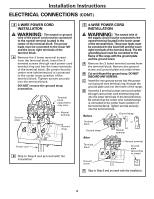
Installation Instructions ELECTRICAL CONNECTIONS (CONT.) 4 3-WIRE POWER CORD INSTALLATION WARNING: The terminals of the terminal block. The 4th grounding lead must be connected to the frame of the range with the ground plate and the ground screw. A Remove the 3 lower terminal screws from the - GE PB970 | Installation Instructions - Page 7
Instructions 6 3-WIRE CONDUIT INSTALLATION A Loosen the 3 lower terminal screws from the terminal block. Insert the center bare wire (white/neutral) tip through the bottom center terminal block opening. On certain models the ground bare wire tip between the range frame and the ground plate (removed - GE PB970 | Installation Instructions - Page 8
back. 10 PREPARE TO LEVEL MODELS A Measure the height of your countertop at the rear of the opening (X). Back of range Terminal block cover Screw to replace terminal block cover 9 ANTI-TIP DEVICE INSTALLATION An Anti-Tip bracket is supplied with instructions for installation in a variety of - GE PB970 | Installation Instructions - Page 9
Instructions 11 LEVEL THE RANGE A Install the oven shelves in the oven and position the range where it will be installed. B Check for levelness by placing a spirit level or a cup, partially filled Spirit level with water, on one of the oven see the Owner's Manual for proper replacement (on models so - GE PB970 | Installation Instructions - Page 10
Notes 10 - GE PB970 | Installation Instructions - Page 11
Notes 11 - GE PB970 | Installation Instructions - Page 12
Printed in the United States 12
-
 1
1 -
 2
2 -
 3
3 -
 4
4 -
 5
5 -
 6
6 -
 7
7 -
8
-
9
-
10
-
11
-
12
 |
 |
1
31-10652
02-07 JR
Installation
Free-Standing
Instructions
Electric Ranges
Models PB970, PB975
BEFORE YOU BEGIN
Read these instructions completely
and carefully.
•
IMPORTANT
—
Save these
instructions for local inspector’s use.
•
IMPORTANT
—
Observe all
governing codes and ordinances.
•
Note to Installer –
Be sure to leave these
instructions with the Consumer.
•
Note to Consumer –
Keep these
instructions for future reference.
•
Skill level –
Installation of this appliance
requires basic mechanical skills.
•
Completion time –
1 to 3 hours
•
Proper installation is the responsibility of
the installer.
•
Product failure due to improper installation
is not covered under the Warranty.
WARNING
—
This appliance must
be properly grounded.
FOR YOUR SAFETY:
WARNING
—
Before beginning the
installation, switch power off at service panel
and lock the service disconnecting means to
prevent power from being switched on
accidentally. When the service disconnecting
means cannot be locked, securely fasten a
prominent warning device, such as a tag, to
the service panel.
ANTI-TIP DEVICE
WARNING
—
To reduce the risk
of tipping, the appliance must be secured by
properly installed Anti-Tip bracket packed
with this appliance.
WARNING
—
•
All ranges can tip
•
Injury to persons could result
•
Install Anti-Tip bracket packed
with range
•
See Installation Instructions
If you pull the range out and away from the
wall for any reason, make sure the Anti-Tip
bracket is engaged when the range is pushed
back against the wall.
Questions? Call 800.GE.CARES (800.432.2737) or Visit our Website at: ge.com