GE PEB2060SMSS Installation Instructions - Page 3
Install Anti-tip Bracket And Bottom Duct, Install Side Duct And Upper Duct - installation instructions
 |
UPC - 084691164166
View all GE PEB2060SMSS manuals
Add to My Manuals
Save this manual to your list of manuals |
Page 3 highlights
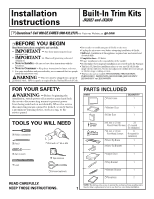
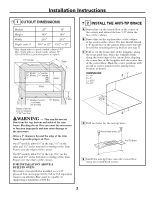
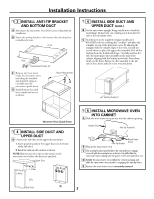
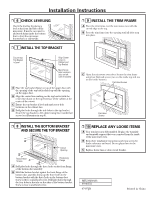
Installation Instructions ❒ 3 INSTALL ANTI-TIP BRACKET AND BOTTOM DUCT A Disconnect the microwave oven before proceeding with the installation. B Fasten the anti-tip bracket to the bottom duct by using four round-head screws. Front Rear Round-Head Screws (4) C Remove any loose items inside the microwave oven, including the turntable and turntable support. Carefully turn the microwave upside down. D Install bottom duct with four round-head screws as shown. Round-Head Screws ❒ 4 INSTALL SIDE DUCT AND UPPER DUCT (cont.) B Set the microwave upright, being careful not to bend the front flange. Remove the one existing screw from the left side of the microwave oven. C As indicated on the supplied template (publication #31-41003), fold or cut along the "cut lines" and place the template on top of the microwave oven. By aligning the template with the outside edges of the oven, you will see exactly where to place the upper duct assembly. Peel off the backing from the double-sided tape. Carefully position the side duct and upper duct assembly on the microwave cabinet, aligning with the bottom screw hole. Press down firmly on the ducts. Fasten the duct assembly to the left side of the cabinet with the screw removed above. Existing Screw (1) Microwave Oven Upside Down ❒ 4 INSTALL SIDE DUCT AND UPPER DUCT A Connect the side duct to the upper duct as shown. 1. Insert projecting tabs of the upper duct into the holes of the side duct. 2. Bend the tabs up with caution as shown. NOTE: Remove any oil or dirt on the surface of the microwave oven before the ducts are attached. Upper Duct 3 Holes 3 Tabs ❒ 5 INSTALL MICROWAVE OVEN INTO CABINET A Slide the microwave oven part way into the cabinet opening. Bottom Duct Anti-Tip Assembly Anti-Tip Brace Anti-Tip Bracket B Plug in the microwave oven. Round-Head Screw C The anti-tip bracket must be flat to the cutout floor to engage correctly with the anti-tip brace as shown. Carefully slide the microwave back, making sure the power cord is not mashed or cut. D Center the microwave oven within the cutout opening and slide the microwave oven in place, engaging the anti-tip brace. E Ensure the microwave oven is accurately centered. (1) Side Duct (2) 3
-
 1
1 -
 2
2 -
 3
3 -
 4
4
 |
 |
