GE PSB2200NBB Installation Instructions - Page 2

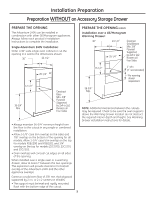
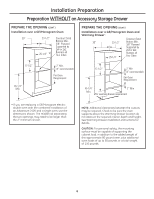
Safety Information, BEFORE YOU BEGIN, CAUTION - dimensions

Page 2 highlights

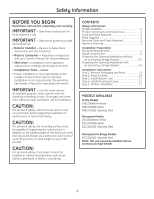
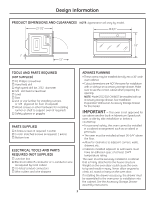
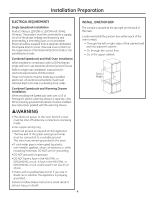
Safety Information BEFORE YOU BEGIN Read these instructions completely and carefully. IMPORTANT - Save these instructions for local inspector's use. IMPORTANT - Observe all governing codes and ordinances. • Note to Installer - Be sure to leave these instructions with the Consumer. • Note to Consumer - Keep these instructions with your Owner's Manual for future reference. • Skill Level - Installation of this appliance requires basic mechanical and electrical skills. • Completion Time - 1 Hour. • Proper installation is the responsibility of the installer. Product failure due to improper installation is not covered under the warranty. See Owner's Manual for warranty information. IMPORTANT - Use this oven only for its intended purpose. Never use the oven for warming or heating a room. Prolonged use of the oven without proper ventilation can be hazardous. CAUTION: For personal safety, remove house fuse or oven circuit breaker before beginning installation to avoid severe or fatal shock injury. CAUTION: For personal safety, the mounting surface must be capable of supporting the cabinet load, in addition to the added weight of the 80-pound oven and 30-pound drawer, plus additional oven loads of up to 50 pounds or a total weight of up to 160 pounds. CAUTION: For personal safety, this product cannot be installed in cabinet arrangements such as an island, a peninsula or below a countertop. CONTENTS Design Information Models Available 2 Product Dimensions and Clearances 3 Tools and Parts Required 3 Parts Supplied 3 Electrical Tools and Parts Required 3 Advance Planning 3 Installation Preparation Electrical Requirements 4 Install Junction Box 4 Preparing the Opening (Installation without an accessory storage drawer 5-6 Preparing the Opening (Installation with an accessory storage drawer 7-8 Installation Instructions Step 1, Remove Packaging and Parts 9 Step 2, Route Conduit 10 Step 3, Install Bottom Trim 11 Step 4, Install Mounting Screws 11 Step 5, Finalize Installation 11 MODELS AVAILABLE Profile Models: PSB2200NWW-White PSB2200NBB-Black PSB2201NSS-Stainless Steel Monogram Models: ZSC2200NWW-White ZSC2200NBB-Black ZSC2201NSS-Stainless Steel Monogram Pro Range Models: ZSC2202NSS-Stainless Steel NOTE: This unit cannot be installed with an accessory storage drawer. 2

  • 1
  • 2
  • 3
  • 4
  • 5
  • 6
  • 7
  • 8
  • 9
  • 10
  • 11
  • 12
  • 13
  • 14
  • 15
  • 16

Safety Information
2
CONTENTS
Design Information
Models Available
......................................................................
2
Product Dimensions and Clearances
............................
3
Tools and Parts Required
....................................................
3
Parts Supplied
..........................................................................
3
Electrical Tools and Parts Required
................................
3
Advance Planning
..................................................................
3
Installation Preparation
Electrical Requirements
........................................................
4
Install Junction Box
................................................................
4
Preparing the Opening (Installation without
an accessory storage drawer)
..................................
5-6
Preparing the Opening (Installation with
an accessory storage drawer)
..................................
7-8
Installation Instructions
Step 1, Remove Packaging and Parts
..........................
9
Step 2, Route Conduit
........................................................
10
Step 3, Install Bottom Trim
..............................................
11
Step 4, Install Mounting Screws
....................................
11
Step 5, Finalize Installation
..............................................
11
BEFORE YOU BEGIN
Read these instructions completely and carefully.
IMPORTANT
Save these instructions for
local inspector’s use.
IMPORTANT
Observe all governing codes
and ordinances.
Note to Installer
Be sure to leave these
instructions with the Consumer.
Note to Consumer
Keep these instructions
with your Owner’s Manual for future reference.
Skill Level
Installation of this appliance
requires basic mechanical and electrical skills.
Completion Time
1 Hour.
Proper installation is the responsibility of the
installer. Product failure due to improper
installation is not covered under the warranty.
See Owner’s Manual for warranty information.
IMPORTANT
Use this oven only for
its intended purpose. Never use the oven for
warming or heating a room. Prolonged use of the
oven without proper ventilation can be hazardous.
CAUTION:
For personal safety, remove house fuse or oven
circuit breaker before beginning installation to
avoid severe or fatal shock injury.
CAUTION:
For personal safety, the mounting surface must
be capable of supporting the cabinet load, in
addition to the added weight of the 80-pound oven
and 30-pound drawer, plus additional oven loads of
up to 50 pounds or a total weight of up to 160
pounds.
CAUTION:
For personal safety, this product cannot be
installed in cabinet arrangements such as an
island, a peninsula or below a countertop.
MODELS AVAILABLE
Profile Models:
PSB2200NWW–White
PSB2200NBB–Black
PSB2201NSS–Stainless Steel
Monogram Models:
ZSC2200NWW–White
ZSC2200NBB–Black
ZSC2201NSS–Stainless Steel
Monogram Pro Range Models:
ZSC2202NSS–Stainless Steel
NOTE: This unit cannot be installed with an
accessory storage drawer.