Gigabyte GA-880GMA-USB3 Manual - Page 87
Configuring S/PDIF Out
 |
UPC - 818313012166
View all Gigabyte GA-880GMA-USB3 manuals
Add to My Manuals
Save this manual to your list of manuals |
Page 87 highlights
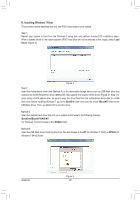
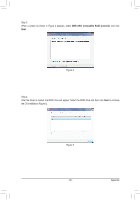
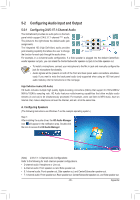
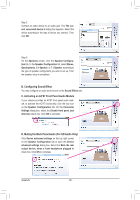
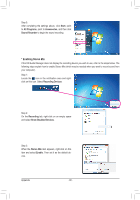
5-2-2 Configuring S/PDIF Out The S/PDIF Out jack (Note 1) can transmit audio signals to an external decoder for decoding to get the best audio quality. 1. Connecting a S/PDIF Out Cable: S/PDIF Optical Cable Connect a S/PDIF optical cable to an external decoder for transmitting the S/PDIF digital audio signals. 2. Configuring S/PDIF Out: On the Digital Output(Optical) screen (Note 2), click the Default Format tab and then select the sample rate and bit depth. Click OK to complete. (Note 1) The actual location of the S/PDIF Out connector may differ by model. (Note 2) Enter the Digital Output(Optical) screen to configure further settings if you use the S/PDIF Out connector on the back panel for digital audio output or enter the Digital Output screen if you use the internal S/PDIF Out connector (SPDIF_OUT) for digital audio output. - 87 - Appendix
-
 1
1 -
2
-
3
-
4
-
5
-
6
-
7
-
8
-
9
-
10
-
11
-
12
-
13
-
14
-
15
-
16
-
17
-
18
-
19
-
20
-
21
-
22
-
23
-
24
-
25
-
26
-
27
-
28
-
29
-
30
-
31
-
32
-
33
-
34
-
35
-
36
-
37
-
38
-
39
-
40
-
41
-
42
-
43
-
44
-
45
-
46
-
47
-
48
-
49
-
50
-
51
-
52
-
53
-
54
-
55
-
56
-
57
-
58
-
59
-
60
-
61
-
62
-
63
-
64
-
65
-
66
-
67
-
68
-
69
-
70
-
71
-
72
-
73
-
74
-
75
-
76
-
77
-
78
-
79
-
80
-
81
-
 82
82 -
 83
83 -
 84
84 -
 85
85 -
 86
86 -
 87
87 -
 88
88 -
 89
89 -
 90
90 -
 91
91 -
 92
92 -
93
-
94
-
95
-
96
-
97
-
98
-
99
-
100
 |
 |
