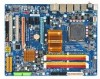
Gigabyte GA-EP45-DS3R Manual
Gigabyte GA-EP45-DS3R Manual
 |
UPC - 818313005816
View all Gigabyte GA-EP45-DS3R manuals
Add to My Manuals
Save this manual to your list of manuals |
Gigabyte GA-EP45-DS3R manual content summary:
- Gigabyte GA-EP45-DS3R | Manual - Page 1
Table of Contents TPM Configuration Procedure 2 1. Configuring the System BIOS 2 2. Installing the Infineon TPM Driver and the GIGABYTE Ultra TPM Utility 3 3. Initializing the TPM Chip 4 3.1. Easy Mode ...4 3.2. Advanced Mode ...6 4. Configuring the GIGABYTE Ultra TPM Utility 16 - 1 - - Gigabyte GA-EP45-DS3R | Manual - Page 2
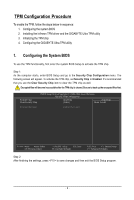
follow the steps below in sequence: 1. Configuring the system BIOS 2. Installing the Infineon TPM driver and the GIGABYTE Ultra TPM utility 3. Initializing the TPM chip 4. Configuring the GIGABYTE Ultra TPM utility 1. Configuring the System BIOS To use the TPM functionality, first enter the system - Gigabyte GA-EP45-DS3R | Manual - Page 3
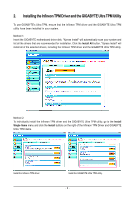
Ultra TPM, ensure that the Infineon TPM driver and the GIGABYTE Ultra TPM utility have been installed in your system. Method 1: Insert the GIGABYTE motherboard driver disk. "Xpress Install" will automatically scan your system and list all the drivers that are recommended for installation. Click the - Gigabyte GA-EP45-DS3R | Manual - Page 4
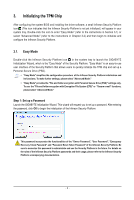
configuring the system BIOS and installing the driver software, a small Infineon Security Platform icon (This icon indicates that the Infineon Security Platform is not yet initialized.) will appear in your system tray. Double-click the icon to enter "Easy Mode" (refer to the instructions in Section - Gigabyte GA-EP45-DS3R | Manual - Page 5
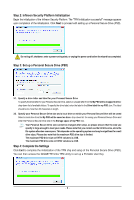
power cord before the wizard has completed. Step 3: Set up a Personal Secure Drive (PSD) 3-1. Specify a drive letter and label for your Personal Secure Drive To specify the drive letter for your Personal Secure Drive, select an unused letter from the My PSD will be mapped to drive: drop-down list - Gigabyte GA-EP45-DS3R | Manual - Page 6
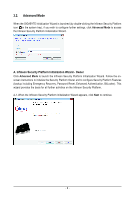
3.2. Advanced Mode When the GIGABYTE Initialization Wizard is launched (by double-clicking the Infineon Security to launch the Infineon Security Platform Initialization Wizard. Follow the onscreen instructions to initialize the Security Platform Owner and to configure Security Platform Features - Gigabyte GA-EP45-DS3R | Manual - Page 7
A-2. Select Security Platform initialization and click Next to create the Security Platform Owner Password. The Infineon Security Platform Owner key is created and stored in the Infineon Trusted Platform Module together with the Infineon Security Platform Owner secret. This key is protected by the - Gigabyte GA-EP45-DS3R | Manual - Page 8
) Check this feature, if you want to configure automatic Security Platform backups. Configuring Backup is strongly recommended. Otherwise all user data will be lost in case of emergency. You cannot uncheck this feature, if the policy Enforce configuration of Backup including Emergency Recovery is - Gigabyte GA-EP45-DS3R | Manual - Page 9
a new token password. A-7. Make sure you have selected all the functions you want to perform. Click Next to continue. Do not log off, shutdown, enter a power-saving state, or unplug the power cord before the wizard has completed. - 9 - - Gigabyte GA-EP45-DS3R | Manual - Page 10
). This wizard has to be started for each computer user, who is intended to use the personalized Infineon Security Platform Features (i.e., who will be Infineon Security Platform User). B-1. Launch the Infineon Security Platform User Initialization Wizard. Click Next to continue. - 10 - - Gigabyte GA-EP45-DS3R | Manual - Page 11
B-2. Set a Basic User Password and click Next. B-3. Enable the reset functionality for the Basic User Password. Select the location that you wish to save the file and then click Next. B-4. Click Next to continue the initialization. - 11 - - Gigabyte GA-EP45-DS3R | Manual - Page 12
this feature guarantees that only the e-mail creator and the specified recipients will be able to decrypt and read the message or validate the identity EFS. You can also request or create a new certificate. EFS is not supported in Windows Vista Home Basic, Vista Home Premium and XP Home Editions. - Gigabyte GA-EP45-DS3R | Manual - Page 13
B-5-1. Use the File and folder encryption with Personal Secure Drive (PSD) as the example: To configure "Encryption Certificate", click Select. B-5-2. Click Create to create the certificate. After the certificate appears, click the certificate and click Select. B-5-3. The certificate has been - Gigabyte GA-EP45-DS3R | Manual - Page 14
your Personal Secure Drive, select an unused letter from the drop-down list of available letters. To specify the drive label, enter the label Secure Drive size and a local drive on which your Personal Secure Drive will be saved.Click Next. Your Personal Secure Drive size cannot be changed after - Gigabyte GA-EP45-DS3R | Manual - Page 15
B-7. Click Next to continue. Do not logoff, shutdown, enter a power-saving state, or unplug the power cord before the wizard has completed. B-8. Click Finish to finish the user initialization and features configuration of the Infineon Security Platform. C. Infineon Security Platform Settings - Gigabyte GA-EP45-DS3R | Manual - Page 16
TPM Utility GIGABYTE's unique Ultra TPM (Trusted Platform Module) supports the industry's most advanced TPM hardware-based encryption. With the easy-to-use Ultra TPM user interface, users can store/back up their digital signature keys on a USB flash drive or in the system BIOS. The key(s) will be - Gigabyte GA-EP45-DS3R | Manual - Page 17
Ultra TPM will be locked. To be able to enter the password again, go to the "Security Chip Configuration" menu in BIOS Setup and USB flash drive. Click OK to continue. Step 3: Click OK to complete the duplication of the key. If you want to uninstall the Ultra TPM software, be sure to insert the USB
-
 1
1 -
 2
2 -
 3
3 -
 4
4 -
 5
5 -
 6
6 -
 7
7 -
8
-
9
-
10
-
11
-
12
-
13
-
14
-
15
-
16
-
17
 |
 |

- 1 -
Table of Contents
TPM Configuration Procedure
.......................................................................................
2
1.
Configuring the System BIOS
....................................................................................
2
2.
Installing the Infineon TPM Driver and the GIGABYTE Ultra TPM Utility
..................
3
3.
Initializing the TPM Chip
.............................................................................................
4
3.1.
Easy Mode
.........................................................................................................................
4
3.2.
Advanced Mode
................................................................................................................
6
4.
Configuring the GIGABYTE Ultra TPM Utility
..........................................................
16