Gigabyte GA-EP45-DS3R Manual - Page 5
Step 3: Set up a Personal Secure Drive PSD, Step 2: Infineon Security Platform Initialization, Step
 |
UPC - 818313005816
View all Gigabyte GA-EP45-DS3R manuals
Add to My Manuals
Save this manual to your list of manuals |
Page 5 highlights
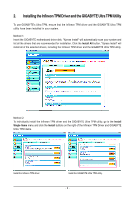
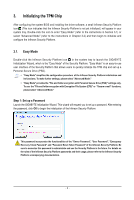
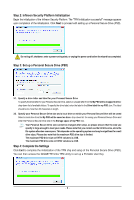
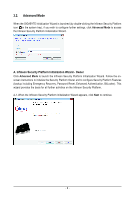
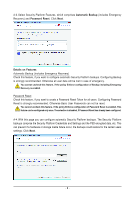
Step 2: Infineon Security Platform Initialization Begin the initialization of the Infineon Security Platform. The "TPM initialization successful!" message appears upon completion of the initialization. Click Next to proceed with setting up a Personal Secure Drive (PSD). Do not log off, shutdown, enter a power-saving state, or unplug the power cord before the wizard has completed. Step 3: Set up a Personal Secure Drive (PSD) 3-1. Specify a drive letter and label for your Personal Secure Drive To specify the drive letter for your Personal Secure Drive, select an unused letter from the My PSD will be mapped to drive: drop-down list of available letters. To specify the drive label, enter the label in the Drive label for my PSD: box. The label should be no more than 32 characters in length. 3-2. Specify your Personal Secure Drive size and a local drive on which your Personal Secure Drive will be saved Select a local drive from the My PSD will be saved on drive: drop-down list for saving your Personal Secure Drive and enter the Personal Secure Drive size in the Storage space of my PSD: box. Your Personal Secure Drive size cannot be changed after setup, so please ensure that the size you specify is large enough to meet your needs. Please note that you cannot use the full drive size, since the file system allocates some space. This depends on the operating system and may be significant for small drive sizes. Please also note that the maximum PSD drive size is limited: The maximum PSD drive size on FAT16 volumes is 2 GB. The maximum PSD drive size on FAT32 volumes is 4 GB. Step 4: Complete the Settings Click Exit to complete the initialization of the TPM chip and setup of the Personal Secure Drive (PSD). You can then access the GIGABYTE Ultra TPM utility to set up a Portable User Key. - 5 -
-
 1
1 -
 2
2 -
 3
3 -
 4
4 -
 5
5 -
 6
6 -
 7
7 -
 8
8 -
 9
9 -
 10
10 -
 11
11 -
12
-
13
-
14
-
15
-
16
-
17
 |
 |
