Gigabyte GA-K8NE User Manual - Page 14
Recommended Memory Configurations SS: Single -Sided, DS:Double-Sided
 |
View all Gigabyte GA-K8NE manuals
Add to My Manuals
Save this manual to your list of manuals |
Page 14 highlights
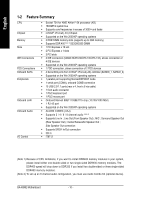
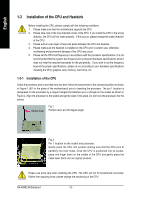
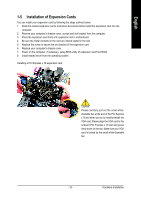
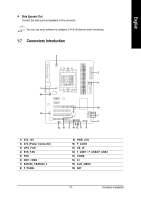
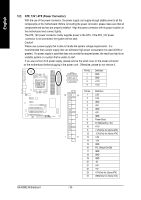
English Fig.1 The DIMM socket has a notch, so the DIMM memory module can only fit in one direction. Insert the DIMM memory module vertically into the DIMM socket. Then push it down. Fig.2 Close the plastic clip at both edges of the DIMM sockets to lock the DIMM module. Reverse the installation steps when you wish to remove the DIMM module. Please refer to the recommended memory configuration table below before installing memory. Recommended Memory Configurations (SS: Single -Sided, DS:Double-Sided) Number of DIMMs 1 1 1 1 1 1 2 2 2 2 2 2 3 3 DDR1 SS --DS --SS -SS DS -DS SS DS DIMM Socket DDR2 -SS --DS -SS SS -DS DS -SS DS DDR3 --SS --DS -SS SS -DS DS SS DS Max. Memory Speed DDR 400 DDR 400 DDR 400 DDR 400 DDR 400 DDR 400 DDR 400 DDR 400 DDR 400 DDR 333 DDR 333 DDR 333 DDR 333 DDR 333 GA-K8NE Motherboard - 14 -
-
 1
1 -
2
-
3
-
4
-
5
-
6
-
7
-
8
-
 9
9 -
 10
10 -
 11
11 -
 12
12 -
 13
13 -
 14
14 -
 15
15 -
 16
16 -
 17
17 -
 18
18 -
 19
19 -
20
-
21
-
22
-
23
-
24
-
25
-
26
-
27
-
28
-
29
-
30
-
31
-
32
-
33
-
34
-
35
-
36
-
37
-
38
-
39
-
40
-
41
-
42
-
43
-
44
-
45
-
46
-
47
-
48
-
49
-
50
-
51
-
52
-
53
-
54
-
55
-
56
-
57
-
58
-
59
-
60
-
61
-
62
-
63
-
64
-
65
-
66
-
67
-
68
-
69
-
70
-
71
-
72
-
73
-
74
-
75
-
76
-
77
-
78
-
79
-
80
 |
 |
