Gigabyte GA-K8NXP-SLI User Manual - Page 49
Load Optimized Defaults, Set Supervisor/User Password - overclocking
 |
View all Gigabyte GA-K8NXP-SLI manuals
Add to My Manuals
Save this manual to your list of manuals |
Page 49 highlights
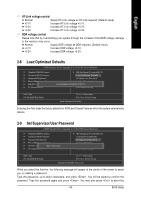
English HT-Link voltage control Normal +0.1V +0.2V +0.3V Supply HT-Link voltage as HT-Link required. (Default value) Increase HT-Link voltage +0.1V. Increase HT-Link voltage +0.2V. Increase HT-Link voltage +0.3V. DDR voltage control Please note that by overclocking your system through the increase of the DDR voltage, damage to the memory may occur. Normal Supply DDR voltage as DDR required. (Default value) +0.1V Increase DDR voltage +0.1V. +0.2V Increase DDR voltage +0.2V. 2-8 Load Optimized Defaults CMOS Setup Utility-Copyright (C) 1984-2005 Award Software ` Standard CMOS Features ` Advanced BIOS Features ` Integrated Peripherals ` Power Management Setup ` PnP/PCI Configurations ` PC Health Status ` MB Intelligent Tweaker(M.I.T.) Load Optimized Defaults Set Supervisor Password Set User Password Load Optimized DefaultsS(aYve/N&)?ENxit Setup Exit Without Saving ESC: Quit F8: Dual BIOS/Q-Flash KLJI: Select Item F10: Save & Exit Setup Load Optimized Defaults Selecting this field loads the factory defaults for BIOS and Chipset Features which the system automatically detects. 2-9 Set Supervisor/User Password CMOS Setup Utility-Copyright (C) 1984-2005 Award Software ` Standard CMOS Features ` Advanced BIOS Features ` Integrated Peripherals ` Power Management Setup ` PnP/PCI ConfigurationEsnter Password: ` PC Health Status ` MB Intelligent Tweaker(M.I.T.) Load Optimized Defaults Set Supervisor Password Set User Password Save & Exit Setup Exit Without Saving ESC: Quit F8: Dual BIOS/Q-Flash KLJI: Select Item F10: Save & Exit Setup Change/Set/Disable Password When you select this function, the following message will appear at the center of the screen to assist you in creating a password. Type the password, up to eight characters, and press . You will be asked to confirm the password. Type the password again and press . You may also press to abort the - 49 - BIOS Setup
-
 1
1 -
2
-
3
-
4
-
5
-
6
-
7
-
8
-
9
-
10
-
11
-
12
-
13
-
14
-
15
-
16
-
17
-
18
-
19
-
20
-
21
-
22
-
23
-
24
-
25
-
26
-
27
-
28
-
29
-
30
-
31
-
32
-
33
-
34
-
35
-
36
-
37
-
38
-
39
-
40
-
41
-
42
-
43
-
 44
44 -
 45
45 -
 46
46 -
 47
47 -
 48
48 -
 49
49 -
 50
50 -
 51
51 -
 52
52 -
 53
53 -
 54
54 -
55
-
56
-
57
-
58
-
59
-
60
-
61
-
62
-
63
-
64
-
65
-
66
-
67
-
68
-
69
-
70
-
71
-
72
-
73
-
74
-
75
-
76
-
77
-
78
-
79
-
80
-
81
-
82
-
83
-
84
-
85
-
86
-
87
-
88
 |
 |
