Gigabyte g-Smart User Manual - GSmart English Version - Page 45
Compose and Send MMS
 |
View all Gigabyte g-Smart manuals
Add to My Manuals
Save this manual to your list of manuals |
Page 45 highlights
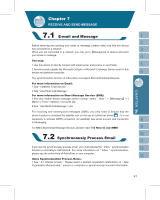
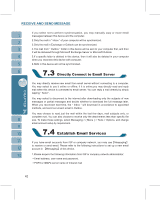
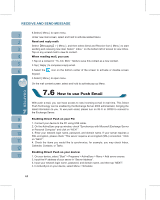
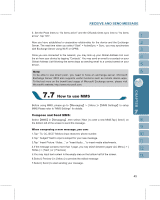
5. Set the Peak times to "As items arrive" and the Off-peak times sync time to "As items arrive". Tap "OK". Now you have established a cooperative relationship for the device and the Exchange Server. The next time when you select "Start" > ActiveSync > Sync, you may synchronize with Exchange Server using Wi-Fi or GPRS. Once you are connected to the network, you may look up your Global Address List over the air from your device by tapping "Contacts". You may send an email to a contact on your Global Address List following the same steps as sending email to a contact saved on your device. Note: To be able to use direct push, you need to have an exchange server. Microsoft Exchange Server 2003 also supports useful functions such as remote device wipe. To find out more on the benefit and usage of Microsoft Exchange server, please visit Microsoft's website, http://www.microsoft.com. Before using MMS, please go toʲMessagingʳ> { Menu }>ʲMMS Settingsʳto setup MMS.Please refer to "MMS Settings" for details. Compose and Send MMS: SelectʲMMSʳinʲMessagingʳ,then select { New } to write a new MMS.Tap { Send } on the bottom left of the screen to send the message. When composing a new message, you can: 1.Tap " To, CC, BCC" fields to input receivers' phone number. 2.Tap " Subject" field to input a subject for your new message. 3.Tap " Insert Picture / Video..." or "Insert Audio..." to insert media attachments. 4.If the message contains more than 1 page, you may switch between pages via { Menu } > { Slides } > { Next } or { Previous} 5.You may input text content in the empty area on the bottom half of the screen. 6.Select { Preview } in { Menu } to preview the edited message 7.Select { Send } to start sending your message. 45
-
 1
1 -
2
-
3
-
4
-
5
-
6
-
7
-
8
-
9
-
10
-
11
-
12
-
13
-
14
-
15
-
16
-
17
-
18
-
19
-
20
-
21
-
22
-
23
-
24
-
25
-
26
-
27
-
28
-
29
-
30
-
31
-
32
-
33
-
34
-
35
-
36
-
37
-
38
-
39
-
 40
40 -
 41
41 -
 42
42 -
 43
43 -
 44
44 -
 45
45 -
 46
46 -
 47
47 -
 48
48 -
 49
49 -
 50
50 -
51
-
52
-
53
-
54
-
55
-
56
-
57
-
58
-
59
-
60
-
61
-
62
-
63
-
64
-
65
-
66
-
67
-
68
-
69
-
70
-
71
-
72
-
73
-
74
-
75
 |
 |
