Haier HRF-305 User Manual - Page 19
foot cover is put at the back of the foot, and fasten its left side by wood screw. 1 piece
 |
View all Haier HRF-305 manuals
Add to My Manuals
Save this manual to your list of manuals |
Page 19 highlights
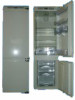
Installation Sequences 3. Put the refrigerator into the cabinet 1. Put the refrigerator into cabinet, don't squeeze the cord. Damaged power cord may cause fire disaster. 2. Connect the power. (If the socket is at the back of the cabinet, first connect the power before put the refrigerator cabinet into its place.) 3. For safeties, put the power switch in off position, and the switch of the whole room as well. =Draw the cord from the hole at the back of the refrigerator cabinet. =Put the refrigerator into the cabinet. = The clearance-adjusting sheet shall stick tightly with side panel. = The front of the upper fixing plate shall align with the end surface of the side panel. =The left and right clearance between refrigerator and the cabinet shall be kept the same. =Adjust hex screw to adjust the refrigerator's height, and adjust the uprightness and horizon. (Screwdriver can be found in the installation kit.) upper surface (Plane Diagram) Refrigerator Door Refrigerator cabinet Front line of side surface End surface of clearance adjusting sheet Upper fixing plate =The side surfaces of hinge shall be fastened by screws _. (2 pieces: 1 screw is fastened on the first hinge, and another one on the 4th hinge) Installation Sequences =The front of the refrigerator cabinet door shall be adjusted by square or steel rule and "A" and "B" shall be the same. Square Position Adjustment "B" Upper surface (Plane Diagram) "A" =NNfoot cover is put at the back of the foot, and fasten its left side by wood screw. (1 piece) Fasten the other hole on hinges after installation of the refrigerator door. 34 =Fasten the other parts of the foot after the refrigerator door is installed. 35
-
 1
1 -
2
-
3
-
4
-
5
-
6
-
7
-
8
-
9
-
10
-
11
-
12
-
13
-
 14
14 -
 15
15 -
 16
16 -
 17
17 -
 18
18 -
 19
19 -
 20
20 -
 21
21 -
 22
22 -
 23
23
 |
 |
