Harman Kardon AVP-1A Owners Manual - Page 5
appropriate interconnect
 |
View all Harman Kardon AVP-1A manuals
Add to My Manuals
Save this manual to your list of manuals |
Page 5 highlights
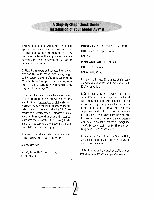
A Step-By-Step"Quick Guide" Installation of Your Model AVP1A I. You will require the following items: Left/right front speakers, two surround speakers, necessary audio amplifiers, and an audio-video source plus necessary interconnect cables. Additional options include a center channel speaker, and subwoofers or THX - certified loudspeaker components. 2. Place the speakers and connect them to your amplifiers. Be sure to observe proper polarity. A typical front speaker placement diagram is found on page 11. A dipolar surround speaker placement diagram is found on page 12. A Home THX Audio System block diagram is found on page 15. 3. Connect the appropriate interconnect cables between the outputs of the Model AVP1A to the audio amplifier inputs. Be sure to turn off the electronic crossover if you are not using a subwoofer. The push switch is found on the rear panel of the AVP1A. Also note that an electronic crossover is provided for a subwoofer on the surround channels as well. If your surround speakers have woofers of less than eight inches in diameter, we suggest that you leave the surround channel electronic crossover engaged. 4. Connect the output of an audio-video source such as a laser disc player or HiFi VCR to the AVP1A. 5. Turn on the AVP1A. b. Using the hand held remote control, set the following: MODE: Dolby Pro Logic or Home THX Cinema. CTR: On, if a center speaker is used. REF: On. INPUT CALIBRATE: Auto position. PAN: CTR position on. DELAY: Set to 20 ms. 7. Make sure the Bass EQ is turned off (full counterclockwise) and set the Input Level control to the 12 o'clock position. 8. On the front panel of the AVP1A, turn on the Noise Sequencer. The test signal will start at left front channel and go clockwise around the room. If you are not using side speakers, turn off the side channel output switch on the rear panel. Adjust the Output Trim Level controls so that the volume is the same from each speaker at the listening location. We recommend the use of a sound pressure level meter, if available, set for "C" weighting, "slow". Set each speaker for 85 dB sound level using the internal noise sequencer. 9. Turn off the Noise Sequencer. Select a Dolby Surround encoded movie on laser or hifi VCR to verify system performance. 10. Read the rest of this manual for additional information regarding the fine tuning of your system!
-
 1
1 -
 2
2 -
 3
3 -
 4
4 -
 5
5 -
 6
6 -
 7
7 -
 8
8 -
 9
9 -
 10
10 -
 11
11 -
12
-
13
-
14
-
15
-
16
-
17
-
18
-
19
-
20
-
21
-
22
-
23
-
24
-
25
-
26
-
27
-
28
-
29
-
30
-
31
-
32
 |
 |
