Hayward Pro-Grid Models: DE2420 DE3620 DE4820 DE6020 DE7220 - Page 6
Filter Control Valve Functions, Manual Cleaning - parts
 |
View all Hayward Pro-Grid manuals
Add to My Manuals
Save this manual to your list of manuals |
Page 6 highlights
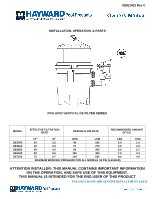
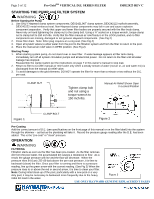
Page 6 of 12 Pro-GridTM VERTICAL D.E. SERIES FILTER ISDE2423 REV C To prevent unnecessary strain on piping system and valves, always shut off pump before switching Filter Control Valve positions. FILTER CONTROL VALVE FUNCTIONS Six-Position Vari-FloTM Filter Control Valve SP0710XR50 or SP0715XR50 (A) FILTER - Set valve to FILTER for normal filtering. Also use for regular Vacuuming. (B) BACKWASH - a. Shut off the pump. b. Set Filter Control Valve to BACKWASH. c. Start Pump and backwash approximately two minutes, or until water out waste line appears clean. d. Shut off pump. e. Set Control Valve to RINSE. f. Start pump and operate for 20 seconds. g. Shut off pump. h. Set Filter control valve to FILTER. i. Proceed as in Pre-Coating to add fresh D.E. (C) RINSE - Water Flows through the filter the same as in FILTER position, except that the water goes to WASTE. An optimal position used for pre-coating if a large cloud (pre-coat puff) is observed returning to pool during the pre-coating process. (D) WASTE - To bypass filter for draining or lowering water level and for vacuuming heavy debris directly to WASTE. (E) RECIRCULATE - Water is re-circulated through the pool system, bypassing the filter. (F) CLOSED - Shuts off flow from pump to filter. Four Position Selecta-FloTM Filter Control Valve SP0740DE (A) FILTER- Set valve to FILTER for normal filtering. Also use for regular Vacuuming. (B) WASTE- To bypass filter for draining or lowering water level and for vacuuming heavy debris directly to WASTE. (C) BACKWASH- a. Shut off the pump. b. Set Filter Control Valve to BACKWASH. c. Start Pump and backwash approximately two minutes, or until water out waste line appears clean. d. Shut off pump e. Set Filter control valve to FILTER. f. Proceed as in Pre-Coating to add fresh D.E. (D) POOL OR SPA BOOST - Water is re-circulated through the pool system, bypassing the filter. Two-Position Slide Valve SP0410X502S (A) FILTER - Set Valve to FILTER for normal filtering. Also use for vacuuming (Handle in Down position). (B) BACKWASH - a. Shut off the pump. b. Set valve to BACKWASH (UP position). c. Start Pump and backwash approximately two minutes, or until water out waste line appears clean. d. Shut off pump e. Set Filter control valve to FILTER (DOWN Position). f. Proceed as in Pre-Coating to add fresh D.E. for cleaning filter (Handle in Up position) MANUAL CLEANING Before manually cleaning the filter, backwash by following BACKWASHING instructions under each type of valve. WARNING This product should be installed and serviced only by a qualified professional. FILTER DISASSEMBLY INSTRUCTIONS 1. Turn off all system circulation pumps and all electric power on the pad. 2. Set all system valves in a position to prevent water flow to the filter. 3. The manual air relief valve must be placed in the OPEN position. (FIG 6) 4. Remove filter drain plug (FIG 4) and drain water from filter. 5. Using 3/4" wrenches, loosen and remove the clamp nut and the clamp bolt. (Fig 5) 6. Holding both ends of the filter body clamp carefully spread the clamp ends. Remove the clamp by lifting over the upper filter body. Do not to drop the clamp during removal because the clamp could be damaged. Do not strike the clamp with metal tools as they can damage the clamp. 7. Lift off upper filter body. Do not use the pressure gauge to lift the upper filter body. USE ONLY HAYWARD GENUINE REPLACEMENT PARTS
-
 1
1 -
 2
2 -
 3
3 -
 4
4 -
 5
5 -
 6
6 -
 7
7 -
 8
8 -
 9
9 -
 10
10 -
 11
11 -
 12
12
 |
 |
