Hayward Pro-Grid Models: DE2420 DE3620 DE4820 DE6020 DE7220 - Page 7
Filter Re-assembly Instructions - filter parts
 |
View all Hayward Pro-Grid manuals
Add to My Manuals
Save this manual to your list of manuals |
Page 7 highlights
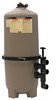
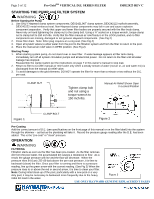
Page 7 of 12 Clamp Nut Pro-GridTM VERTICAL D.E. SERIES FILTER ISDE2423 REV C INITIAL CLEANING OF ELEMENT CLUSTER ASSEMBLY Before removing the element cluster assembly we recommend hosing it down with a strong stream from a garden hose or preferably with the Hayward cleaning wand (EC2024). Be sure the drain plug is not in place or the drain valve is open. Remove as much of the dirty D.E. and accumulated debris by flushing it out of the drain opening. This will allow for easier removal of the element cluster assembly. REMOVING ELEMENT CLUSTER Rock the element cluster assembly slightly from side to side to free the manifold from the vertical outlet elbow. The element cluster assembly may now be removed by lifting it straight up using the lift handles. Figure 4 CLEANING ELEMENT CLUSTER The filter element cluster can be cleaned by washing inside and outside with a garden hose. After hosing filter element cluster, for best results, carefully brush the surface to remove fine particles. Do Not Pressure Wash as it can damage the filter element cluster. You may find some debris on the filter element cluster, which may not have been removed with hosing. Figure 5 Clamp Bolt Figure 6 Manual Air Relief Shown in Open FILTER RE-ASSEMBLY INSTRUCTIONS WARNING CLEAN SEAL RING AND SEAL SURFACE 1. Remove filter tank seal. 2. With a clean cloth wipe the lower filter body seal surface. (Fig 4) Do not use a solvent. 3. With a clean cloth wipe the upper filter body seal surface. Notice: •Do not use any petroleum solvents to clean filter components. •Do not lubricate DEX2422Z2 Seal. RE-INSTALLING ELEMENT CLUSTER 1. Lubricate outlet elbow O-rings with Jack's Formula 327 Multilube. 2. Replace filter element cluster into filter tank, carefully fitting top collector manifold outlet over outlet elbow O-ring. USE ONLY HAYWARD GENUINE REPLACEMENT PARTS
-
 1
1 -
 2
2 -
 3
3 -
 4
4 -
 5
5 -
 6
6 -
 7
7 -
 8
8 -
 9
9 -
 10
10 -
 11
11 -
 12
12
 |
 |
