HealthRider Hr2 English Manual - Page 6
Maintenance And Troubleshooting
 |
View all HealthRider Hr2 manuals
Add to My Manuals
Save this manual to your list of manuals |
Page 6 highlights
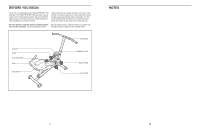
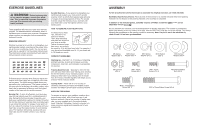
1. To make assembly easier, read the 1 information on page 5 before you begin. Press a Stabilizer Cap (11) onto each end of a Stabilizer (10). Attach the Stabilizer (10) to the front of the Frame (1) with two M10 x 75mm Button Screws (42) and two M10 Curved Washers (59). 10 42 59 11 1 59 11 2. Press a Stabilizer Cap (11) onto each end of the other Stabilizer (10). 2 Attach the Stabilizer (10) to the rear of the Frame (1) with two M10 x 75mm Button Screws (42) and two M10 Curved Washers (59). 3. Identify the Left Pedals (24), which are marked with "L" stickers. 3 Using an adjustable wrench, firmly tighten the Left Pedals counterclockwise into the Pedal Frame (5). Tighten the Right Pedals (25) clockwise into the Pedal Frame (5). IMPORTANT: Tighten all pedals as firmly as possible. After using the exerciser for one week, retighten the pedals. For best performance, keep the pedals tightened. 1 11 10 11 59 59 42 5 25 24 6 MAINTENANCE AND TROUBLESHOOTING Inspect and tighten all parts of the exerciser regularly. Replace any worn parts immediately. To clean the exerciser, use a damp cloth and a small amount of mild soap. IMPORTANT: To prevent damage to the console, keep liquid away from the console and keep the console out of direct sunlight. When storing the exerciser, remove the battery from the console. HOW TO REPLACE THE BATTERY ROLLER MAINTENANCE Clean the roller and the frame track regularly. Use a damp cloth and mild soap to remove dust and debris from the roller and the track on which it travels. If the display of the console becomes dim, the AAA battery should be replaced. See step 9 on page 8 and replace the old battery. Roller Track 11
-
 1
1 -
 2
2 -
 3
3 -
 4
4 -
 5
5 -
 6
6 -
 7
7 -
 8
8
 |
 |
