HealthRider Hr2 English Manual - Page 8
How To Use The Exerciser
 |
View all HealthRider Hr2 manuals
Add to My Manuals
Save this manual to your list of manuals |
Page 8 highlights
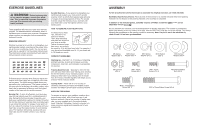
7. Orient a Seat Handlebar (9) as shown. 7 Attach the Seat Handlebar (9) to the Seat Carriage (3) with two M8 x 40mm Button Bolts (39), two M8 Curved Washers (60), and two M8 Locknuts (40). Attach the other Seat Handlebar (9) in the same way. 8. Loosen the Seat Knob (29). 8 Orient the Seat Carriage (3) as shown, and slide it onto the Seat Frame (2). Attach the Seat Carriage (3) with an M6 x 10mm Screw (55) and an M6 Spring Washer (56). Slide the Seat Carriage (3) forward or backward to the desired position and retighten the Seat Knob (29). 9 3 60 60 39 9 40 2 29 56 3 55 9. The Console (12) requires one AAA battery (not included); an alkaline battery is recommended. 9 Carefully pull the Console away from the Upper Console Shroud (13) as shown. Be careful not to disconnect the reed switch wire. Next, insert the battery into the holder on the back of the Console. Make sure that the battery is ori- ented as shown by the diagram on the back of the Console. Then, reinsert the Console into the Console Shroud. 12 Reed Switch Wire 13 10. Make sure that all parts are properly tightened. To protect the floor or carpet from damage, place a mat under the exerciser. 8 HOW TO USE THE EXERCISER ADJUSTING THE SEAT EXERCISING ON THE EXERCISER To adjust the position of the seat, loosen the seat knob, move Seat the seat forward or backward to the desired position, and then retighten the knob. To determine if the seat is properly adjusted, sit on the seat and pull the handlebar as close Seat Knob as possible to your stomach. Your legs should be almost straight, with your knees bent slightly. Sit on the seat, place your feet on the lower pedals, and hold the handlebar. Your hands can be positioned close together or far apart, or in an overhand or underhand grip. If necessary, adjust the position of the seat or the height of the handlebar. Handlebar ADJUSTING THE RESISTANCE To change the resis- tance, turn the collar at the front of the resistance cylinder. There are ten differ- Collar Resistance Cylinder ent resistance levels. A small arrow on the side of the resistance cylinder will show which resistance level is selected. CAUTION: The resistance cylinder becomes very hot during use. Allow the resistance cylinder to cool before touching it. When adjusting the resistance, touch only the resistance adjust- ment collar. ADJUSTING THE HANDLEBAR To adjust the height of the handlebar, loosen the handlebar knob, move the handlebar upward or downward to the desired position, and then retighten the knob into an adjustment hole in the handlebar. Make sure that the handlebar knob is engaged in an adjustment hole. Handlebar Handlebar Knob Seat Upper Pedals Lower Pedals To begin exercising, pull the handlebar toward your waist while pushing the pedals away with your legs. Return to the starting position. This completes one repetition. Repeat, moving with a smooth, continuous motion. For the best results, move through the full range of motion and maintain a steady pace. CAUTION: To avoid injury, keep your back straight; do not arch your back. Do no operate the exerciser without the cylinder shields in place. To focus on the muscles of the upper body, place your feet on the upper pedals as you exercise. Note: The console will automatically turn on when you begin exercising on the exerciser. The operation of the console is described on the following page. 9
-
 1
1 -
2
-
 3
3 -
 4
4 -
 5
5 -
 6
6 -
 7
7 -
 8
8
 |
 |
