HealthRider Hr2 English Manual - Page 7
How To Operate The Console
 |
View all HealthRider Hr2 manuals
Add to My Manuals
Save this manual to your list of manuals |
Page 7 highlights
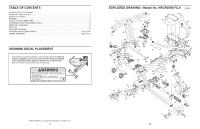
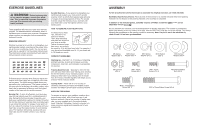
DESCRIPTION OF THE CONSOLE HOW TO OPERATE THE CONSOLE The console offers five modes that provide instant exercise feedback: 1. To turn on the power. Arrow • Time-This mode displays the elapsed time. Note: If you stop exercising for a few seconds, the Time mode will pause. • Reps/Min-This mode displays your exercise pace, in repetitions per minute. • Count-This mode displays the total number of repetitions you have completed, up to 9,999 repetitions. • Calories-This mode displays the approximate number of calories you have burned. • Scan-This mode displays the Time, Reps/Min, Count, and Calories modes, for a few seconds each, in a repeating cycle. Press the console button or simply begin exercising. 2. Select the desired mode. To select the Time, Reps/Min, Button Count, or Calories mode, press the console button repeatedly until an arrow points to the name of the desired mode. Make sure that the Scan mode is not selected. To select the Scan mode, press the console button repeatedly. While the Scan mode is selected, an arrow will show which mode is currently displayed. To reset the Time, Count, and Calories modes to zero, hold down the console button for a few seconds. 3. The console has an "auto-off" feature. If the pedals are not moved and the console button is not pressed for a few minutes, the power will turn off automatically to conserve the battery. 10 4. Orient the Pedal Frame (5) as shown, and then 4 insert the Pedal Frame into the Pivot Frame (6). Attach the Pedal Frame (5) with two M10 x 15mm Button Screws (48), two M10 Spring Washers (57), and two M10 Washers (58). 6 5 58 57 48 5. Orient the Handlebar (7) as shown. 5 Slide the Handlebar Sleeve (31) downward until the tab on the Handlebar Sleeve covers the indicated hole in the Handlebar (7). Loosen and remove the Handlebar Knob (28). Press the tab on the Handlebar Sleeve (31) and insert the Handlebar (7) and the Handlebar Sleeve into the Frame (1); make sure that the tab on the Handlebar Sleeve is in the indicated slot in the Frame. Slide the Handlebar (7) upward or downward to the desired height, and tighten the Handlebar Knob (28) into the Frame (1) and an adjustment hole in the Handlebar. Make sure that the Handlebar Knob is engaged in an adjustment hole in the Handlebar. 31 28 1 7 Tab Hole Slot 6. Orient the Seat (8) and the Seat Carriage (3) as shown. 6 Attach the Seat (8) to the Seat Carriage (3) with four M6 x 16mm Screws (41). Note: The Screws may be preattached to the underside of the Seat. 7 8 3 41 41
-
 1
1 -
 2
2 -
 3
3 -
 4
4 -
 5
5 -
 6
6 -
 7
7 -
 8
8
 |
 |
