HP 220mx HP SureStore 220mx Optical Jukebox User's Guide - Page 26
Connecting Power, Adjusting IDs, and, Turning the Jukebox
 |
View all HP 220mx manuals
Add to My Manuals
Save this manual to your list of manuals |
Page 26 highlights
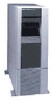
NOTE CAUTION NOTE NOTE Setting up the Jukebox Connecting Power, Adjusting IDs, and Turning the Jukebox On Connecting Power, Adjusting IDs, and Turning the Jukebox On If you are changing SCSI IDs on the host bus adapter to avoid conflicts, change the IDs before turning host power OFF. If you are changing IDs on one (or two) of this jukebox to avoid conflicts, the following steps include this option. 1. Ensure that your host computer is OFF and the jukebox standby/on switch is in the STANDBY position. 2. Plug the socket end of the power cord into the power port on the rear of the jukebox (see "1" on Figure 1-1). Use the power cord supplied with the jukebox. 3. Plug the other end of the power cord into a grounded electrical outlet. Placing the standby/on switch to STANDBY does not remove all power from the jukebox. To remove all power (including primary power) you must pull the jukebox power plug from the wall/floor receptacle. 4. Press the jukebox standby/on switch to ON. If you are connecting two libraries, place both libraries to ON. The remaining steps apply to both libraries. 5. Initially, TESTING appears in the display window on the front of the jukebox. Once the poweron test completes (approximately 1.5 minutes), READY displays. If FAIL 1 displays, the poweron test was not successful. Feel under the chassis at the location shown in Figure 1-3 to ensure that the shipping screw was removed. If the shipping screw was removed, refer to "Troubleshooting" in Chapter 3. 1-14 Chapter 1
-
 1
1 -
2
-
3
-
4
-
5
-
6
-
7
-
8
-
9
-
10
-
11
-
12
-
13
-
14
-
15
-
16
-
17
-
18
-
19
-
20
-
 21
21 -
 22
22 -
 23
23 -
 24
24 -
 25
25 -
 26
26 -
 27
27 -
 28
28 -
 29
29 -
 30
30 -
 31
31 -
32
-
33
-
34
-
35
-
36
-
37
-
38
-
39
-
40
-
41
-
42
-
43
-
44
-
45
-
46
-
47
-
48
-
49
-
50
-
51
-
52
-
53
-
54
-
55
-
56
-
57
-
58
-
59
-
60
-
61
-
62
-
63
-
64
-
65
-
66
-
67
-
68
-
69
-
70
-
71
-
72
-
73
-
74
-
75
-
76
-
77
-
78
-
79
-
80
-
81
-
82
-
83
-
84
-
85
-
86
-
87
-
88
-
89
-
90
-
91
-
92
-
93
-
94
-
95
-
96
-
97
-
98
-
99
-
100
-
101
-
102
-
103
-
104
-
105
-
106
-
107
-
108
 |
 |
