HP 353803-B22 HP StorageWorks 8Gb Simple SAN Connection Kit quick start instru - Page 4
The End User License Agreement EULA is displayed
 |
UPC - 808736781619
View all HP 353803-B22 manuals
Add to My Manuals
Save this manual to your list of manuals |
Page 4 highlights
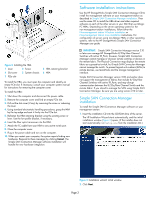
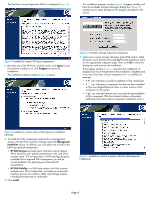
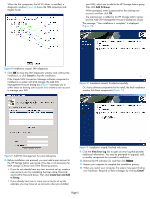
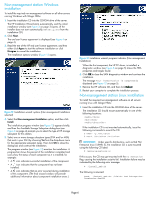
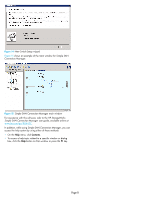
The End User License Agreement (EULA) is displayed (Figure 4). The installation progress window (Figure 7) appears briefly, and then the Available Storage Subsystem dialog box (Figure 6) prompts you to select the type of HP storage subsystem for this station. Figure 4 Installation wizard: HP license agreement 3. Read the text of the HP EULA, and then either click Agree to start the software installation or click Disagree to cancel the installation. The installation options window (Figure 5) opens. Figure 6 Available Storage Subsystem dialog box 6. Select one or more storage subsystem types (EVA and/or MSA) that exist in your SAN by choosing Yes from the drop-down menu for the appropriate subsystem types. Then click OK to close this dialog box and continue the installation. The progress window (Figure 7) monitors the installation. A progress bar shows the percent of the installation completed and icons show the status of each component as it is installed; for example: • A icon indicates successful installation of the component. • A icon indicates a component that has not been installed or that was skipped because there is a later version of the component in the system. • A icon indicates that an error occurred during installation of this component. (The final wizard window will provide additional information about component installation errors.) Figure 5 Installation wizard: options (Management Installation selected) 4. To install all of the components required for a management station with both EVA and MSA storage, select the Management Installation option. In addition, you can select one or both of the following optional components: • HP SAN Designer provides quick and easy ways to design SANs based on your specific performance, cost, and future storage needs. The tool generates a SAN topology diagram, a detailed list of required SAN components, as well as recommendations for planning your future growth requirements. • HP SAN Visibility is a SAN data analysis tool that securely analyzes your SAN configuration, providing an automated inventory process for switches, HBAs, and storage systems, including firmware version verification. 5. Click Install. Figure 7 Installation wizard: progress indicator (Management Installation) Page 4
-
 1
1 -
 2
2 -
 3
3 -
 4
4 -
 5
5 -
 6
6 -
 7
7 -
 8
8
 |
 |
