HP 4400 HP StorageWorks controller enclosure 4Gb array controller with embedde - Page 3
Installing a controller
 |
View all HP 4400 manuals
Add to My Manuals
Save this manual to your list of manuals |
Page 3 highlights
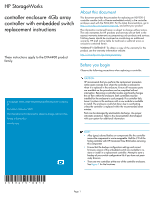
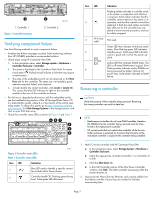
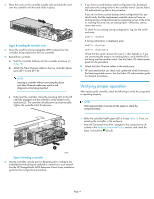
3. Remove the controller. a. Loosen the thumbscrew on the mounting latch and rotate the latch to the right (1, Figure 3). The controller will slightly eject from the enclosure. b. Position one hand under the controller, and with the other hand, pull the controller out of the enclosure (2). 6. Press the retaining clips outward to unlock each DIMM socket (1, Figure 6). This action releases the modules, and partially lifts the modules out of the socket. 2 1 1 2 15787 Figure 3 Removing a controller 4. Push the blue button on top of the controller module (1, Figure 4) and slide off the cover (2). Observe proper anti-static guidelines. 2 1 1 Figure 6 Removing a DIMM 7. Lift out each DIMM (2). 15795 Installing a controller 1. Press each DIMM from the removed controller into the same DIMM socket on the replacement controller (1, Figure 7). 1 2 15784 Figure 4 Removing the controller cover 5. Refer to Figure 5 for the location of the two DIMMs on the controller. 12 2 15764 Figure 7 Installing a DIMM 2. Press the retaining clips inward to lock each DIMM into the socket (2). 15788 1. Slot 1 (policy memory) 2. Slot 2 (cache memory) Figure 5 Location of controller DIMMs Page 3
-
 1
1 -
 2
2 -
 3
3 -
 4
4
 |
 |
