HP 640c (English) Macintosh Connect * Users Guide - Page 35
Using and Caring for Your Print Cartridges, Do - replacement parts
 |
UPC - 725184329418
View all HP 640c manuals
Add to My Manuals
Save this manual to your list of manuals |
Page 35 highlights
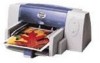
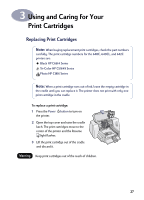
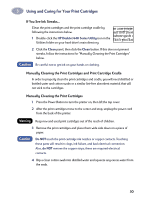
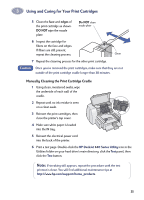
3 Using and Caring for Your Print Cartridges 4 Remove the replacement print cartridge from its packaging and carefully remove the protective vinyl tape. Do NOT touch the ink nozzles. Do NOT touch or remove the copper contacts. Do NOT touch the print cartridge ink nozzles or copper contacts. Touching these parts will result in clogs, ink failure, and bad electrical connection. Also, do NOT remove the copper strips; these are required electrical contacts. 5 Push the print cartridge firmly, straight down into the print cartridge cradle. 6 Close the cradle latch. When the latch is fully closed, you will hear a click. 7 Load plain white paper in the IN tray. 8 Plug in the power cord in the back of the printer. 9 Close the top cover. 10 If the Resume light continues to flash and if the cradles do not move to the right side of the printer, remove and reinstall the print cartridges. Make sure the print cartridges are pressed down into the cradles before you snap them forward into positions. If the Resume light continues to flash after you reinstall the new print cartridge, check the part number on the print cartridge to ensure you installed the correct one. 28
-
 1
1 -
2
-
3
-
4
-
5
-
6
-
7
-
8
-
9
-
10
-
11
-
12
-
13
-
14
-
15
-
16
-
17
-
18
-
19
-
20
-
21
-
22
-
23
-
24
-
25
-
26
-
27
-
28
-
29
-
 30
30 -
 31
31 -
 32
32 -
 33
33 -
 34
34 -
 35
35 -
 36
36 -
 37
37 -
 38
38 -
 39
39 -
 40
40 -
41
-
42
-
43
-
44
-
45
-
46
-
47
-
48
-
49
-
50
-
51
-
52
-
53
-
54
-
55
-
56
-
57
-
58
-
59
-
60
-
61
-
62
-
63
-
64
-
65
-
66
-
67
 |
 |