HP 712c (English) Windows Users Guide - C5894-60003 - Page 7
Load Paper in Your Printer
 |
View all HP 712c manuals
Add to My Manuals
Save this manual to your list of manuals |
Page 7 highlights
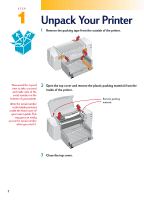
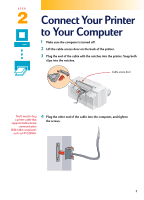
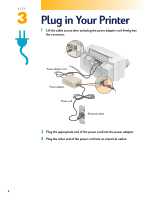
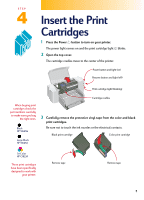
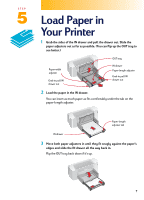
STEP 5 Load Paper in Your Printer 1 Grab the sides of the IN drawer and pull the drawer out. Slide the paper adjusters out as far as possible. (You can flip up the OUT tray to see better.) Paper-width adjuster Grab to pull IN drawer out OUT tray IN drawer Paper-length adjuster Grab to pull IN drawer out 2 Load the paper in the IN drawer. You can insert as much paper as fits comfortably under the tab on the paper-length adjuster. Paper-length adjuster tab IN drawer 3 Move both paper adjusters in until they fit snugly against the paper's edges and slide the IN drawer all the way back in. Flip the OUT tray back down if it's up. 7
-
 1
1 -
 2
2 -
 3
3 -
 4
4 -
 5
5 -
 6
6 -
 7
7 -
 8
8 -
 9
9 -
 10
10 -
 11
11 -
 12
12 -
13
-
14
-
15
-
16
-
17
-
18
-
19
-
20
-
21
-
22
-
23
-
24
-
25
-
26
-
27
-
28
-
29
-
30
-
31
-
32
-
33
-
34
-
35
-
36
-
37
-
38
-
39
-
40
-
41
-
42
-
43
-
44
-
45
-
46
-
47
-
48
-
49
-
50
-
51
-
52
-
53
-
54
-
55
-
56
-
57
-
58
-
59
-
60
-
61
-
62
-
63
-
64
-
65
-
66
-
67
-
68
-
69
-
70
-
71
-
72
-
73
-
74
-
75
-
76
-
77
-
78
-
79
-
80
-
81
-
82
-
83
-
84
-
85
-
86
-
87
-
88
-
89
-
90
 |
 |

7
Load Paper in
Your Printer
1
Grab the sides of the IN drawer and pull the drawer out. Slide the
paper adjusters out as far as possible. (You can flip up the OUT tray to
see better.)
2
Load the paper in the IN drawer.
You can insert as much paper as fits comfortably under the tab on the
paper-length adjuster.
3
Move both paper adjusters in until they fit snugly against the paper’s
edges and slide the IN drawer all the way back in.
Flip the OUT tray back down if it’s up.
OUT tray
IN drawer
Paper-length adjuster
Paper-width
adjuster
Grab to pull IN
drawer out
Grab to pull IN
drawer out
IN drawer
Paper-length
adjuster tab
STEP
5