HP 750c Service Manual - Page 156
Down Arrow, Power Supply PCA
 |
View all HP 750c manuals
Add to My Manuals
Save this manual to your list of manuals |
Page 156 highlights
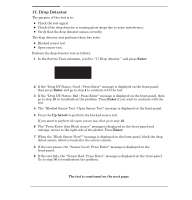
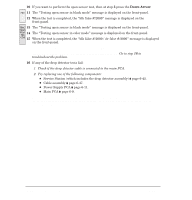
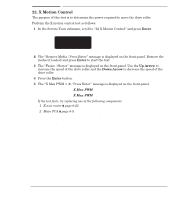
10 If you want to perform the open sensor test, then at step 5 press the Down Arrow. 700 11 The Testing open sensor in black mode" message is displayed on the frontĆpanel. 12 When the test is completed, the blk false #/2000" message is displayed on the frontĆpanel. 750C 13 The Testing open sensor in black mode" message is displayed on the frontĆpanel. 750C Plus 14 The Testing open sensor in color mode" message is displayed on the frontĆpanel. 755 CM 15 When the test is completed, the blk false #/2000 / clr false #/2000" message is displayed on the frontĆpanel. If the blk or clr false value (#) is less than 5 then press Enter. If the blk or clr false value (#) is more than 5 then the test has failed. Go to step 16 to troubleshoot the problem. 16 If any of the drop detector tests fail: 1 Check if the drop detector cable is connected to the main PCA. 2 Try replacing one of the following components: D Service Station (which includes the drop detector assembly) ' page 6Ć42. D Cable assembly ' page 6Ć47. D Power Supply PCA ' page 6Ć11. D Main PCA ' page 6Ć9. Only replace one component at a time and perform the "Drop Detector" test again before replacing another component. Using this procedure you will be able to determine exactly which component failed. 8-38 Troubleshooting C4705-90000
-
 1
1 -
2
-
3
-
4
-
5
-
6
-
7
-
8
-
9
-
10
-
11
-
12
-
13
-
14
-
15
-
16
-
17
-
18
-
19
-
20
-
21
-
22
-
23
-
24
-
25
-
26
-
27
-
28
-
29
-
30
-
31
-
32
-
33
-
34
-
35
-
36
-
37
-
38
-
39
-
40
-
41
-
42
-
43
-
44
-
45
-
46
-
47
-
48
-
49
-
50
-
51
-
52
-
53
-
54
-
55
-
56
-
57
-
58
-
59
-
60
-
61
-
62
-
63
-
64
-
65
-
66
-
67
-
68
-
69
-
70
-
71
-
72
-
73
-
74
-
75
-
76
-
77
-
78
-
79
-
80
-
81
-
82
-
83
-
84
-
85
-
86
-
87
-
88
-
89
-
90
-
91
-
92
-
93
-
94
-
95
-
96
-
97
-
98
-
99
-
100
-
101
-
102
-
103
-
104
-
105
-
106
-
107
-
108
-
109
-
110
-
111
-
112
-
113
-
114
-
115
-
116
-
117
-
118
-
119
-
120
-
121
-
122
-
123
-
124
-
125
-
126
-
127
-
128
-
129
-
130
-
131
-
132
-
133
-
134
-
135
-
136
-
137
-
138
-
139
-
140
-
141
-
142
-
143
-
144
-
145
-
146
-
147
-
148
-
149
-
150
-
 151
151 -
 152
152 -
 153
153 -
 154
154 -
 155
155 -
 156
156 -
 157
157 -
 158
158 -
 159
159 -
 160
160 -
 161
161 -
162
-
163
-
164
-
165
-
166
-
167
-
168
-
169
-
170
-
171
-
172
-
173
-
174
-
175
-
176
-
177
-
178
-
179
-
180
-
181
-
182
-
183
-
184
-
185
-
186
-
187
-
188
-
189
-
190
-
191
-
192
-
193
-
194
-
195
-
196
-
197
-
198
-
199
-
200
-
201
-
202
-
203
-
204
-
205
-
206
-
207
-
208
-
209
-
210
-
211
-
212
-
213
-
214
-
215
-
216
-
217
-
218
-
219
-
220
-
221
-
222
-
223
-
224
-
225
-
226
-
227
-
228
-
229
-
230
-
231
-
232
-
233
-
234
-
235
-
236
-
237
-
238
-
239
-
240
-
241
-
242
-
243
-
244
-
245
-
246
-
247
-
248
-
249
-
250
-
251
-
252
-
253
-
254
-
255
-
256
-
257
-
258
-
259
-
260
-
261
-
262
-
263
-
264
-
265
-
266
-
267
-
268
-
269
-
270
-
271
-
272
-
273
-
274
-
275
-
276
-
277
-
278
-
279
-
280
-
281
-
282
-
283
-
284
-
285
-
286
-
287
-
288
 |
 |