HP A826 Basics Guide
HP A826 - PhotoSmart Home Photo Center Color Inkjet Printer Manual
 |
UPC - 883585093014
View all HP A826 manuals
Add to My Manuals
Save this manual to your list of manuals |
HP A826 manual content summary:
- HP A826 | Basics Guide - Page 1
HP Photosmart A820 series Basics Guide Guía básica - HP A826 | Basics Guide - Page 2
permission of Hewlett-Packard, except as allowed under copyright laws. The only warranties for HP products and services are set forth countries. The Bluetooth trademarks are owned by its proprietor and used by Hewlett-Packard Company under license. Avisos de Hewlett-Packard Company La informaci - HP A826 | Basics Guide - Page 3
HP Photosmart A820 series HP Photosmart A820 series Basics Guide English - HP A826 | Basics Guide - Page 4
clip art...19 Create albums...20 Specialty printing projects 21 4 Troubleshooting and support Printing and hardware issues 21 Find more information...22 HP support...23 Regulatory model identification number SDGOA-0703 23 HP Warranty...24 Printer specifications...24 4 HP Photosmart A820 series - HP A826 | Basics Guide - Page 5
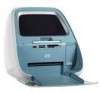
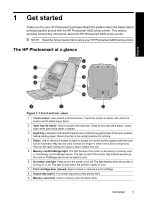
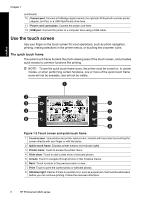
the basics about printing beautiful photos with the HP Photosmart A820 series printer. This section provides introductory information about the HP Photosmart A820 series printer. NOTE: Read the Setup Guide first to setup your HP Photosmart A820 series printer. The HP Photosmart at a glance English - HP A826 | Basics Guide - Page 6
to return to the previous menu or view. 7 Print: Touch to print the current photo or selected photos. 8 Attention light: Flashes if there is a printer error, such as a paper jam, that must be addressed before you can continue printing. Follow the onscreen directions. 6 HP Photosmart A820 series - HP A826 | Basics Guide - Page 7
. When you insert a memory card or connect a photo storage device to the printer, thumbnails of up to nine photos on the card or device appear on the touchscreen. To see a photo larger, touch the center of the photo to enter 1-up view. English Figure 1-3 Photo views 1 Thumbnail or "9-up" view: In - HP A826 | Basics Guide - Page 8
the photo 90 degrees clockwise for each touch of the icon. Red-eye: Appears only in 1-up view. Appears on a photo that has red-eye removed. The icon flashes on a photo undergoing red-eye removal. Video: Appears only on a video clip. Touch to play the video clip. 8 HP Photosmart A820 series - HP A826 | Basics Guide - Page 9
How to use the printer menus The printer menus contain many features for printing photos, changing print settings, and more. English Figure 1-4 Printer menus 1 Menu name: The name of the current menu. 2 Menu option: Touch a menu option to select it. 3 Menu scroll arrows: Touch to scroll through - HP A826 | Basics Guide - Page 10
the memory card out of your camera and insert it into the printer to print your photos. Insert a memory card into the appropriate slot with the label facing up and the metal contacts going in first. Refer to the figure to select the correct slot for your memory card. 10 HP Photosmart A820 series - HP A826 | Basics Guide - Page 11
) Print from a memory card This section describes several ways to print photos from a memory card, including one photo, multiple photos, multiple copies of the same photo, and so on. One touch photo prints 1. Scroll through the photos on the inserted memory card by touching the and buttons on the - HP A826 | Basics Guide - Page 12
printing. Remove red-eye from your photos The printer provides a way to reduce red-eye that can occur in photos taken with a flash. Red-eye removal only affects the way the photo prints as the edit is not saved with the photo. Your original photo remains unchanged. 12 HP Photosmart A820 series - HP A826 | Basics Guide - Page 13
your desktop, double-click the HP Photosmart CD icon. 2. Click Next and follow the onscreen 4. Double-click the HP Installer icon, and instructions. follow the instructions on each installation 3. When prompted, connect one end of the screen to install the printer software. USB cable to the - HP A826 | Basics Guide - Page 14
Load HP Advanced Photo paper in the input tray in preparation for the print cartridge alignment. 3. Open the print cartridge door of the printer. 4. Remove the bright pink tape from the cartridge. NOTE: Do not touch the copper-colored contacts on the print cartridge. 14 HP Photosmart A820 series - HP A826 | Basics Guide - Page 15
lets you recycle used print cartridges free of charge. For more information, go to www.hp.com/hpinfo/globalcitizenship/environment/recycle/ inkjet.html. 3 Creative projects Get creative Maximize the impact of your photos by applying creative features and effects! The printer enables you to draw or - HP A826 | Basics Guide - Page 16
viewing a photo in 1-up view. TIP: To access the 1-up view, touch the center of the photo in the part of anything you have drawn. After a drawing has been added to a photo, you can later delete it by touching the Get Creative button in 1-up view and then touching Remove Drawing. 16 HP Photosmart - HP A826 | Basics Guide - Page 17
by touching the Rotate button. 6. When you are finished, touch Done. 7. In the Add Frame To dialog box, touch This Photo or All photos, as desired. After a frame has been added to a photo, you can later delete it by touching the Get Creative button in 1-up view and then touching Remove Frame. Follow - HP A826 | Basics Guide - Page 18
photo by using the touch screen keyboard. You can select from five fonts and six colors for the text. The keyboard is in the language set you chose for the printer display, so long as the language uses roman characters. For non-roman languages, the English keyboard is displayed. 18 HP Photosmart - HP A826 | Basics Guide - Page 19
can select from several categories, including: Seasonal, Kids, General, and Special. English To use the Clip Art creative option 1. Touch Get Creative when viewing a photo in 1-up view. 2. Touch the Clip Art creative option. Use the onscreen arrows to navigate to this option if it is not visible - HP A826 | Basics Guide - Page 20
desired positions. NOTE: If the template has both portrait and landscape positions, note that photos will rotate only into positions with the same orientation as themselves. 9. Touch to print the album. NOTE: Deleting a photo used in an album also deletes the album. 20 HP Photosmart A820 series - HP A826 | Basics Guide - Page 21
and support Before contacting HP support, read this section for troubleshooting tips or go to the online support services at www.hp.com/support. Printing and hardware issues • The printout did not appear • Print quality is poor • I lost my stylus The printout did not appear Cause: The paper jammed - HP A826 | Basics Guide - Page 22
the printer, install the HP Photosmart software, and print a photo. Read this document first. • Basics Guide: This is the book you are reading. It describes the features of the printer, explains how to use the printer without connecting it to a computer, and contains troubleshooting tips and support - HP A826 | Basics Guide - Page 23
following features: • Fast access to qualified online support specialists • Software and driver updates for the HP Photosmart • Valuable HP Photosmart and troubleshooting information for common problems • Proactive device updates, support alerts, and HP newsgrams that are available when you register - HP A826 | Basics Guide - Page 24
Chapter 4 HP Warranty English Printer specifications For a complete list of specifications, see the online Help. For help on accessing the online Help, see "Find more information" on page 22. 24 HP Photosmart A820 series - HP A826 | Basics Guide - Page 25
Supported media types and sizes Paper photo quality: HP Advanced Photo paper Photo paper 13 x 18 cm (5 x 7 inches) Photo paper 10 x 15 cm (4 x 6 inches) Photo paper photo sticker paper, only load a single sheet at a time Output tray: 100 sheets North America Power requirements: HP Part : HP Part #0957 - HP A826 | Basics Guide - Page 26
Chapter 4 English 26 HP Photosmart A820 series - HP A826 | Basics Guide - Page 27
HP Photosmart A820 series Guía básica de HP Photosmart A820 series Español - HP A826 | Basics Guide - Page 28
de sus fotografías 37 Imprimir desde un equipo ...37 Instale el software y conecte el cable USB 38 Transferir fotografías desde una tarjeta de memoria HP...48 Número normativo de identificación de modelo SDGOA-0703 49 Garantía de HP ...50 Especificaciones de la impresora 50 Español 28 HP Photosmart - HP A826 | Basics Guide - Page 29
A820 series. Esta sección ofrece información básica acerca de la impresora HP Photosmart A820 series. Nota Primero lea esta guía de instalación para instalar su impresora HP Photosmart A820 series. El HP Photosmart de un vistazo Español 8 Figura 1-1 Vistas frontal y posterior 1 Pantalla táctil - HP A826 | Basics Guide - Page 30
Puerto de la cámara: conecte aquí una cámara digital PictBridge, el adaptador de impresora inalámbrico HP Bluetooth opcional, un iPod o una unidad flash o de almacenamiento USB. 11 Conexión del cable de impresora: Toque este botón para acceder al menú de la impresora. 30 HP Photosmart A820 series - HP A826 | Basics Guide - Page 31
vista 9 en 1. 3 Círculo de selección: Toque el círculo de la parte inferior izquierda de una foto para seleccionar la foto para imprimirla o para utilizar otra la impresora La barra de estado de la impresora aparece en la parte superior de la mayoría de las pantallas. La información disponible var - HP A826 | Basics Guide - Page 32
fotografía se imprime. Copias: Toque en la vista 1 en 1 de una fotografía seleccionada para cambiar el número de copias que se imprimirá. Español 32 HP Photosmart A820 series - HP A826 | Basics Guide - Page 33
Iconos de fotografía (continúa) Icono de fotografía Descripción del producto Casilla de selección: Aparece un marco con una marca en la fotografía seleccionada. toque esta opción para seleccionar o anular la selección de una fotografía o un fotograma de un vídeo. Girar: Aparece solo en la vista - HP A826 | Basics Guide - Page 34
Nota Cargue sólo un tipo y tamaño de papel a la vez. No mezcle tipos o tamaños de papel en la bandeja de entrada. Español 34 HP Photosmart A820 series - HP A826 | Basics Guide - Page 35
bandeja de entrada. 3. Cargue hasta 100 hojas de Papel fotográfico avanzado HP en la bandeja de entrada con la parte satinada orientada hacia la parte frontal de la impresora. Cuando cargue el papel, ajústelo hacia la parte izquierda de la bandeja de entrada y empújelo hacia abajo con firmeza hasta - HP A826 | Basics Guide - Page 36
la tarjeta de memoria insertada. Realzar o editar sus fotografías Puede realizar o editar sus fotografías de varias formas, tal como se explica a continuación: 36 HP Photosmart A820 series - HP A826 | Basics Guide - Page 37
vuelva a activarla. La corrección de fotografías siempre está activada para la impresión Bluetooth o PictBridge. Eliminar el efecto de ojos rojos de sus fotografías La impresora permite de imprimir desde el equipo, debe instalar el programa HP Photosmart y conectar Imprimir desde un equipo 37 - HP A826 | Basics Guide - Page 38
separado. Instale el software y conecte el cable USB Usuarios de Windows Usuarios de Mac Importante: no conecte el cable USB hasta 1. Conecte un extremo del cable USB al que lo indique la impresora. puerto USB situado en la parte posterior de 1. Inserte el CD de HP Photosmart en la unidad de - HP A826 | Basics Guide - Page 39
limpias y facilita el paso correcto de la tinta. También se deja parte de la tinta en el cartucho después de su utilización. Para más información, visite www.hp.com/go/inkusage. Utilice el cartucho de impresión HP 110 Tri-color Inkjet para imprimir fotografías en blanco y negro, y de color. Precauci - HP A826 | Basics Guide - Page 40
usados de forma gratuita. Para obtener más información, visite www.hp.com/hpinfo/globalcitizenship/environment/recycle/inkjet.html 3 Proyectos creativos Creatividad Maximice el impacto de sus fotos lápiz suministrado con la impresora o un lápiz de repuesto homologado. 40 HP Photosmart A820 series - HP A826 | Basics Guide - Page 41
piz para dibujar o escribir en la fotografía actual. Puede tocar el botón de borrador de la pantalla táctil para cambiar a esa herramienta y borrar parte del dibujo. Después de haber agregado un dibujo a una fotografía, podrá eliminarlo si toca el botón Creatividad en la vista 1 en 1 y, a continuaci - HP A826 | Basics Guide - Page 42
opción creativa Galería de diseño le permite aplicar efectos especiales. Puede modificar el efecto si cambia la configuración disponible para ese efecto. Español 42 HP Photosmart A820 series - HP A826 | Basics Guide - Page 43
Para usar la opción creativa Galería de diseño 1. Toque Creatividad cuando vea una fotografía en la vista 1 en 1. 2. Toque la opción creativa Galería de diseño. Utilice las flechas de la pantalla para desplazarse a esta opción si no está visible. 3. Si desea modificar el aspecto del efecto en la - HP A826 | Basics Guide - Page 44
Álbumes le permite agregar fotografías a los libros fotográficos e imprimirlos. Puede seleccionar varias categorías, incluidas las siguientes: estaciones, niños, general y especial. 44 HP Photosmart A820 series - HP A826 | Basics Guide - Page 45
Español Para usar la opción creativa Álbumes 1. Toque Creatividad cuando vea una fotografía en la vista 1 en 1. 2. Toque la opción creativa Álbumes. Utilice las flechas de la pantalla para desplazarse a esta opción si no está visible. Nota Si desea aplicar el zoom o rotar una fotografía, hágalo - HP A826 | Basics Guide - Page 46
o visite los servicios de asistencia en línea en el sitio Web www.hp.com/support. Problemas de impresión y hardware • No se imprimió la copia • Mala calidad de impresión • He perdido mi lápiz No se imprimió la copia Causa: El papel se atasca al imprimir. Español 46 HP Photosmart A820 series - HP A826 | Basics Guide - Page 47
continuación tire con cuidado del papel atascado para extraerlo por la parte posterior de la impresora. • Levante la bandeja de entrada hasta tipo de papel admitido por la impresora. Utilice papel fotográfico Avanzado HP para obtener los mejores resultados al imprimir fotografías. • Utilice papel - HP A826 | Basics Guide - Page 48
la solución de problemas de software. Una vez que haya instalado el software HP Photosmart en el equipo, podrá HP Photosmart. 2. Visite el sitio Web de asistencia en línea de HP que se encuentra en www.hp.com/ support. La asistencia en línea de HP se encuentra disponible para todos los clientes de HP - HP A826 | Basics Guide - Page 49
á una lista de números de teléfono de asistencia técnica en la parte interior de la cubierta posterior. Número normativo de identificación de modelo SDGOA- No debe confundirse este número normativo con el nombre comercial (HP Photosmart A820 series) o el número de producto (Q8546A). Español - HP A826 | Basics Guide - Page 50
ítulo 4 Garantía de HP Español Especificaciones de la impresora Para obtener una lista completa de especificaciones, vea la Ayuda en línea. Para obtener ayuda sobre cómo acceder a la Ayuda en línea, consulte la sección "Cómo buscar más información" en la página 48. 50 HP Photosmart A820 series - HP A826 | Basics Guide - Page 51
a 2080 % HR Tipos y tamaños de Soportes recomendados para obtener la mejor calidad fotográfica: soportes de impresión Papel fotográfico avanzado de HP admitidos Papel fotográfico 13 x 18 cm (5 x 7 pulgadas) Papel fotográfico 10 x 15 cm (4 x 6 pulgadas) Papel fotográfico con pestaña 10 x 15 cm - HP A826 | Basics Guide - Page 52
Capítulo 4 Español 52 HP Photosmart A820 series - HP A826 | Basics Guide - Page 53
-
 1
1 -
 2
2 -
 3
3 -
 4
4 -
 5
5 -
 6
6 -
 7
7 -
8
-
9
-
10
-
11
-
12
-
13
-
14
-
15
-
16
-
17
-
18
-
19
-
20
-
21
-
22
-
23
-
24
-
25
-
26
-
27
-
28
-
29
-
30
-
31
-
32
-
33
-
34
-
35
-
36
-
37
-
38
-
39
-
40
-
41
-
42
-
43
-
44
-
45
-
46
-
47
-
48
-
49
-
50
-
51
-
52
-
53
 |
 |
HP Photosmart A820 series
Guía básica
Basics Guide