HP A9890A HP A9890A Smart Array 6402 Controller Installation Guide - Page 28
Smart Array 6402 Windows Quick Installation, Installing the Smart Array 6402 Controller
 |
UPC - 829160079530
View all HP A9890A manuals
Add to My Manuals
Save this manual to your list of manuals |
Page 28 highlights
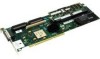
Smart Array 6402 Controller Windows Installation Smart Array 6402 Windows Quick Installation Smart Array 6402 Windows Quick Installation This chapter provides Windows installation information for the RAID Smart Array 6402, A9890A controller. The procedure for installing the controller can be split into several phases. The sequence in which you must perform the phases depends on the type of server. CAUTION Smart Array 6402 controllers contain electronic components that can easily be damaged by small amounts of electricity. To avoid damage, follow these guidelines: • Store controllers in their anti-static plastic bags until installation. • Work in a static-free area, if possible. • Handle controllers by the edges only. Do not touch electronic components or electrical traces. • Use a grounding wrist strap. • Use a suitable ground-any exposed metal surface on the computer chassis. Installing the Smart Array 6402 Controller The controller comes pre-configured. You do not have to set any jumpers or connectors. Step 1. Access the system controller bay • If the system is running, shut it down. • Wait for the system to shut down completely, and then power off the system. • Open the system to gain access to the PCI backplane. • For better performance, insert the controller into the highest performance PCI slot available. Step 2. Install the controller • Slide the controller edge-connector into the PCI slot until it is fully seated. • Secure the controller and reassemble the system. 28 Chapter 3
-
 1
1 -
2
-
3
-
4
-
5
-
6
-
7
-
8
-
9
-
10
-
11
-
12
-
13
-
14
-
15
-
16
-
17
-
18
-
19
-
20
-
21
-
22
-
 23
23 -
 24
24 -
 25
25 -
 26
26 -
 27
27 -
 28
28 -
 29
29 -
 30
30 -
 31
31 -
 32
32 -
 33
33 -
34
-
35
-
36
-
37
-
38
-
39
-
40
-
41
-
42
-
43
-
44
 |
 |
