HP A9890A HP A9891A Smart Array 6404 Controller Installation Guide - Page 21
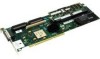
Connecting Controller For Internal Storage - internal raid 5
 |
UPC - 829160079530
View all HP A9890A manuals
Add to My Manuals
Save this manual to your list of manuals |
Page 21 highlights
Smart Array 6404 Controller OpenVMS Installation Smart Array 6404 OpenVMS Quick Installation Step 1. Access the system controller bay • If the system is running, shut it down. • Wait for the system to shut down completely, and then power off the system. • Open the system to gain access to the PCI backplane. • For better performance, insert the controller into the fastest performance PCI slot available. Step 2. Install the controller • Slide the controller edge-connector into the PCI slot until it is fully seated. • Secure the controller and reassemble the system. Connecting Controller For Internal Storage This section provides information on how to connect the Smart Array 6404 controller for internal storage. For more information on cable routing review the latest edition of the Smart Array (A9891A) Cable Routing on docs.hp.com. Step 1. Power down the system and open any access panels and covers giving you access to the internal SCSI cabling and the PCI slots. Step 2. Install the Smart Array PCI-X RAID card (A9891A) in a full-length PCI slot. There may be a specific slot required on your server, please see your server documentation for details. Step 3. Remove the SCSI cable(s) connecting the internal disks to the built-in SCSI controller. Step 4. Route the new SCSI cables(s) from the internal disks to the Smart Array cards. Step 5. Replace access panels and covers CAUTION Do not operate the server for long periods without the access panel installed. Operating the server without the access panel results in improper airflow and improper cooling that can lead to thermal damage. WARNING To reduce the risk of personal injury or damage to the equipment, consult the safety information and user documentation provided with your server before attempting installation. Many computers are capable of producing energy levels that are considered hazardous. These computers are intended to be serviced by qualified personnel trained to deal with those hazards. Do not remove enclosures or attempt to bypass any interlocks that may be provided for the purpose of removing these hazardous conditions. Chapter 2 21
-
 1
1 -
2
-
3
-
4
-
5
-
6
-
7
-
8
-
9
-
10
-
11
-
12
-
13
-
14
-
15
-
 16
16 -
 17
17 -
 18
18 -
 19
19 -
 20
20 -
 21
21 -
 22
22 -
 23
23 -
 24
24 -
 25
25 -
 26
26 -
27
-
28
-
29
-
30
 |
 |
