HP AJ765A HP StorageWorks RDX Removable Disk Backup System User Guide (484933- - Page 24
Media
 |
UPC - 883585922024
View all HP AJ765A manuals
Add to My Manuals
Save this manual to your list of manuals |
Page 24 highlights
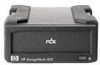
1. cartridge activity LED 3. emergency reset hole Figure 11 Front panel 2. eject button / power LED NOTE: On the internal model, the Eject button is to the right of the cartridge slot. Media For best performance we recommend HP branded media. The RDX Removable Backup System supports any HP RDX cartridge. Cartridges are available in different capacities to support your storage requirements. Order online at: http://www.hp.com/go/storagemedia. Write-protecting cartridges If you want to protect the data on a cartridge from being altered or overwritten, you can write-protect the cartridge. 1. Eject the cartridge from the RDX Removable Disk Backup System. 2. The write-protect tab is on the rear of the cartridge, see "Inserting a cartridge" on page 25. • When the cartridge is write-protected, the padlock icon is closed. • When the cartridge is write-enabled, the padlock icon is open. Handling cartridges Although cartridges are ruggedly built, they must be handled with care to ensure data integrity and long life. Observe the following precautions: • Store cartridges in their protective cases when you are not using them. • Do not stack cartridges. • Keep cartridges away from dust, dirt and moisture. • Avoid direct sunlight, heat sources and temperature extremes or rapid changes in temperature. • Do not drop cartridges or handle them roughly. • Never try to force the cartridge into the unit. If it is difficult to insert, check the orientation and try again. Use the keyed corner as a guide to correct alignment, see "Inserting a cartridge" on page 25. 24 Operating your RDX Removable Disk Backup System
-
 1
1 -
2
-
3
-
4
-
5
-
6
-
7
-
8
-
9
-
10
-
11
-
12
-
13
-
14
-
15
-
16
-
17
-
18
-
 19
19 -
 20
20 -
 21
21 -
 22
22 -
 23
23 -
 24
24 -
 25
25 -
 26
26 -
 27
27 -
 28
28 -
 29
29 -
30
-
31
-
32
-
33
-
34
-
35
-
36
-
37
-
38
 |
 |
