HP AiO400r HP StorageWorks All-in-One Storage System Quick Start Instructions - Page 3
Prepare for installation
 |
View all HP AiO400r manuals
Add to My Manuals
Save this manual to your list of manuals |
Page 3 highlights
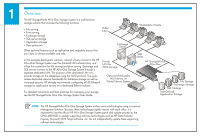
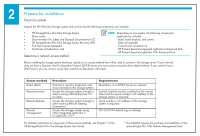
2 Prepare for installation Check kit contents Unpack the HP All-in-One Storage System and confirm that the following components are included: • HP StorageWorks All-in-One Storage System • Power cords • Documentation Kit, Safety and Disposal Documentation CD • HP StorageWorks All-in-One Storage System Recovery DVD • End User License Agreement • Certificate of Authenticity card Determine a network access method NOTE: Depending on your system, the following components might also be included: - Bezel, bezel brackets, and screws - Slide rail assembly - Tower-to-rack conversion kit - HP ProLiant Essentials Integrated Lights-Out 2 Advanced Pack - HP ProLiant Essentials Lights-Out 100i Advanced Pack Before installing the storage system hardware, decide on an access method that will be used to connect to the storage server. If your network does not have a Dynamic Host Configuration Protocol (DHCP) server, you must connect using the direct attach method. If your network has a DHCP server, you can connect using other methods as described in this table. Access method Direct attach Remote browser Remote desktop Remote management Procedure Connect a monitor, keyboard, and mouse directly to the storage system. Access the storage system through a client running Internet Explorer 5.5 (or later). Access the storage system through a client running Remote Desktop Connection. Access the storage system using either Integrated Lights-Out 2 or Lights-Out 100*. Requirements Mandatory if no DHCP server on network. ActiveX controls must be enabled on the remote client and the serial number or IP address of the storage system is required. Serial number or IP address of the storage system is required. iLO 2/LO100 default log on settings. For detailed instructions on using each of these access methods, see Chapter 1 of the HP StorageWorks All-in-One Storage System User Guide. * The AiO400t requires the purchase and installation of the optional Lights-Out 100c Remote Management Card.
-
 1
1 -
 2
2 -
 3
3 -
 4
4 -
 5
5 -
 6
6 -
 7
7 -
 8
8
 |
 |
