HP Business Inkjet 3000 HP Business Inkjet 3000 series printers - (English) Us - Page 126
Clearing jams, To clear jams in Tray 2 or optional Tray 3
 |
View all HP Business Inkjet 3000 manuals
Add to My Manuals
Save this manual to your list of manuals |
Page 126 highlights
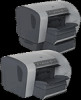
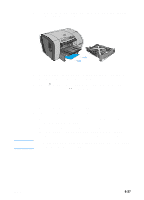
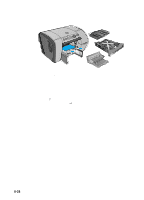
Note Clearing jams Because media might be jammed in more than one location inside the printer, check the LCD control panel for information about the jam location. Then follow the procedures that correspond with the displayed message. To clear an all pages jam, complete all four procedures in the order that they appear in this section. Press (down arrow button) on the LCD control panel for more information about the jam. If the media tears when you try to remove it, make sure that all media fragments are removed from the printer before resuming printing. After the jam is cleared, the printer will attempt to reprint jammed pages when sufficient memory is available. For more information about this feature or to change the jam recovery setting, see "Jam recovery." To clear jams in Tray 2 or optional Tray 3 1 Pull out the tray indicated on the LCD control panel (where X = 2 or 3), and place it on a flat surface. If clearing a jam in optional Tray 3, grasp the handle below Tray 3 and pull it out until you feel some resistance. Use your other hand to grasp the side of the tray and lift up slightly. Remove Tray 3 from the printer and place it on a sturdy, level surface that completely supports the tray. Note Optional Tray 3 is heavy. If clearing a jam in Tray 3, use two hands when removing and inserting the tray. 2 Remove any wrinkled or curled media from the tray. Make sure the media width and length guides fit snugly but gently against the edges of the media stack. WARNING! The printer contains metal parts that might be hot. Avoid touching the metal parts inside the printer. 8-26 ENWW
-
 1
1 -
2
-
3
-
4
-
5
-
6
-
7
-
8
-
9
-
10
-
11
-
12
-
13
-
14
-
15
-
16
-
17
-
18
-
19
-
20
-
21
-
22
-
23
-
24
-
25
-
26
-
27
-
28
-
29
-
30
-
31
-
32
-
33
-
34
-
35
-
36
-
37
-
38
-
39
-
40
-
41
-
42
-
43
-
44
-
45
-
46
-
47
-
48
-
49
-
50
-
51
-
52
-
53
-
54
-
55
-
56
-
57
-
58
-
59
-
60
-
61
-
62
-
63
-
64
-
65
-
66
-
67
-
68
-
69
-
70
-
71
-
72
-
73
-
74
-
75
-
76
-
77
-
78
-
79
-
80
-
81
-
82
-
83
-
84
-
85
-
86
-
87
-
88
-
89
-
90
-
91
-
92
-
93
-
94
-
95
-
96
-
97
-
98
-
99
-
100
-
101
-
102
-
103
-
104
-
105
-
106
-
107
-
108
-
109
-
110
-
111
-
112
-
113
-
114
-
115
-
116
-
117
-
118
-
119
-
120
-
 121
121 -
 122
122 -
 123
123 -
 124
124 -
 125
125 -
 126
126 -
 127
127 -
 128
128 -
 129
129 -
 130
130 -
 131
131 -
132
-
133
-
134
-
135
-
136
-
137
-
138
-
139
-
140
-
141
-
142
-
143
-
144
-
145
-
146
-
147
-
148
-
149
-
150
-
151
-
152
-
153
-
154
-
155
-
156
-
157
-
158
-
159
-
160
-
161
-
162
-
163
-
164
-
165
-
166
-
167
-
168
-
169
-
170
-
171
-
172
-
173
-
174
-
175
-
176
-
177
-
178
-
179
-
180
-
181
-
182
-
183
-
184
-
185
-
186
-
187
-
188
-
189
-
190
-
191
-
192
-
193
-
194
-
195
-
196
-
197
-
198
 |
 |