HP Cisco MDS 9124 Cisco MDS 9500 Series Hardware Installation Guide (OL-17467- - Page 194
Installing an SFP Transceiver, Removing and Installing Cables into SFP Transceivers
 |
View all HP Cisco MDS 9124 manuals
Add to My Manuals
Save this manual to your list of manuals |
Page 194 highlights
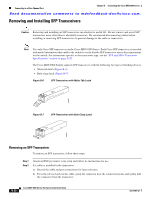
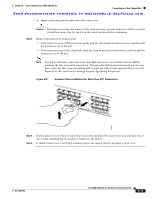
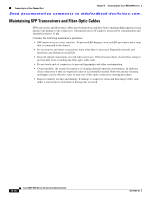
Connecting to a Fibre Channel Port Chapter B Connecting the Cisco MDS 9500 Series Send documentation comments to [email protected]. Installing an SFP Transceiver To install an SFP transceiver, follow these steps: Step 1 Step 2 Step 3 Step 4 Attach an ESD-preventive wrist strap and follow its instructions for use. Remove the dust cover from the port cage. Remove the dust cover from the port end of the transceiver. Insert the transceiver into the port: • If the transceiver has a Mylar tab, orient the transceiver with the tab on the bottom, and then gently insert the transceiver into the port until it clicks into place. • If the transceiver has a bale clasp, orient the transceiver with the clasp on the bottom, close the clasp by pushing it up over the transceiver, and then gently insert the transceiver into the port until it clicks into place. Caution If the transceiver does not install easily, ensure that it is correctly oriented and the tab or clasp are in the correct position before continuing. Note If you cannot install the cable into the transceiver, insert or leave the dust plug in the cable end of the transceiver. Removing and Installing Cables into SFP Transceivers Caution To prevent damage to the fiber-optic cables, do not place more tension on them than the rated limit and do not bend to a radius of less than 1 inch if there is no tension in the cable, or 2 inches if there is tension in the cable. Removing a Cable from an SFP Transceiver Caution When pulling a cable from a transceiver, grip the body of the connector. Do not pull on the jacket sleeve, because this can compromise the fiber-optic termination in the connector. Caution If the cable does not remove easily, ensure that any latch present on the cable has been released before continuing. To remove the cable, follow these steps: Step 1 Attach an ESD-preventive wrist strap and follow its instructions for use. B-14 Cisco MDS 9500 Series Hardware Installation Guide OL-17467-02
-
 1
1 -
2
-
3
-
4
-
5
-
6
-
7
-
8
-
9
-
10
-
11
-
12
-
13
-
14
-
15
-
16
-
17
-
18
-
19
-
20
-
21
-
22
-
23
-
24
-
25
-
26
-
27
-
28
-
29
-
30
-
31
-
32
-
33
-
34
-
35
-
36
-
37
-
38
-
39
-
40
-
41
-
42
-
43
-
44
-
45
-
46
-
47
-
48
-
49
-
50
-
51
-
52
-
53
-
54
-
55
-
56
-
57
-
58
-
59
-
60
-
61
-
62
-
63
-
64
-
65
-
66
-
67
-
68
-
69
-
70
-
71
-
72
-
73
-
74
-
75
-
76
-
77
-
78
-
79
-
80
-
81
-
82
-
83
-
84
-
85
-
86
-
87
-
88
-
89
-
90
-
91
-
92
-
93
-
94
-
95
-
96
-
97
-
98
-
99
-
100
-
101
-
102
-
103
-
104
-
105
-
106
-
107
-
108
-
109
-
110
-
111
-
112
-
113
-
114
-
115
-
116
-
117
-
118
-
119
-
120
-
121
-
122
-
123
-
124
-
125
-
126
-
127
-
128
-
129
-
130
-
131
-
132
-
133
-
134
-
135
-
136
-
137
-
138
-
139
-
140
-
141
-
142
-
143
-
144
-
145
-
146
-
147
-
148
-
149
-
150
-
151
-
152
-
153
-
154
-
155
-
156
-
157
-
158
-
159
-
160
-
161
-
162
-
163
-
164
-
165
-
166
-
167
-
168
-
169
-
170
-
171
-
172
-
173
-
174
-
175
-
176
-
177
-
178
-
179
-
180
-
181
-
182
-
183
-
184
-
185
-
186
-
187
-
188
-
 189
189 -
 190
190 -
 191
191 -
 192
192 -
 193
193 -
 194
194 -
 195
195 -
 196
196 -
 197
197 -
 198
198 -
 199
199 -
200
-
201
-
202
-
203
-
204
-
205
-
206
-
207
-
208
-
209
-
210
-
211
-
212
-
213
-
214
-
215
-
216
-
217
-
218
-
219
-
220
-
221
-
222
-
223
-
224
-
225
-
226
-
227
-
228
-
229
-
230
-
231
-
232
-
233
-
234
-
235
-
236
-
237
-
238
-
239
-
240
-
241
-
242
-
243
-
244
-
245
-
246
-
247
-
248
-
249
-
250
-
251
-
252
-
253
-
254
-
255
-
256
-
257
-
258
-
259
-
260
-
261
-
262
-
263
-
264
-
265
-
266
-
267
-
268
-
269
-
270
-
271
-
272
-
273
-
274
-
275
-
276
-
277
-
278
-
279
-
280
-
281
-
282
-
283
-
284
-
285
-
286
-
287
-
288
 |
 |