HP Color LaserJet Enterprise MFP X57945dn User Guide - Page 97
Scan/Digital Send, Scan to SharePoint®, Quick Sets, Apply, Quick Set Name, Quick Set Description
 |
View all HP Color LaserJet Enterprise MFP X57945dn manuals
Add to My Manuals
Save this manual to your list of manuals |
Page 97 highlights
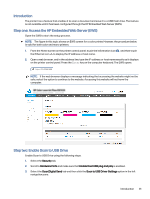
1. From the Home screen on the printer control panel, touch the Information icon , and then touch the Ethernet icon to display the IP address or host name. 2. Open a web browser, and in the address line, type the IP address or host name exactly as it displays on the printer control panel. Press the Enter key on the computer keyboard. The EWS opens. NOTE: If the web browser displays a message indicating that accessing the website might not be safe, select the option to continue to the website. Accessing this website will not harm the computer. Step two: Enable Scan to SharePoint and create a Scan to SharePoint Quick Set Follow the steps to enable the Scan to SharePoint feature and create a Scan to SharePoint Quick Set. 1. Using the top navigation tabs, click Scan/Digital Send. 2. In the left navigation pane, click Scan to SharePoint®. NOTE: Quick Sets are shortcut jobs that can be accessed on the printer Home screen or within the Quick Sets application. 3. Select Enable Scan to SharePoint®, and then click Apply. 4. In the Scan to SharePoint area of the left navigation pane, click Quick Sets. Click Add to launch the Quick Set Wizard. 5. Enter a Quick Set Name (for example, "Scan to SharePoint") and a Quick Set Description. 6. Select a Quick Set Start Option to determine what occurs after selecting a Quick Set on the printer control panel, and then click Next. 7. Use the following steps to add the path to the SharePoint folder: 86 Chapter 6 Scan
-
 1
1 -
2
-
3
-
4
-
5
-
6
-
7
-
8
-
9
-
10
-
11
-
12
-
13
-
14
-
15
-
16
-
17
-
18
-
19
-
20
-
21
-
22
-
23
-
24
-
25
-
26
-
27
-
28
-
29
-
30
-
31
-
32
-
33
-
34
-
35
-
36
-
37
-
38
-
39
-
40
-
41
-
42
-
43
-
44
-
45
-
46
-
47
-
48
-
49
-
50
-
51
-
52
-
53
-
54
-
55
-
56
-
57
-
58
-
59
-
60
-
61
-
62
-
63
-
64
-
65
-
66
-
67
-
68
-
69
-
70
-
71
-
72
-
73
-
74
-
75
-
76
-
77
-
78
-
79
-
80
-
81
-
82
-
83
-
84
-
85
-
86
-
87
-
88
-
89
-
90
-
91
-
 92
92 -
 93
93 -
 94
94 -
 95
95 -
 96
96 -
 97
97 -
 98
98 -
 99
99 -
 100
100 -
 101
101 -
 102
102 -
103
-
104
-
105
-
106
-
107
-
108
-
109
-
110
-
111
-
112
-
113
-
114
-
115
-
116
-
117
-
118
-
119
-
120
-
121
-
122
-
123
-
124
-
125
-
126
-
127
-
128
-
129
-
130
-
131
-
132
-
133
-
134
-
135
-
136
-
137
-
138
-
139
-
140
-
141
-
142
-
143
-
144
-
145
-
146
-
147
-
148
-
149
-
150
-
151
-
152
-
153
-
154
-
155
-
156
-
157
-
158
-
159
-
160
-
161
-
162
-
163
-
164
-
165
-
166
-
167
-
168
-
169
-
170
-
171
-
172
-
173
-
174
-
175
-
176
-
177
-
178
-
179
-
180
-
181
-
182
-
183
-
184
-
185
-
186
-
187
-
188
-
189
-
190
-
191
-
192
-
193
-
194
-
195
-
196
-
197
-
198
-
199
-
200
-
201
-
202
-
203
-
204
-
205
-
206
-
207
-
208
-
209
-
210
-
211
-
212
-
213
-
214
-
215
-
216
-
217
-
218
-
219
-
220
-
221
-
222
-
223
-
224
-
225
-
226
-
227
-
228
-
229
-
230
-
231
-
232
-
233
-
234
-
235
-
236
-
237
-
238
-
239
-
240
-
241
-
242
-
243
-
244
-
245
-
246
-
247
-
248
-
249
-
250
-
251
-
252
-
253
-
254
-
255
-
256
-
257
-
258
-
259
-
260
-
261
-
262
-
263
-
264
-
265
-
266
-
267
-
268
-
269
-
270
-
271
 |
 |
