HP Designjet 815mfp HP Designjet cc800ps, 815mfp, 5500mfp, and 4200 scanner - - Page 47
Creating a new Type of original: Color
 |
View all HP Designjet 815mfp manuals
Add to My Manuals
Save this manual to your list of manuals |
Page 47 highlights
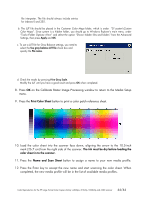
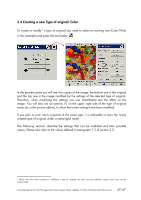
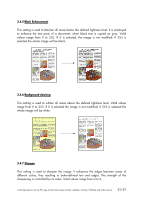
3.4 Creating a new Type of original: Color To create or modify5 a type of original you need to select an existing one (Color Photo in this example) and press the tool button . In the preview pane you will see two copies of the image: the bottom one is the original and the top one is the image modified by the settings of the selected type of original. Therefore, when modifying the settings you can immediately see the effect on the image. You will also see an asterisk (*) on the upper right side of the type of original name (as in the picture above), to show that some settings have been modified. If you plan to scan many originals of the same type, it is advisable to store the newly created type of original under a meaningful name. The following sections describe the settings that can be modified and their possible values. Please also refer to the values defined in paragraph 1.3 of section 2.2. 5 Please note that when creating or modifying a type of original, the color accuracy between original and copy can be compromised. Color Reproduction for the HP Large Format Color Copiers family: cc800ps, 815mfp, 5500mfp and 4200 scanner 47/47
-
 1
1 -
2
-
3
-
4
-
5
-
6
-
7
-
8
-
9
-
10
-
11
-
12
-
13
-
14
-
15
-
16
-
17
-
18
-
19
-
20
-
21
-
22
-
23
-
24
-
25
-
26
-
27
-
28
-
29
-
30
-
31
-
32
-
33
-
34
-
35
-
36
-
37
-
38
-
39
-
40
-
41
-
 42
42 -
 43
43 -
 44
44 -
 45
45 -
 46
46 -
 47
47 -
 48
48 -
 49
49 -
 50
50 -
 51
51 -
 52
52 -
53
-
54
-
55
-
56
-
57
-
58
-
59
-
60
-
61
 |
 |
