HP LaserJet 6L Service Manual - Page 145
High-Voltage Power Supply Check
 |
View all HP LaserJet 6L manuals
Add to My Manuals
Save this manual to your list of manuals |
Page 145 highlights
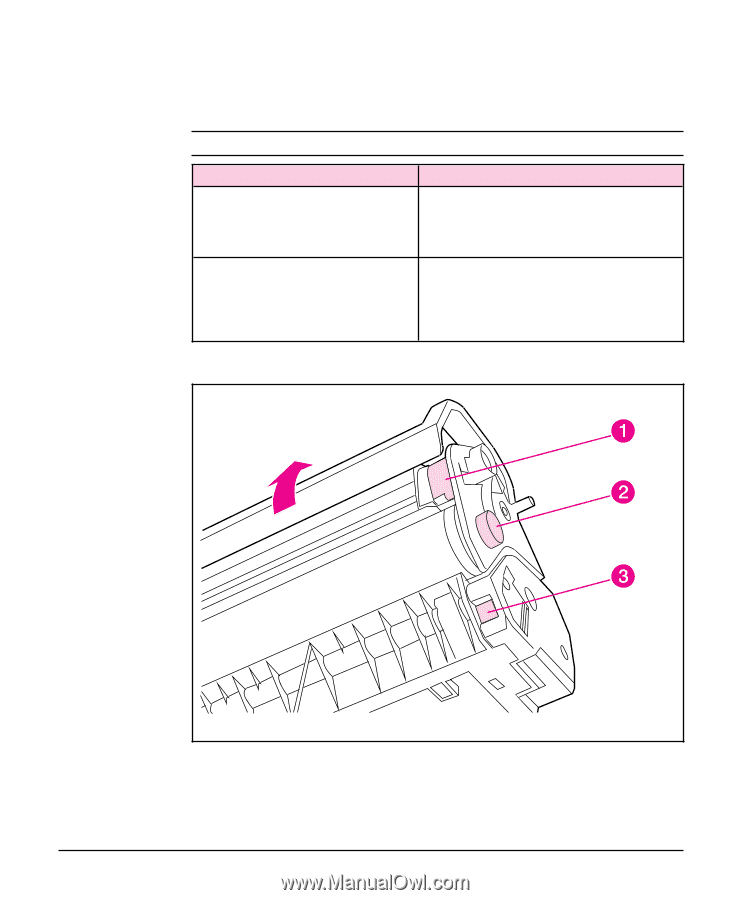
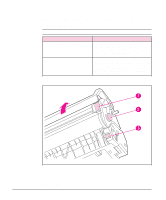
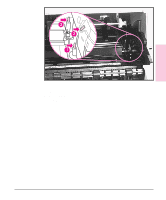
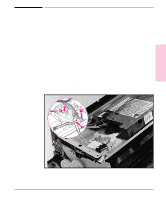
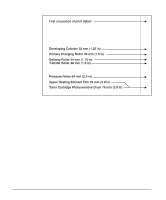
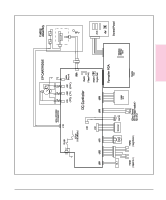
Table 7-5 Figure 7-5 High-Voltage Power Supply Check The High-Voltage Power Supply PCA provides the necessary voltages for the electrophotographic processes. A method for verifying the high-voltage system is given in the table below. High-Voltage Power Supply Check Checks Toner Cartridge Connection Points High Voltage Connector Assembly Action Visually inspect the three connection points on the underside, right end of the toner cartridge. If they are dirty or corroded, clean the connections. Use alcohol only. If damaged, replace the toner cartridge. (See Figure 7-5 below.) This assembly uses spring-loaded pins to contact the toner cartridge. (See Figure 7-6 on the following page.) Verify that the pins are not dirty or corroded and that the spring-loading action is functional. If the pins are dirty, clean using alcohol only; if damaged, replace the High Voltage Connector Assembly. Toner Cartridge High Voltage Connection Points (1 of 2) • Charging (1) • Drum Ground (2) • Developing Roller (3) 7-24 Troubleshooting
-
 1
1 -
2
-
3
-
4
-
5
-
6
-
7
-
8
-
9
-
10
-
11
-
12
-
13
-
14
-
15
-
16
-
17
-
18
-
19
-
20
-
21
-
22
-
23
-
24
-
25
-
26
-
27
-
28
-
29
-
30
-
31
-
32
-
33
-
34
-
35
-
36
-
37
-
38
-
39
-
40
-
41
-
42
-
43
-
44
-
45
-
46
-
47
-
48
-
49
-
50
-
51
-
52
-
53
-
54
-
55
-
56
-
57
-
58
-
59
-
60
-
61
-
62
-
63
-
64
-
65
-
66
-
67
-
68
-
69
-
70
-
71
-
72
-
73
-
74
-
75
-
76
-
77
-
78
-
79
-
80
-
81
-
82
-
83
-
84
-
85
-
86
-
87
-
88
-
89
-
90
-
91
-
92
-
93
-
94
-
95
-
96
-
97
-
98
-
99
-
100
-
101
-
102
-
103
-
104
-
105
-
106
-
107
-
108
-
109
-
110
-
111
-
112
-
113
-
114
-
115
-
116
-
117
-
118
-
119
-
120
-
121
-
122
-
123
-
124
-
125
-
126
-
127
-
128
-
129
-
130
-
131
-
132
-
133
-
134
-
135
-
136
-
137
-
138
-
139
-
 140
140 -
 141
141 -
 142
142 -
 143
143 -
 144
144 -
 145
145 -
 146
146 -
 147
147 -
 148
148 -
 149
149 -
 150
150 -
151
-
152
-
153
-
154
-
155
-
156
-
157
-
158
-
159
-
160
-
161
-
162
-
163
-
164
-
165
-
166
-
167
-
168
-
169
-
170
-
171
-
172
-
173
-
174
-
175
-
176
-
177
-
178
-
179
-
180
-
181
-
182
-
183
-
184
-
185
-
186
-
187
-
188
-
189
-
190
-
191
-
192
-
193
-
194
-
195
-
196
-
197
-
198
-
199
-
200
-
201
-
202
-
203
-
204
 |
 |