HP LaserJet Enterprise MFP M725 HP LaserJet Enterprise MFP M725 - User Guide - Page 183
Set or verify the date and time, Administration, General Settings, Date/Time Settings, Date/Time
 |
View all HP LaserJet Enterprise MFP M725 manuals
Add to My Manuals
Save this manual to your list of manuals |
Page 183 highlights
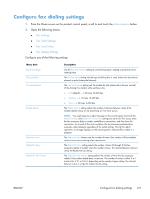
NOTE: The settings configured using the Fax Setup Wizard on the control panel override any settings made in the HP Embedded Web Server. NOTE: If the Fax Settings menu does not appear in the menu listing, LAN or internet fax might be enabled. When LAN or internet fax is enabled, the analog fax accessory is disabled and the Fax Settings menu does not display. Only one fax feature, either LAN fax, analog fax, or internet fax, can be enabled at a time. If you want to use analog fax when LAN fax is enabled, use the HP MFP Digital Sending Software Configuration Utility or the HP Embedded Web Server to disable LAN fax. Set or verify the date and time The date and time setting for the fax accessory is the same value as the product date and time setting. Use the Fax Setup Wizard to provide this information, or follow these steps: 1. From the Home screen on the product control panel, scroll to and touch the Administration button. 2. Open the following menus: ● General Settings ● Date/Time Settings ● Date/Time 3. Touch the correct Time Zone setting for your locale. 4. Touch the Month drop-down menu and select a month. 5. Touch the boxes next to the Date drop-down menu to enter the day and year from the keypad. 6. Touch the boxes below the Time heading to enter the hour and minutes from the keypad, and then touch the AM or PM button. 7. Touch the Adjust for Daylight Savings feature, if necessary. 8. Touch the Save button to save the settings. Set or verify the date/time format The date and time format setting for the fax accessory is in the same format as the product date and time setting. Use the Fax Setup Wizard to provide this information, or follow these steps: 1. From the Home screen on the product control panel, scroll to and touch the Administration button. 2. Open the following menus: ● General Settings ● Date/Time Settings ● Date/Time Format 3. Touch a Date Format option. ENWW Configure required fax settings 169
-
 1
1 -
2
-
3
-
4
-
5
-
6
-
7
-
8
-
9
-
10
-
11
-
12
-
13
-
14
-
15
-
16
-
17
-
18
-
19
-
20
-
21
-
22
-
23
-
24
-
25
-
26
-
27
-
28
-
29
-
30
-
31
-
32
-
33
-
34
-
35
-
36
-
37
-
38
-
39
-
40
-
41
-
42
-
43
-
44
-
45
-
46
-
47
-
48
-
49
-
50
-
51
-
52
-
53
-
54
-
55
-
56
-
57
-
58
-
59
-
60
-
61
-
62
-
63
-
64
-
65
-
66
-
67
-
68
-
69
-
70
-
71
-
72
-
73
-
74
-
75
-
76
-
77
-
78
-
79
-
80
-
81
-
82
-
83
-
84
-
85
-
86
-
87
-
88
-
89
-
90
-
91
-
92
-
93
-
94
-
95
-
96
-
97
-
98
-
99
-
100
-
101
-
102
-
103
-
104
-
105
-
106
-
107
-
108
-
109
-
110
-
111
-
112
-
113
-
114
-
115
-
116
-
117
-
118
-
119
-
120
-
121
-
122
-
123
-
124
-
125
-
126
-
127
-
128
-
129
-
130
-
131
-
132
-
133
-
134
-
135
-
136
-
137
-
138
-
139
-
140
-
141
-
142
-
143
-
144
-
145
-
146
-
147
-
148
-
149
-
150
-
151
-
152
-
153
-
154
-
155
-
156
-
157
-
158
-
159
-
160
-
161
-
162
-
163
-
164
-
165
-
166
-
167
-
168
-
169
-
170
-
171
-
172
-
173
-
174
-
175
-
176
-
177
-
 178
178 -
 179
179 -
 180
180 -
 181
181 -
 182
182 -
 183
183 -
 184
184 -
 185
185 -
 186
186 -
 187
187 -
 188
188 -
189
-
190
-
191
-
192
-
193
-
194
-
195
-
196
-
197
-
198
-
199
-
200
-
201
-
202
-
203
-
204
-
205
-
206
-
207
-
208
-
209
-
210
-
211
-
212
-
213
-
214
-
215
-
216
-
217
-
218
-
219
-
220
-
221
-
222
-
223
-
224
-
225
-
226
-
227
-
228
-
229
-
230
-
231
-
232
-
233
-
234
-
235
-
236
-
237
-
238
-
239
-
240
-
241
-
242
-
243
-
244
-
245
-
246
-
247
-
248
-
249
-
250
-
251
-
252
-
253
-
254
-
255
-
256
-
257
-
258
-
259
-
260
-
261
-
262
-
263
-
264
-
265
-
266
-
267
-
268
-
269
-
270
-
271
-
272
-
273
-
274
-
275
-
276
-
277
-
278
-
279
-
280
-
281
-
282
-
283
-
284
-
285
-
286
-
287
-
288
-
289
-
290
-
291
-
292
-
293
-
294
-
295
-
296
-
297
-
298
-
299
-
300
-
301
-
302
-
303
-
304
-
305
-
306
-
307
-
308
-
309
-
310
-
311
-
312
-
313
-
314
-
315
-
316
-
317
-
318
 |
 |