HP ML115 HP ProLiant ML115 Generation 5 Server Maintenance and Service Guide - Page 51
To install a HP Smart Array E200 controller card, Removal and Replacement Procedures
 |
UPC - 884962252765
View all HP ML115 manuals
Add to My Manuals
Save this manual to your list of manuals |
Page 51 highlights
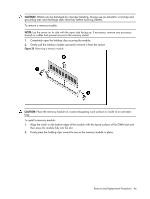
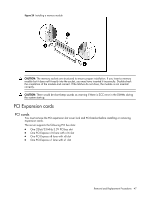
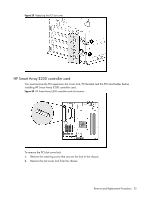
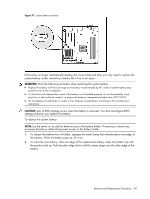
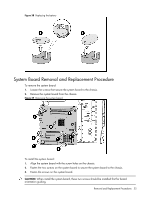
Figure 31 Removing the PCI slot cover lock 3. Remove the PCI bracket from the chassis. NOTE: If necessary, remove any accessory boards or cables that prevent access to the PCI slots. CAUTION: Do not discard the PCI bracket. If the PCI expansion card is removed in the future, the PCI bracket must be reinstalled. To install a HP Smart Array E200 controller card: 1. Hold the card above the expansion slot on the system board and then move the card toward the rear of the chassis so that the bracket on the card is aligned with the open slot on the rear of the chassis. 2. Press the card straight down into the expansion slot on the system board. Figure 32 Installing the HP Smart Array E200 controller card Removal and Replacement Procedures 51
-
 1
1 -
2
-
3
-
4
-
5
-
6
-
7
-
8
-
9
-
10
-
11
-
12
-
13
-
14
-
15
-
16
-
17
-
18
-
19
-
20
-
21
-
22
-
23
-
24
-
25
-
26
-
27
-
28
-
29
-
30
-
31
-
32
-
33
-
34
-
35
-
36
-
37
-
38
-
39
-
40
-
41
-
42
-
43
-
44
-
45
-
 46
46 -
 47
47 -
 48
48 -
 49
49 -
 50
50 -
 51
51 -
 52
52 -
 53
53 -
 54
54 -
 55
55 -
 56
56 -
57
-
58
-
59
-
60
-
61
-
62
-
63
-
64
-
65
-
66
-
67
-
68
-
69
-
70
-
71
-
72
-
73
-
74
-
75
-
76
-
77
-
78
-
79
-
80
-
81
-
82
-
83
-
84
-
85
-
86
-
87
-
88
 |
 |

Removal and Replacement Procedures
51
Figure 31
Removing the PCI slot cover lock
3.
Remove the PCI bracket from the chassis.
NOTE:
If necessary, remove any accessory boards or cables that prevent access to the PCI slots.
CAUTION:
Do not discard the PCI bracket. If the PCI expansion card is removed in the future, the
PCI bracket must be reinstalled.
To install a HP Smart Array E200 controller card:
1.
Hold the card above the expansion slot on the system board and then move the card toward the
rear of the chassis so that the bracket on the card is aligned with the open slot on the rear of the
chassis.
2.
Press the card straight down into the expansion slot on the system board.
Figure 32
Installing the HP Smart Array E200 controller card