HP Mini 110-3100 HP Mini 110 and Compaq Mini CQ10 - Maintenance and Service Gu - Page 52
Removal and replacement procedures, out of the bay.
 |
View all HP Mini 110-3100 manuals
Add to My Manuals
Save this manual to your list of manuals |
Page 52 highlights
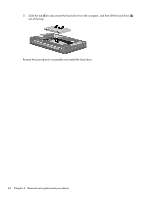
3. Slide the tab (1) to disconnect the hard drive from the computer, and then lift the hard drive (2) out of the bay. Reverse this procedure to reassemble and install the hard drive. 42 Chapter 4 Removal and replacement procedures
-
 1
1 -
2
-
3
-
4
-
5
-
6
-
7
-
8
-
9
-
10
-
11
-
12
-
13
-
14
-
15
-
16
-
17
-
18
-
19
-
20
-
21
-
22
-
23
-
24
-
25
-
26
-
27
-
28
-
29
-
30
-
31
-
32
-
33
-
34
-
35
-
36
-
37
-
38
-
39
-
40
-
41
-
42
-
43
-
44
-
45
-
46
-
 47
47 -
 48
48 -
 49
49 -
 50
50 -
 51
51 -
 52
52 -
 53
53 -
 54
54 -
 55
55 -
 56
56 -
 57
57 -
58
-
59
-
60
-
61
-
62
-
63
-
64
-
65
-
66
-
67
-
68
-
69
-
70
-
71
-
72
-
73
-
74
-
75
-
76
-
77
-
78
-
79
-
80
-
81
-
82
-
83
-
84
-
85
-
86
-
87
-
88
-
89
-
90
-
91
-
92
-
93
-
94
-
95
-
96
-
97
-
98
-
99
-
100
-
101
-
102
-
103
-
104
-
105
-
106
-
107
-
108
-
109
-
110
-
111
-
112
-
113
-
114
-
115
 |
 |

3.
Slide the tab
(1)
to disconnect the hard drive from the computer, and then lift the hard drive
(2)
out of the bay.
Reverse this procedure to reassemble and install the hard drive.
42
Chapter 4
Removal and replacement procedures