HP Mini 210-1010SS HP Mini 2102, HP Mini 210, and Compaq Mini 210 - Maintenanc - Page 50
Removal and replacement procedures, Insert the front edge of the service cover
 |
View all HP Mini 210-1010SS manuals
Add to My Manuals
Save this manual to your list of manuals |
Page 50 highlights
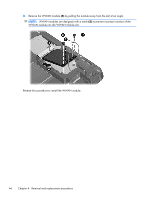
5. Continue lifting the rear edge of the service cover (1) up and forward until it rests at an angle, and then remove the service cover (2). Install the service cover: 1. Place the service cover above the computer at an angle, with the front edge toward the front of the computer. 2. Insert the front edge of the service cover (1) into the front edge of the base enclosure, making sure the tabs on the cover insert into the slots on the base enclosure (2). 42 Chapter 4 Removal and replacement procedures
-
 1
1 -
2
-
3
-
4
-
5
-
6
-
7
-
8
-
9
-
10
-
11
-
12
-
13
-
14
-
15
-
16
-
17
-
18
-
19
-
20
-
21
-
22
-
23
-
24
-
25
-
26
-
27
-
28
-
29
-
30
-
31
-
32
-
33
-
34
-
35
-
36
-
37
-
38
-
39
-
40
-
41
-
42
-
43
-
44
-
 45
45 -
 46
46 -
 47
47 -
 48
48 -
 49
49 -
 50
50 -
 51
51 -
 52
52 -
 53
53 -
 54
54 -
 55
55 -
56
-
57
-
58
-
59
-
60
-
61
-
62
-
63
-
64
-
65
-
66
-
67
-
68
-
69
-
70
-
71
-
72
-
73
-
74
-
75
-
76
-
77
-
78
-
79
-
80
-
81
-
82
-
83
-
84
-
85
-
86
-
87
-
88
-
89
-
90
-
91
-
92
-
93
-
94
-
95
-
96
-
97
-
98
-
99
-
100
-
101
-
102
-
103
-
104
-
105
-
106
-
107
-
108
-
109
 |
 |

5.
Continue lifting the rear edge of the service cover
(1)
up and forward until it rests at an angle,
and then remove the service cover
(2)
.
Install the service cover:
1.
Place the service cover above the computer at an angle, with the front edge toward the front of the
computer.
2.
Insert the front edge of the service cover
(1)
into the front edge of the base enclosure, making sure
the tabs on the cover insert into the slots on the base enclosure
(2)
.
42
Chapter 4
Removal and replacement procedures