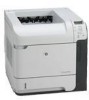
HP P4014n HP LaserJet P4010 and P4510 Series - Software Technical Reference - Page 92
Plug and play driver install packages - laserjet review
 |
UPC - 883585429066
View all HP P4014n manuals
Add to My Manuals
Save this manual to your list of manuals |
Page 92 highlights
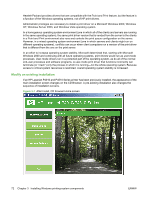
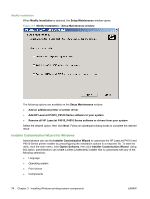
16. Click Finish to continue the installation. 17. The Completing the Add Printer Wizard dialog box appears. Click Finish to complete the installation. Plug and play driver install packages Instead of using Microsoft Windows Add-Printer Wizard to install print drivers on computers directly connected to the printer, HP recommends using either a Minimum installation from the printing-system CD or a Plug-and-Play installation. Minimum installation of print drivers from the printing-system CD A Minimum installation from the printing-system CD installs everything on your computer needed for the HP LaserJet P4010 and P4510 Series printer to print. Perform a Minimum installation with a direct connection using the following procedure: 1. Quit all open programs. Insert the HP LaserJet P4010 and P4510 Series printer software CD into the CD-ROM drive. NOTE: If the CD does not start automatically, click Start, click Run, and then browse to and double-click the SETUP.EXE file in the root directory of the CD. 2. The Thank You for Purchasing from HP! screen appears. Click Install and an Installing screen briefly appears, which automatically leads to the Welcome dialog box. 3. Click Next to get to the Do Not Block HP Install Wizard Processes screen. Click Next to continue. 4. The Check for Recommended Updates screen appears. If you have Web access, click Yes to check for HP LaserJet P4010 and P4510 Series printer installation updates and to continue with installation of the printing-system software. This step is optional. Click any of the links to open a screen that provides further information. 5. The Installing screen appears and automatically leads to the Installation Options screen. Select Minimum and click Next to continue. 6. After an Installing screen, the License Agreement screen appears. Review this agreement and if you accept the terms, select the I accept the terms in the license agreement option. Click Next to continue. 7. Another Installing screen appears and automatically leads to the Thank you for buying another HP product! screen. This screen shows the destination folder where the printing-system software files are installed. The default option creates an HP program group, which is accessed by clicking Start and then selecting Programs or All Programs. 8. Click Next to go to the Ready to Install dialog box . 9. Click Next to go to an Installing screen, which automatically leads to the Connection Type dialog box. Select the Directly through this computer using a USB cable option and then click Next. 10. The Connect Your Device Now screen appears. Follow the instructions and click Next. 11. The Device has been detected screen appears. After the device setup has finished, the Product connected successfully! message appears on the screen. Click Next to continue. 12. An Installing screen appears and automatically leads to the Congratulations! Software installation complete screen. Click Finish to complete the installation. Print a Test page when 70 Chapter 3 Installing Windows printing-system components ENWW
-
 1
1 -
2
-
3
-
4
-
5
-
6
-
7
-
8
-
9
-
10
-
11
-
12
-
13
-
14
-
15
-
16
-
17
-
18
-
19
-
20
-
21
-
22
-
23
-
24
-
25
-
26
-
27
-
28
-
29
-
30
-
31
-
32
-
33
-
34
-
35
-
36
-
37
-
38
-
39
-
40
-
41
-
42
-
43
-
44
-
45
-
46
-
47
-
48
-
49
-
50
-
51
-
52
-
53
-
54
-
55
-
56
-
57
-
58
-
59
-
60
-
61
-
62
-
63
-
64
-
65
-
66
-
67
-
68
-
69
-
70
-
71
-
72
-
73
-
74
-
75
-
76
-
77
-
78
-
79
-
80
-
81
-
82
-
83
-
84
-
85
-
86
-
 87
87 -
 88
88 -
 89
89 -
 90
90 -
 91
91 -
 92
92 -
 93
93 -
 94
94 -
 95
95 -
 96
96 -
 97
97 -
98
-
99
-
100
-
101
-
102
-
103
-
104
-
105
-
106
-
107
-
108
-
109
-
110
-
111
-
112
-
113
-
114
-
115
-
116
-
117
-
118
-
119
-
120
-
121
-
122
-
123
-
124
-
125
-
126
-
127
-
128
-
129
-
130
-
131
-
132
-
133
-
134
-
135
-
136
-
137
-
138
-
139
-
140
-
141
-
142
-
143
-
144
-
145
-
146
-
147
-
148
-
149
-
150
-
151
-
152
-
153
-
154
-
155
-
156
-
157
-
158
-
159
-
160
-
161
-
162
-
163
-
164
-
165
-
166
-
167
-
168
-
169
-
170
-
171
-
172
-
173
-
174
-
175
-
176
-
177
-
178
-
179
-
180
-
181
-
182
-
183
-
184
-
185
-
186
-
187
-
188
-
189
-
190
-
191
-
192
-
193
-
194
-
195
-
196
-
197
-
198
-
199
-
200
-
201
-
202
-
203
-
204
-
205
-
206
-
207
-
208
-
209
-
210
-
211
-
212
-
213
-
214
-
215
-
216
-
217
-
218
-
219
-
220
-
221
-
222
-
223
-
224
-
225
-
226
-
227
-
228
-
229
-
230
-
231
-
232
-
233
-
234
-
235
-
236
-
237
-
238
-
239
-
240
-
241
-
242
-
243
-
244
-
245
-
246
-
247
-
248
-
249
-
250
-
251
-
252
-
253
-
254
-
255
-
256
-
257
-
258
-
259
-
260
-
261
-
262
-
263
-
264
-
265
-
266
-
267
-
268
-
269
-
270
-
271
-
272
-
273
-
274
-
275
-
276
-
277
-
278
-
279
-
280
-
281
-
282
-
283
-
284
-
285
-
286
-
287
-
288
-
289
-
290
-
291
-
292
-
293
-
294
-
295
-
296
-
297
-
298
 |
 |
