HP P6000 HP StorageWorks disk enclosure fan interconnect board replacement ins - Page 3
Installing a fan interconnect board, Read Power UID ribbon cable 4.
 |
View all HP P6000 manuals
Add to My Manuals
Save this manual to your list of manuals |
Page 3 highlights
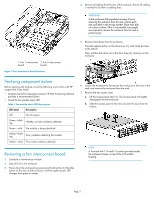
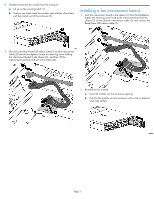
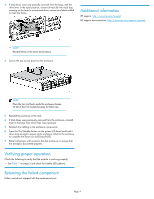
8. Partially remove the fan module from the enclosure. a. Lift up on the mounting latch (1). b. Position one hand under the module, and with the other hand, pull the module out of the enclosure (2). Installing a fan interconnect board 1. Seat the interconnect board in the chassis (1) from the backplane, tighten the retaining screw holding the interconnect board to the chassis (2) connect the fan interconnect cable (3), and connect the Read Power UID ribbon cable (4). 9. Disconnect the Rear Power UID ribbon cable (1) and fan interconnect cable (2) from the backplane, loosen the retaining screw holding the interconnect board to the chassis (3), and then, lift the interconnect board up and out of the chassis (4). 2. Reinstall the fan module. a. Insert the module into the enclosure opening. b. Push the fan module into the enclosure until a click is detected when fully seated. Page 3
-
 1
1 -
 2
2 -
 3
3 -
 4
4
 |
 |
