HP PL Class450/500/550/600/650/700/750 HP Visualize Linux Workstation - User's - Page 28
Creating Rescue Disk Set, Starting and Stopping Your HP Visualize Linux Workstation
 |
View all HP PL Class450/500/550/600/650/700/750 manuals
Add to My Manuals
Save this manual to your list of manuals |
Page 28 highlights
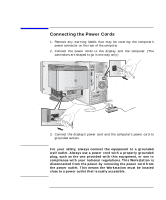
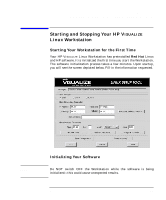
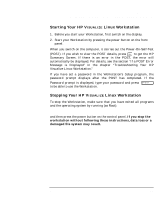
Setting Up and Using Your HP Visualize Linux Workstation Starting and Stopping Your HP Visualize Linux Workstation To initialize your software: 1. Turn on the display first, and then the HP VISUALIZE Linux Workstation. When the Workstation is switched on, the Workstation performs a Power-On-Self-Test (POST). Press if you want to view the POST details in the HP BIOS Summary Screen (see the section "The HP BIOS Summary Screen and Setup Program" in the chapter "Technical Information"). If an error is detected during the Power-On-Self-Test, the Workstation will automatically display the error. You may be prompted to press to start the Setup program to correct the error. The HP Linux Setup Tool will then run. It allows you to enter information. For example: • The Boot Protocol, networking parameters, current date and time, root password, etc. 2. While the Setup Toolis running, you can complete the Warranty Registration card that came with this manual. 3. When you are finished entering information into the Setup Tool, click OK and the Workstation will restart. Creating Rescue Disk Set It is very important that you create a rescue disk set for your preloaded software and operating system, as soon as possible. HP recommends that you use new diskettes for this purpose. To create these back-up diskettes, follow instructions that appear in the HP Linux Setup and Recovery Guide (HP Part Number A1297-90010) that was included with your Workstation. 12 Chapter 1
-
 1
1 -
2
-
3
-
4
-
5
-
6
-
7
-
8
-
9
-
10
-
11
-
12
-
13
-
14
-
15
-
16
-
17
-
18
-
19
-
20
-
21
-
22
-
 23
23 -
 24
24 -
 25
25 -
 26
26 -
 27
27 -
 28
28 -
 29
29 -
 30
30 -
 31
31 -
 32
32 -
 33
33 -
34
-
35
-
36
-
37
-
38
-
39
-
40
-
41
-
42
-
43
-
44
-
45
-
46
-
47
-
48
-
49
-
50
-
51
-
52
-
53
-
54
-
55
-
56
-
57
-
58
-
59
-
60
-
61
-
62
-
63
-
64
-
65
-
66
-
67
-
68
-
69
-
70
-
71
-
72
-
73
-
74
-
75
-
76
-
77
-
78
-
79
-
80
-
81
-
82
-
83
-
84
-
85
-
86
-
87
-
88
-
89
-
90
-
91
-
92
-
93
-
94
-
95
-
96
-
97
-
98
-
99
-
100
-
101
-
102
-
103
-
104
-
105
-
106
-
107
-
108
-
109
-
110
-
111
-
112
-
113
-
114
-
115
-
116
-
117
-
118
-
119
-
120
-
121
-
122
-
123
-
124
-
125
-
126
-
127
-
128
-
129
-
130
-
131
-
132
-
133
-
134
-
135
-
136
-
137
-
138
-
139
-
140
-
141
-
142
-
143
-
144
-
145
-
146
-
147
-
148
-
149
-
150
-
151
-
152
-
153
-
154
-
155
-
156
-
157
-
158
 |
 |