HP Pro 3000 Maintenance & Service Guide: HP Pro 3000/3010/3080 Business PC - Page 121
Installing a 3.5-inch Device Diskette Drive Shown,
 |
View all HP Pro 3000 manuals
Add to My Manuals
Save this manual to your list of manuals |
Page 121 highlights
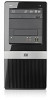
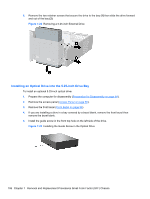
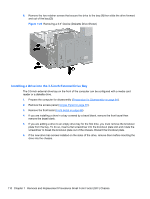
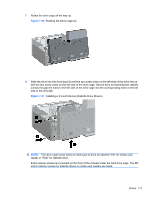
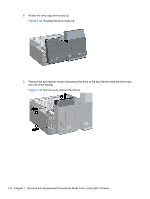
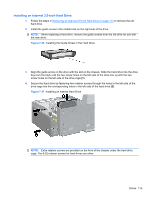
7. Rotate the drive cage all the way up. Figure 7-30 Rotating the Drive Cage Up 8. Slide the drive into the drive bay (1) until the two screw holes on the left side of the drive line up with the two screw holes on the left side of the drive cage. Secure drive by fastening two retainer screws through the holes in the left side of the drive cage into the corresponding holes in the left side of the drive (2). Figure 7-31 Installing a 3.5-inch Device (Diskette Drive Shown) NOTE: The drive cage screw holes for each type of drive are labeled "CR" for media card reader or "FDD" for diskette drive. Extra retainer screws are provided on the front of the chassis under the hard drive cage. The M3 metric retainer screws for diskette drives or media card readers are black. Drives 111
-
 1
1 -
2
-
3
-
4
-
5
-
6
-
7
-
8
-
9
-
10
-
11
-
12
-
13
-
14
-
15
-
16
-
17
-
18
-
19
-
20
-
21
-
22
-
23
-
24
-
25
-
26
-
27
-
28
-
29
-
30
-
31
-
32
-
33
-
34
-
35
-
36
-
37
-
38
-
39
-
40
-
41
-
42
-
43
-
44
-
45
-
46
-
47
-
48
-
49
-
50
-
51
-
52
-
53
-
54
-
55
-
56
-
57
-
58
-
59
-
60
-
61
-
62
-
63
-
64
-
65
-
66
-
67
-
68
-
69
-
70
-
71
-
72
-
73
-
74
-
75
-
76
-
77
-
78
-
79
-
80
-
81
-
82
-
83
-
84
-
85
-
86
-
87
-
88
-
89
-
90
-
91
-
92
-
93
-
94
-
95
-
96
-
97
-
98
-
99
-
100
-
101
-
102
-
103
-
104
-
105
-
106
-
107
-
108
-
109
-
110
-
111
-
112
-
113
-
114
-
115
-
 116
116 -
 117
117 -
 118
118 -
 119
119 -
 120
120 -
 121
121 -
 122
122 -
 123
123 -
 124
124 -
 125
125 -
 126
126 -
127
-
128
-
129
-
130
-
131
-
132
-
133
-
134
-
135
-
136
-
137
-
138
-
139
-
140
-
141
-
142
-
143
-
144
-
145
-
146
-
147
-
148
-
149
-
150
-
151
-
152
-
153
-
154
-
155
-
156
-
157
-
158
-
159
-
160
-
161
-
162
-
163
-
164
-
165
-
166
-
167
-
168
-
169
-
170
-
171
-
172
-
173
-
174
-
175
-
176
-
177
-
178
-
179
-
180
-
181
-
182
-
183
-
184
-
185
-
186
-
187
-
188
-
189
-
190
-
191
-
192
-
193
-
194
 |
 |
